
Channel settings decide which orders Webgility i downloads and posts, which QuickBooks Online accounts, customers, products and tax codes it uses, and what it does by itself. Each sales channel has its own Channel settings, and every workflow and rule of that channel uses them.
Note: The settings you see depend on your sales channel, your QuickBooks Online company's country, your plan and the choices you make on the page. A setting shows only where it applies, so your page may not show every setting in this article.
Steps:
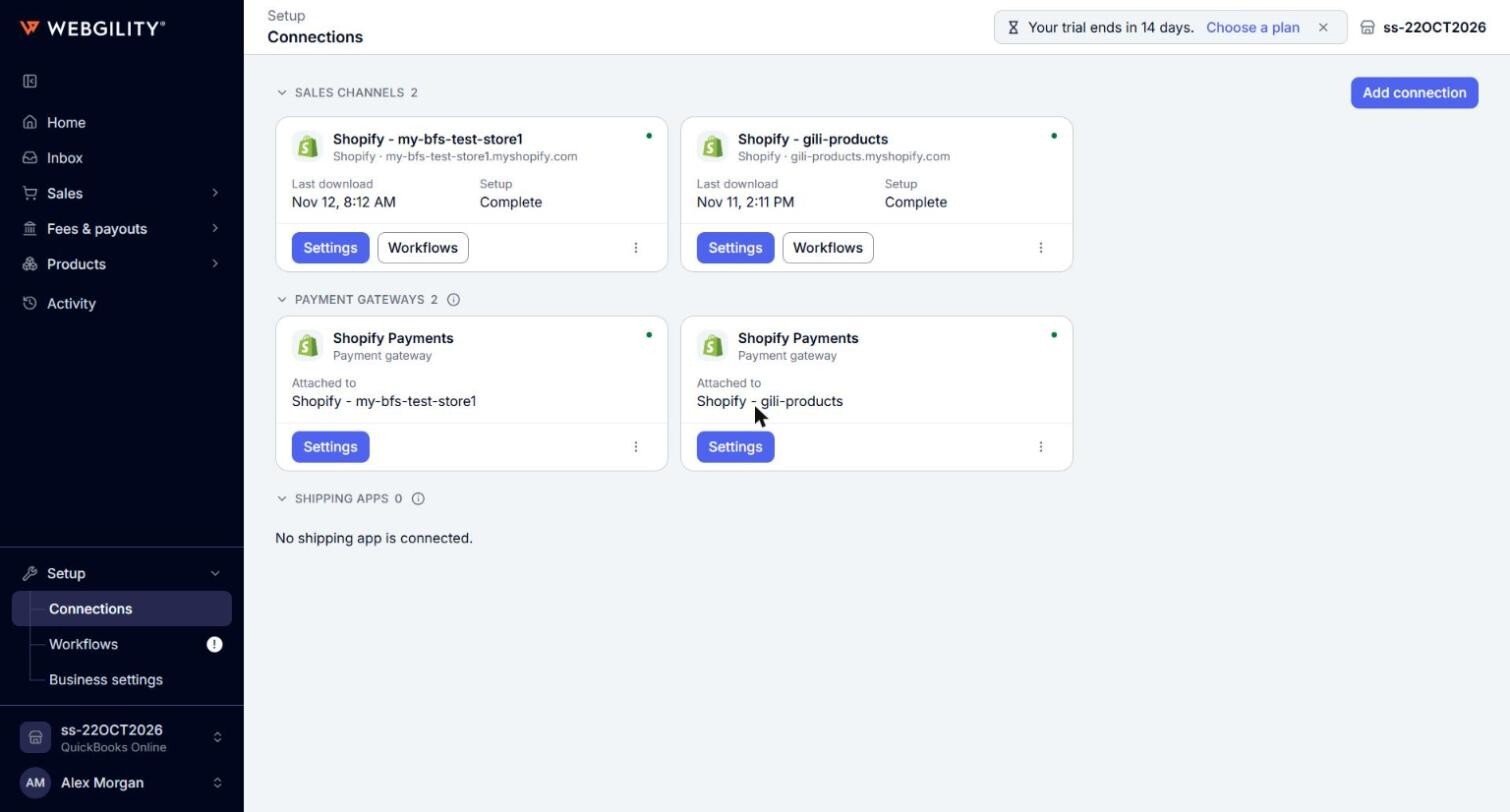
- Go to Setup > Connections.
- On the card of the sales channel under Sales channels, click Settings.
- The page opens on the Posting and sync tab. Its header shows the channel name, Channel settings, the Business and the Status of the connection, and the date orders download from with the time of the last download.
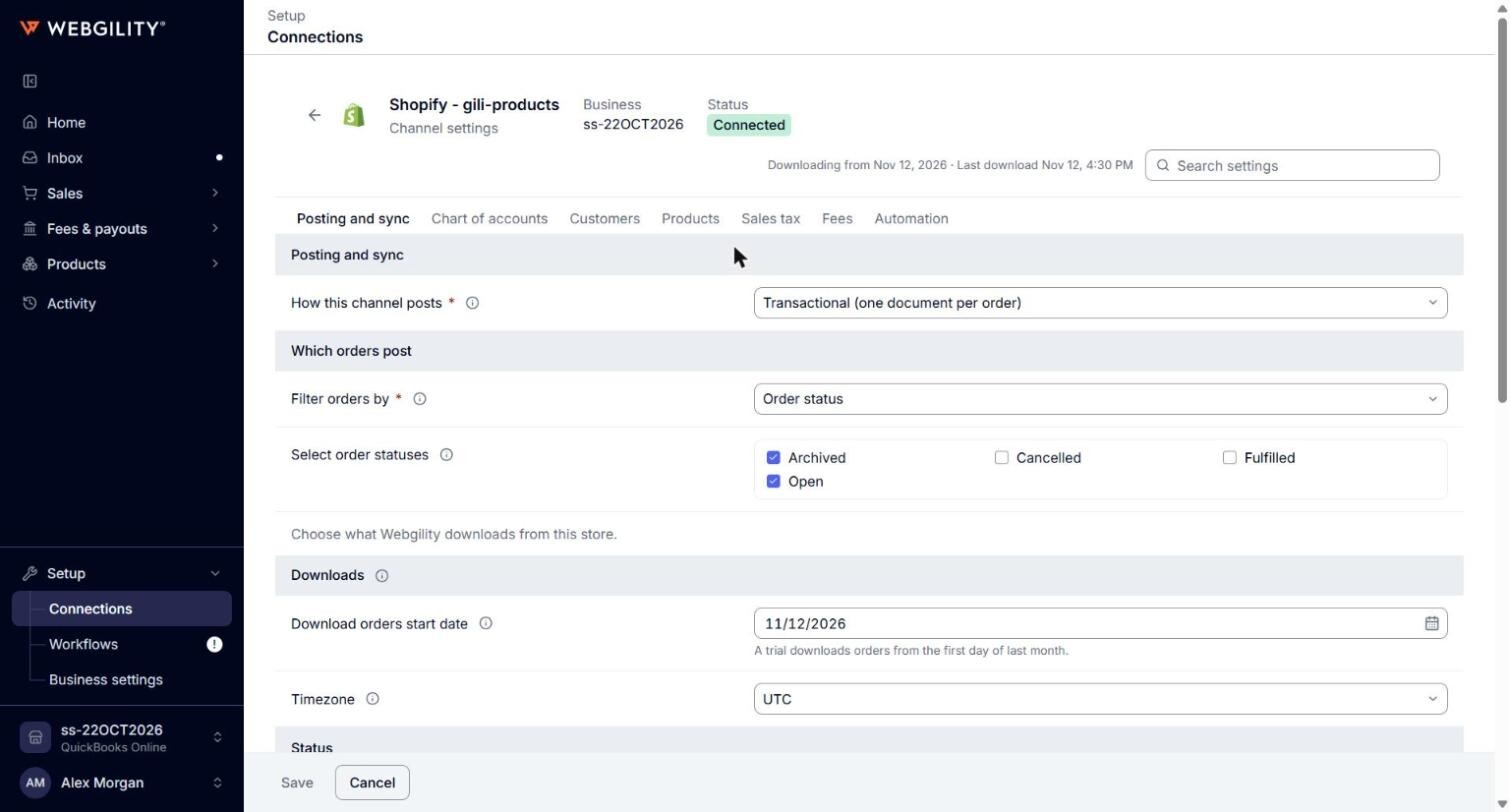
- Click a tab to see its settings: Posting and sync, Chart of accounts, Customers, Products, Sales tax, Fees or Automation. An Amazon channel has no Chart of accounts tab.
- To find a setting by name, type in Search settings at the top right. The page lists the settings that match in place of the tab. If it shows "No settings match your search.", try fewer words.
- Change the settings you need. Point to the info icon next to a setting to read what it does. A setting marked with a red asterisk is required.
- Click Save at the bottom of the tab. Each tab saves on its own, so save before you move to another tab. Save stays greyed out until you change something.
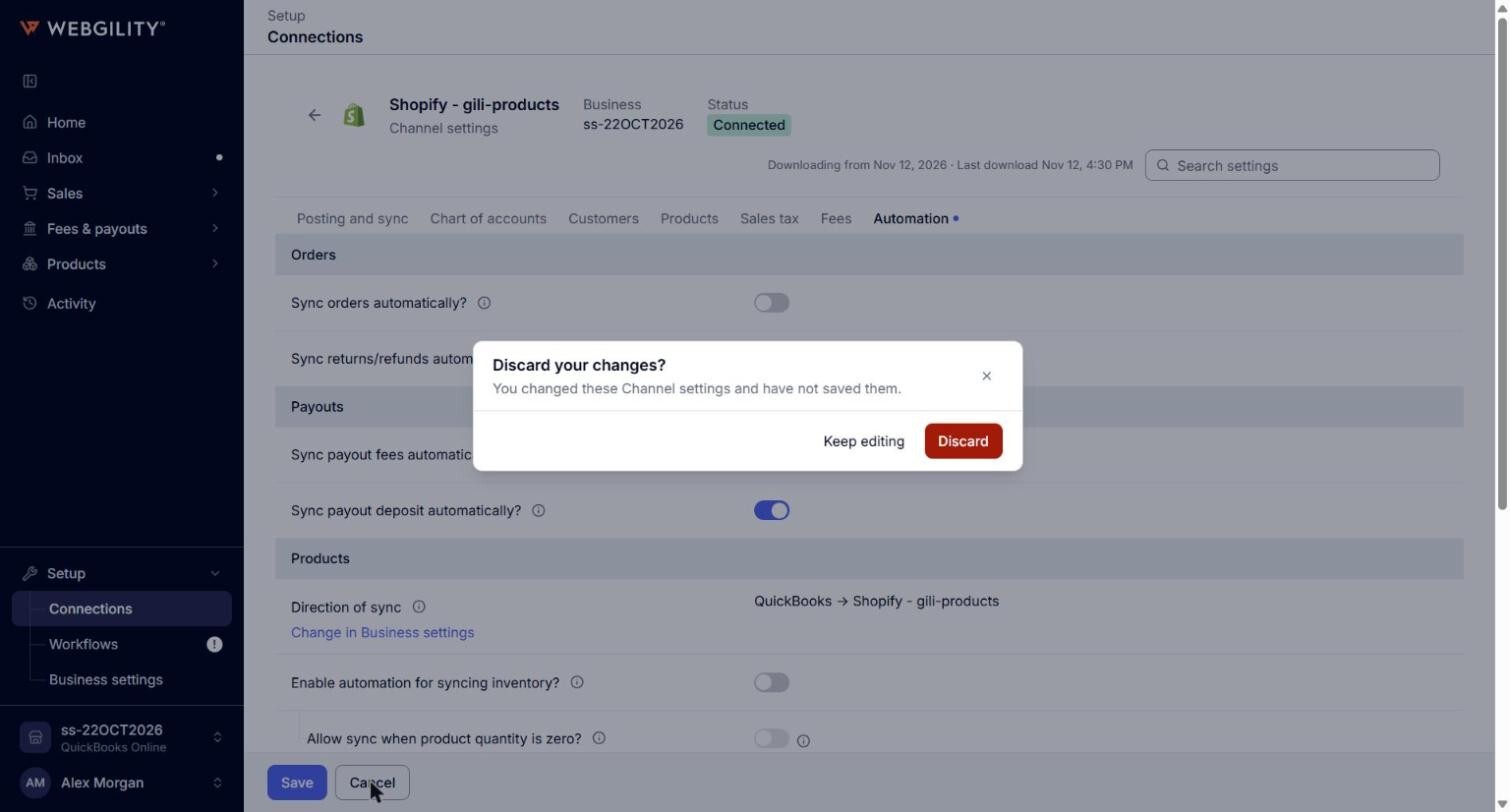
- To leave without saving, click Cancel. If you have unsaved changes, Webgility i asks "Discard your changes?". Click Keep editing to stay, or Discard to leave without saving.
Note: Some settings show the line "Saved, but not used yet" with a reason. Webgility i keeps your choice for those settings, but does not act on it yet.
Note: A sales channel with several marketplaces, such as an Amazon seller account, shows a Sub store row above the settings of some tabs. Pick the marketplace whose settings you want to change. Copy settings at the end of the row copies every setting of the Customers, Products, Sales tax and Fees tabs from one marketplace to the others you pick. Nothing is saved until you click Save.
Posting and sync tab
This tab sets how the channel posts, which orders post automatically and what Webgility i downloads from the store.
Posting and sync
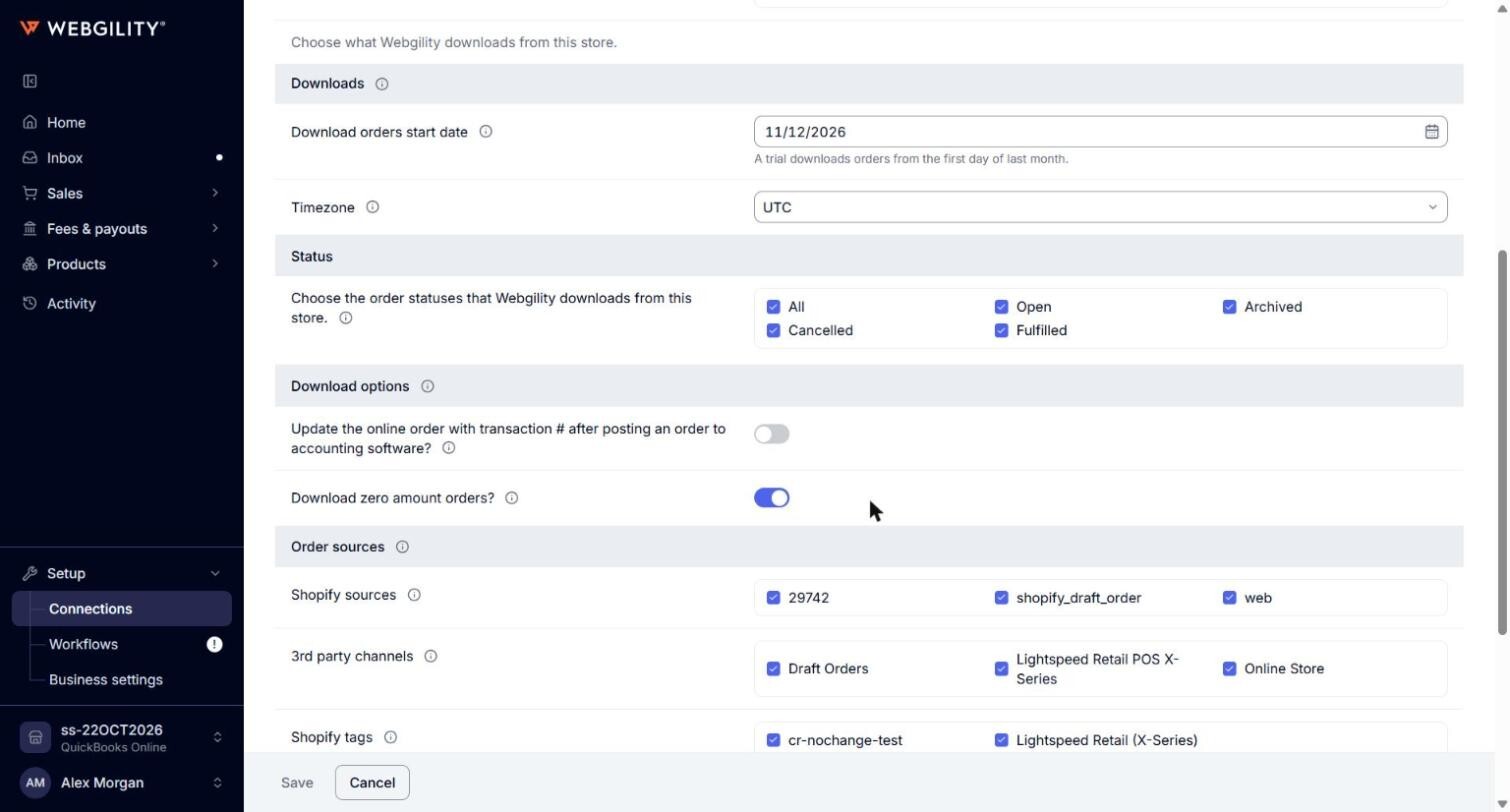
- How this channel posts: how much sales activity one QuickBooks Online document covers. It decides which workflows run on the channel. A change applies from the next run. Options: Transactional (one document per order), Consolidated (one document per period). Default: Transactional (one document per order). See Understanding Posting Grain and How It Affects Automation.
- Period of each consolidated document: shows when the channel posts Consolidated. Options: Day (one document per day). Default: Day (one document per day).
- Start date of consolidated posting: shows when the channel posts Consolidated. Orders dated on this day or later post in consolidated documents. Orders dated before it are left out. Orders from today post after the day ends.
Which orders post
- Filter orders by: the order value that decides whether an order posts automatically. Every workflow and rule of the channel uses it. Options: Order status, Payment method, Currency, Shopify tags (Shopify only), Payment status (some sales channels only). Default: Order status.
- Select order statuses, Select payment methods, Select currencies, Select Shopify tags or Select payment statuses: the list that matches Filter orders by. An order posts automatically only when its value is one you tick. With nothing ticked, no order posts. Default: the order statuses of a completed or paid order for your sales channel, for example Open and Archived for Shopify, or Shipped for Amazon.
Downloads
- Download orders start date: orders created or updated after this date download into Webgility i. Required. On a trial, orders download from the first day of last month. Downloading older orders can need an add-on.
- Download orders cutoff date: some sales channels only. Webgility i skips updates to orders placed on or before this date, even when the store changes them later. Leave it empty to download every update.
- Download refund start date: some sales channels only. Refunds issued on or after this date download.
- Download payouts start date: some sales channels only. Payouts made on or after this date download.
- Report Start Date: some sales channels only. Settlement reports download from this date. It does not change posting. Leave it empty to keep the saved date.
- Timezone: the time zone Webgility i uses for the order dates of this store. When you change it and click Save, a panel titled "You are changing the time zone" explains that Webgility i updates the dates of every order of this store it holds, posted or not, but not the dates of documents already in QuickBooks Online. Click Continue to go ahead, or Go back.
Status
- Status: the order statuses Webgility i downloads from this store. Tick at least one, or tick All. A change applies to orders downloaded from now on. An unposted order of a status you untick is hidden from the Orders page and does not post.
Download options
These options show for some sales channels only.
- Update the online order with transaction # after posting an order to accounting software?: adds a note with the QuickBooks Online document number to the order in your store after it posts. Options: on or off.
- Download zero amount orders?: when off, orders with a total of zero do not download. Options: on or off.
- Record withholding tax with order/refund: Amazon only. Records the withholding tax with the order or refund. If it is on, you cannot create a deposit for a settlement report from Webgility i. Options: on or off.
- Download ship date as: Amazon only. The ship date of an order that ships in several parcels. Options: Latest ship date, Earliest ship date.
- Download item description with orders: downloads the item description with each order. Options: on or off.
- Download archived orders: downloads orders the store has archived. Options: on or off.
- Download shipping and billing address with orders: downloads the customer addresses with each order. Options: on or off.
Amazon orders (Amazon only)
- Store to get orders from: the marketplaces whose orders download. Tick at least one.
- Orders to download: Download FBA orders for orders Amazon fulfils, and Download FBM orders for orders you fulfil.
Order sources (Shopify only)
- Shopify sources: orders from a ticked source download, such as web or pos.
- 3rd party channels: orders that a ticked app sold through your store download.
- Shopify tags: an order downloads when it has a ticked tag. An order with no tag downloads too.
- POS locations to download orders from: point of sale orders download from the ticked locations. Tick All locations, or no location, to download them from every location.
When you save, Webgility i checks again each unposted order that came through a third-party app or has a tag, and hides or shows it to match. Other orders already downloaded keep their place. The change applies to the orders your store sends next. An order that a filter leaves out stays hidden and never posts.
Order source settings (BigCommerce only)
- Order sources: orders that came through a ticked source download.
- Other: when ticked, orders with no source, or from a source not in the list, download.
Download products
- Download products starting from: Date is the only choice.
- Download products start date: products created or updated on or after this date download. To download all your products again, set an earlier date.
- Select Shopify location to sync: Shopify only. The location whose quantity Webgility i uses when it syncs inventory, instead of the total quantity of the store. If your store has one location, it is chosen for you. Click Refresh locations to read the locations from your store again.
Chart of accounts tab
This tab sets the clearing accounts that hold the money of the channel's orders, refunds and fees until it reaches your bank. A clearing account tracks undeposited funds, or funds in transit from your payment gateway to your checking account.
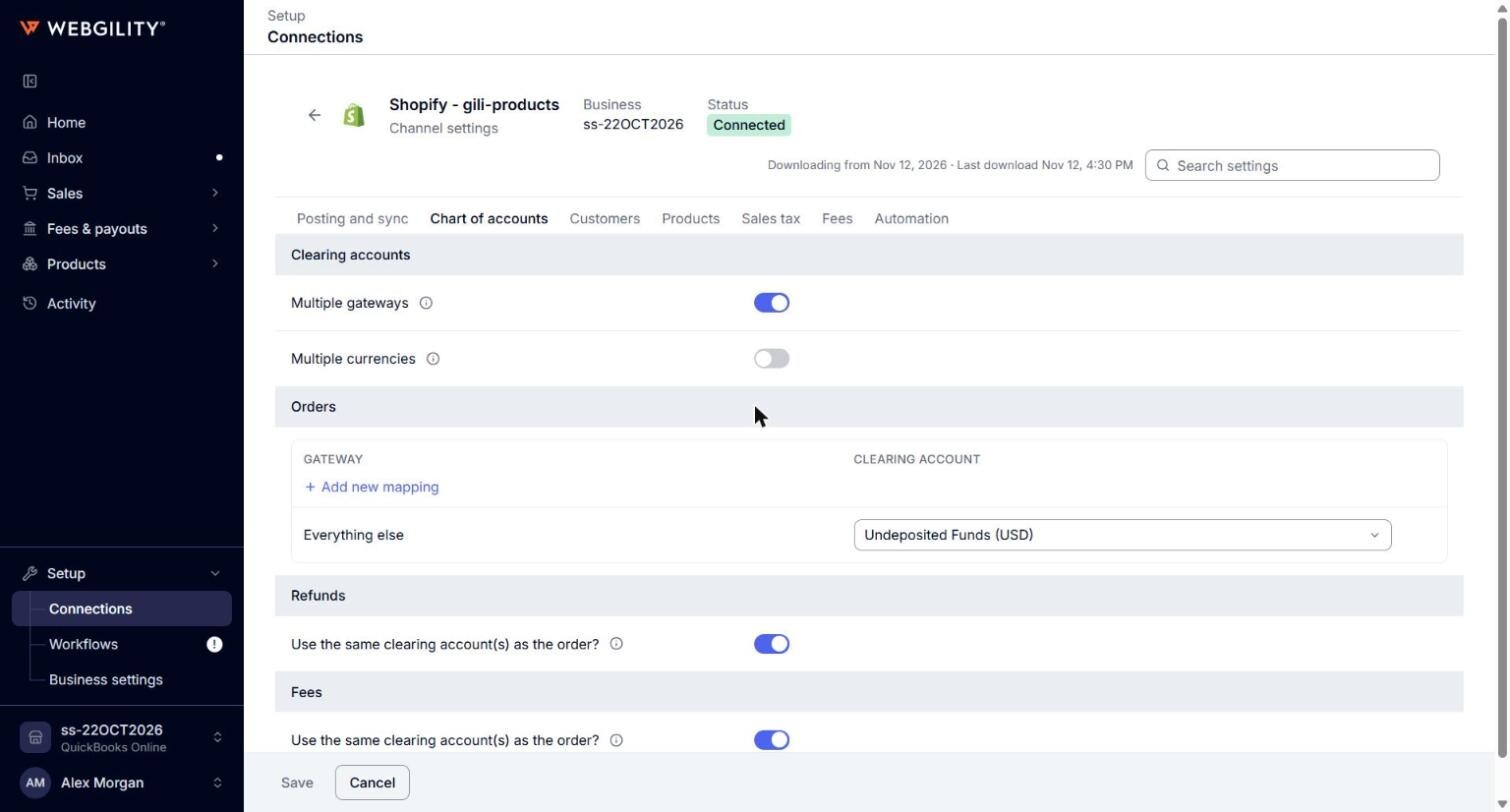
- Multiple gateways: gives each payment gateway its own clearing account. When off, every order uses the Everything else account. Options: on or off.
- Multiple currencies: gives each currency its own clearing account. It may need the Multicurrency setting of QuickBooks Online to be on, which Webgility i does not check. See How to Turn On Multicurrency in QuickBooks Online. Options: on or off.
- Orders: the clearing account for each gateway and currency, and an Everything else account for any payment that matches no row. Default: the Undeposited Funds account of your QuickBooks Online company for Everything else.
- Use the same clearing account(s) as the order? (under Refunds): when on, refunds use the order accounts above. Turn it off to set refund accounts of their own, by gateway and currency, with Everything else for the rest. Options: on or off.
- Use the same clearing account(s) as the order? (under Fees): when on, payment processor fees are paid from the order accounts above. Turn it off to set fee accounts of their own. Options: on or off.
Customers tab
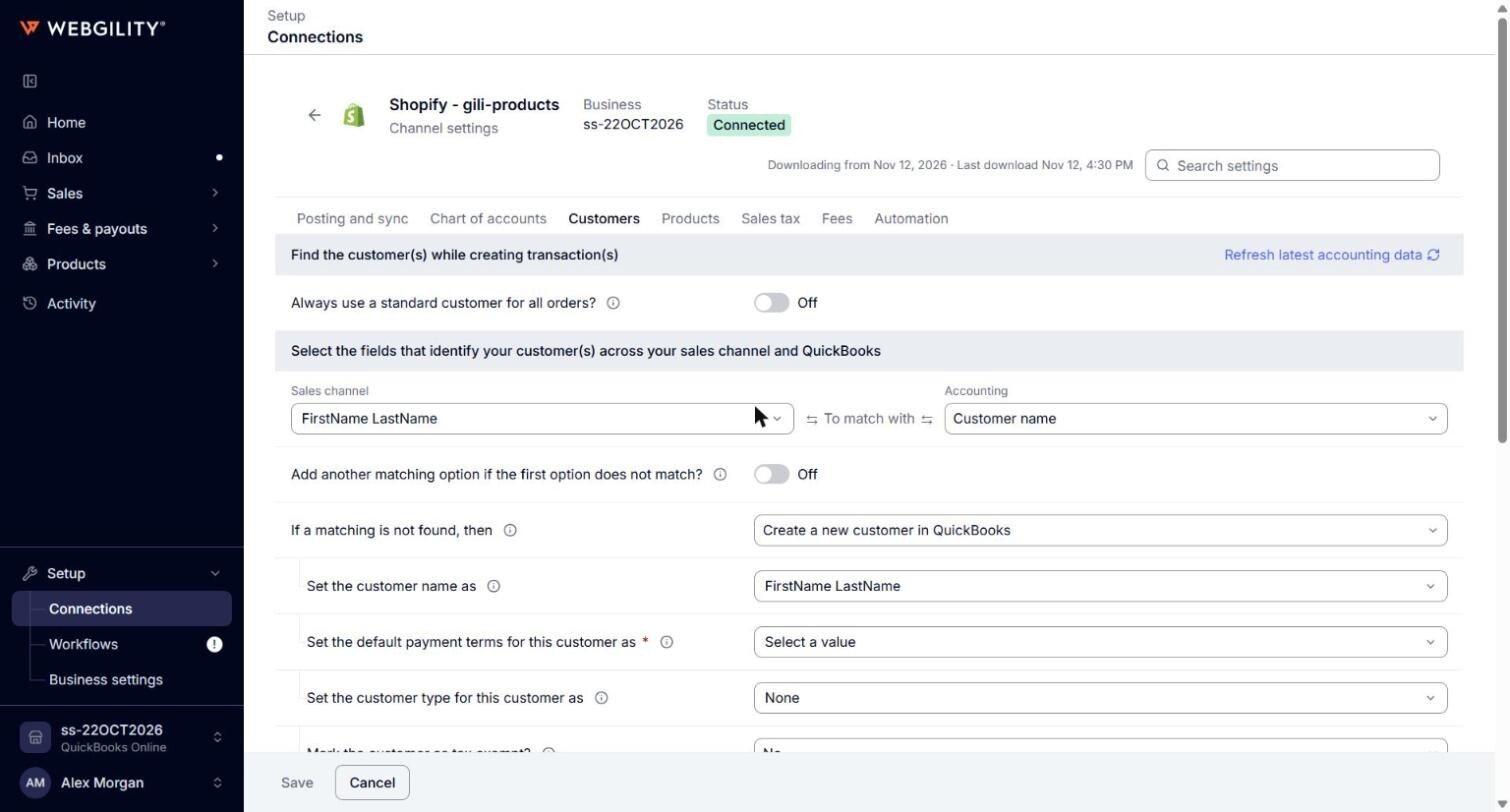
This tab sets how Webgility i finds or creates the QuickBooks Online customer of each order. Most of these settings show when the channel posts Transactional.
Find the customer(s) while creating transaction(s)
- Always use a standard customer for all orders?: when on, every order posts to one customer, the one in Use this as the standard customer. Options: on or off.
Note: When Always use a standard customer for all orders? is on, the matching fields are hidden. The other customer settings then show under Select the standard customer to use as the default customer.
Select the fields that identify your customer(s) across your sales channel and QuickBooks
- Sales channel and Accounting: the fields Webgility i compares to find the customer. Sales channel options: FirstName LastName, LastName, FirstName, Company, FirstName LastName, Company, FirstName LastName, ZipCode, FirstName LastName, Email, LastName, FirstName, Email, LastName, FirstName, ZipCode, Email. Accounting options: Customer name, Email.
- Add another matching option if the first option does not match?: tries a second pair of fields when the first finds no customer. Options: on or off.
- If a matching is not found, then: what happens when no customer matches. Options: Create a new customer in QuickBooks, Use a standard customer instead.
- Use this as the standard customer: the QuickBooks Online customer used when you post every order to one customer, or when no matching customer is found and you chose Use a standard customer instead. Search for the customer by name.
- Use different customer based on currency: uses a different standard customer for each currency. Then set the currencies and customers in Map currency. Options: on or off.
- Set the customer name as: the name of a customer Webgility i creates. When empty, it uses the fields of the first matching option.
- Set the default payment terms for this customer as: the QuickBooks Online payment term a new customer gets. It is not the term of the document.
- Set the customer type for this customer as: the QuickBooks Online customer type of a new customer. None gives no type.
- Mark the customer as tax exempt?: United States companies only. Options: Yes, No, Based on store. Based on store creates the customer as not taxable.
- Set email field as a blank?: Amazon only. Creates the customer with no email, so the hidden Amazon buyer email stays out of your customer list. Options: on or off.
- Update customers' addresses in QuickBooks with the data provided in the most recent order: with In sales channel and In accounting to pick the addresses. Saved, but not used yet.
- Select different customer for FBA orders?: Amazon only. Posts orders that Amazon fulfils to the customer in Select customer for FBA orders. Options: on or off.
- Set inactive customers to "Active" when they appear on a new order: when on, an inactive matching customer is made active when the order posts. When off, the order does not post and Webgility i says why. Options: on or off.
- If the customer details are not found, then use this default customer: some sales channels only. The customer used when an order has no customer details.
- Enable different customer matching for B2B orders?: Shopify only, on plans that include it. Matches the customer of a B2B order on its own Sales channel and Accounting fields. Saved, but not used yet.
More customer settings
- Record sales channel's physical address as the shipping address for pickup orders?: some sales channels only. Uses the store address as the shipping address of a pickup order. Options: on or off.
- If billing address is blank, use shipping address as billing address: some sales channels only. Options: on or off.
Payment terms
- Map payment terms: some sales channels only, on plans that include it. The QuickBooks Online term an invoice takes for each payment term of the sales channel.
Products tab
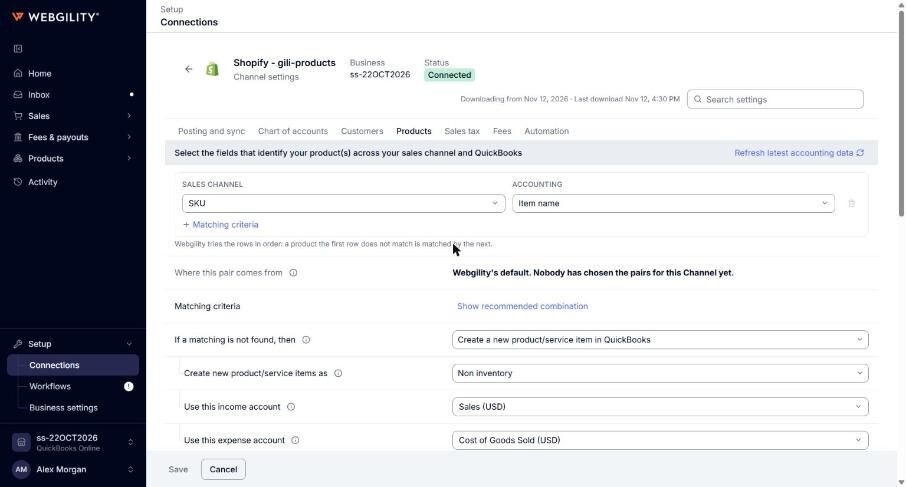
This tab sets how Webgility i matches the products of your orders to QuickBooks Online products and services, and what it does when there is no match.
Select the fields that identify your product(s) across your sales channel and QuickBooks
- Sales channel and Accounting: each row is a pair of fields Webgility i compares to match a product to a QuickBooks Online item. Rows are tried in order. Click Matching criteria to add a row. A change applies to products matched from now on. Products already matched keep their match.
- If a matching is not found, then: Options: Create a new product/service item in QuickBooks, Use a standard item instead, Flag the order with an error, Give an option to match it manually.
- Create missing item while posting order using automation?: shows with Give an option to match it manually. When off, an order with an unmatched product shows an error with a link to map the product. When on, automatic posting creates the missing item. Options: on or off.
- Use this standard item:: shows with Use a standard item instead. The QuickBooks Online item used for every unmatched product.
- Create new product/service items as: shows with Create a new product/service item in QuickBooks. Options: Non inventory, Inventory. An Inventory item is created only when the asset account and expense account below are set.
- Manually specify inventory start date? and Set the inventory start date as: the start date of a new Inventory item. When no date is set, the item starts on 1 January of the current year.
- Manage purchase information?: on QuickBooks Online Plus and higher. Saved, but not used yet.
- Use this inventory asset account, Use this income account and Use this expense account: the QuickBooks Online accounts of a new item. The expense account is also used for the fee items and the refund item Webgility i creates.
- Set the sales description of the item as: Options: Sales channel product description, Sales channel product name, Item title. Webgility i uses the sales channel product description on a new item.
- Set the purchase description as: Saved, but not used yet.
- Set the new item to be taxable?: United States companies only. Options: on or off. Outside the United States, Inclusive of tax? and Tax show instead.
- Set the item quantity as: Options: Sales channel quantity, 0. Webgility i creates a new Inventory item with a quantity of 0.
- Use secondary item matching criteria if the primary is found blank on your sales channel?: when the matching field is blank on the order, uses the secondary criteria to create the missing item, so the order can post. When off, the order waits until you map the product. Options: on or off.
- Set inactive items to "Active" when they appear on a new order: when on, an inactive QuickBooks Online item is made active when the order posts. When off, the order does not post and Webgility i says why. Options: on or off.
Inventory quantity sync
- Inventory adjustment account: the QuickBooks Online account that records the change in inventory value each time a quantity is adjusted. Default: Inventory shrinkage (default).
- Shopify quantity field for inventory sync: Shopify only. The Shopify field that inventory sync updates. On hand is your physical count. Available is on hand less the quantity committed to open orders. Options: Available, On hand. Default: Available.
Create new item(s) in products & services
Some sales channels only. The settings of an item Webgility i creates in QuickBooks Online from the Catalog page: Track inventory, Income account, Inventory asset account, Expense account, Manually specify inventory start date?, Set inventory start date as, Set sales description as, Set purchase description as, Taxable, Inclusive of tax?, Tax and Set item quantity as. Saved, but not used yet.
Product sync
- Enable handling time (in days) and Use handling time during product sync (in days): Amazon only. The handling time, from 1 to 15 days, sent to Amazon with each product. Saved, but not used yet.
Sales tax tab
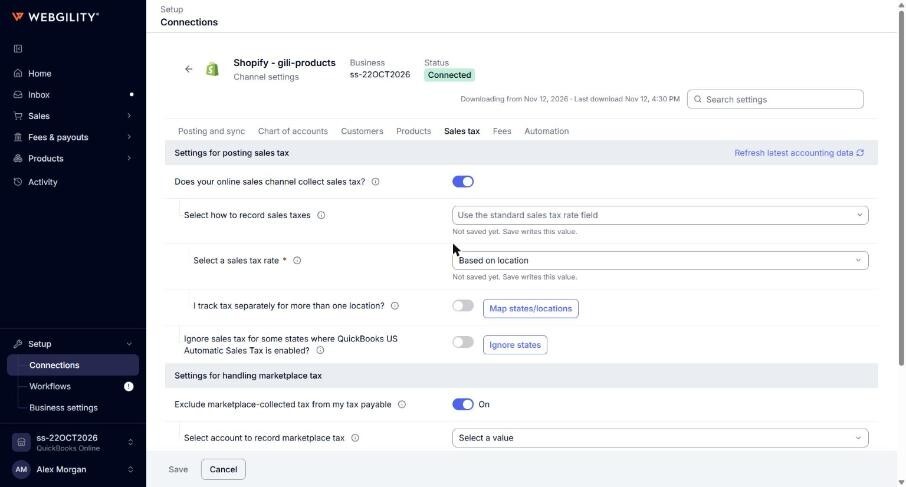
This tab sets whether and how Webgility i records the tax on each order. The settings shown depend on the country of your QuickBooks Online company.
Settings for posting sales tax
- Does your online sales channel collect sales tax?: turns on recording sales tax. Options: on or off.
- Select how to record sales taxes: United States, Canada and United Kingdom companies. Options: Record the exact amount collected as a line item, Use the standard sales tax rate field. In other countries, you pick the tax code to use.
- Use this line item to record tax in QuickBooks: shows with Record the exact amount collected as a line item. The QuickBooks Online item that records the tax.
- Select a sales tax rate: shows with Use the standard sales tax rate field. For United States companies, Based on location is also an option.
- All the order amounts are: Canada, United Kingdom and Australia companies. Options: Exclusive of tax, Inclusive of tax.
- Ignore sales tax for some states where QuickBooks US Automatic Sales Tax is enabled? and Ignore certain states for tax sync: leaves the tax of the states you pick out of what posts, for companies that use QuickBooks Online Automated Sales Tax. Options: on or off.
- I track tax separately for more than one location? and Map states/locations: United States and Canada companies, on plans that include it. Maps each state, city, county or zip code to a sales tax code. A zip code row wins over a city, and a city over a state.
Settings for handling marketplace tax
- Exclude marketplace-collected tax from my tax payable: some sales channels only. Marketplace tax is tax a marketplace collects and pays to tax authorities for you. When on (recommended), Webgility i takes it out of the order's sales tax and records it on its own line, Marketplace Tax Adjustment. Options: on or off.
- Select account to record marketplace tax: the QuickBooks Online Other Current Liability account that holds the marketplace tax.
Other tax settings
- Apply discount before calculating sales tax?: when on, the discount is taken off before tax. Either way, Webgility i posts the exact tax your store charged. Options: on or off.
- Mark items as taxable when orders are taxed?: marks items as taxable on the document when the order has tax. Saved, but not used yet.
- Apply tax for non-taxable orders and Select a tax code for non-taxable orders: Canada companies only. Posts a tax code on orders with no tax. Options: on or off.
- My Amazon orders contain per-item VAT taxes: Amazon only. Saved, but not used yet.
Fees tab
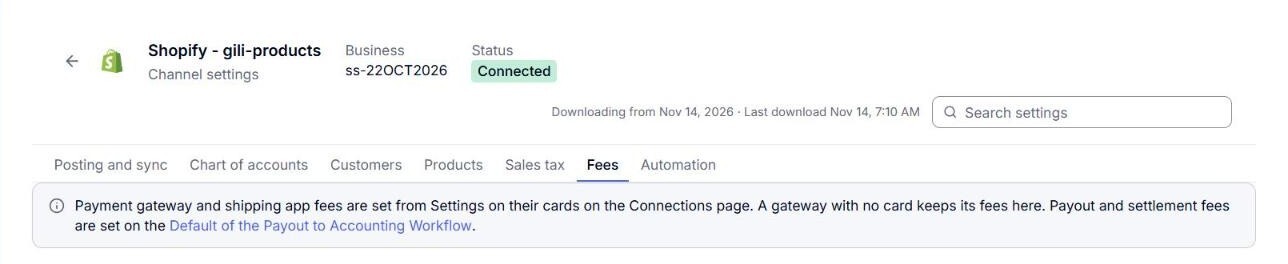
The tab starts with a line that says where the channel's fees are set. Payment gateway fees and shipping app fees are set from Settings on their cards on the Connections page. A gateway with no card keeps its fees on this tab. Payout and settlement fees are set on the default rule of the Payout to Accounting workflow. See Understanding the Default Rule and How Your Rules Work on Top of It. For gateway and shipping app fees, see How to Connect a Payment Gateway to Webgility i and How to Connect a Shipping App to Webgility i.
Note: Multi-currency fee payments is set in the Settings of each payment gateway card on the Connections page. See How to Connect a Payment Gateway to Webgility i.
Automation tab
This tab sets what Webgility i does by itself for this channel. See How to Set Up Automation in Webgility i.
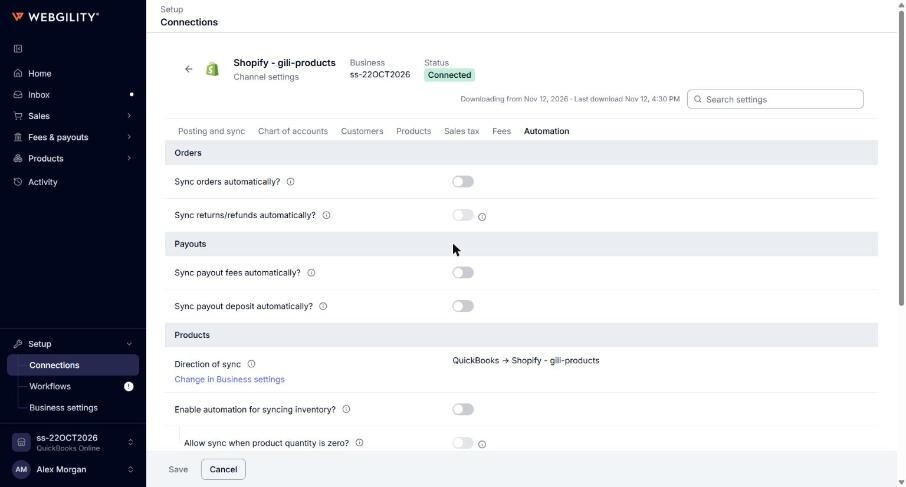
- Sync orders automatically? and Sync returns/refunds automatically? (under Orders): when on, Webgility i posts orders, and then refunds, to QuickBooks Online by itself in its runs. When off, you post them yourself from the Orders page. On a Transactional channel, Sync returns/refunds automatically? can be on only while Sync orders automatically? is on.
- Sync payout fees automatically? and Sync payout deposit automatically? (under Payouts): sales channels whose payouts post only. When on, Webgility i posts the fees and the deposit of each payout by itself.
- Direction of sync (under Products): read only. Shows which system inventory, price and cost are copied from, for example "Shopify - My Store → QuickBooks". Click Change in Business settings to change it. See How to Set the Product Sync Direction.
- Enable automation for syncing inventory?, Enable automation for syncing price? and Enable automation for syncing cost? (under Products): update inventory, price or cost automatically for products that are out of sync. Each has options under it, such as Allow sync when product quantity is zero?, Sync inventory as zero when quantity is negative, Allow sync when product price is zero?, Allow sync when product cost is zero? and Include multiple mapped products for syncing?.
- Enable automated synchronization of order updates (under Changes to posted orders): Transactional channels only. When on, Webgility i applies a change the sales channel makes to an order that already posted. When off, it holds the change and does not post it. Default: off.
Related articles
- How to Connect Your Sales Channel to Webgility i
- Understanding Posting Grain and How It Affects Automation
- How to Set Up Automation in Webgility i
- How to Configure Workflows in Webgility i
- How to Configure Your Business Settings
- How to Set the Product Sync Direction
- How to Connect a Payment Gateway to Webgility i