Steps to follow:
1. Set Up QuickBooks Desktop for Amazon Orders & Fees
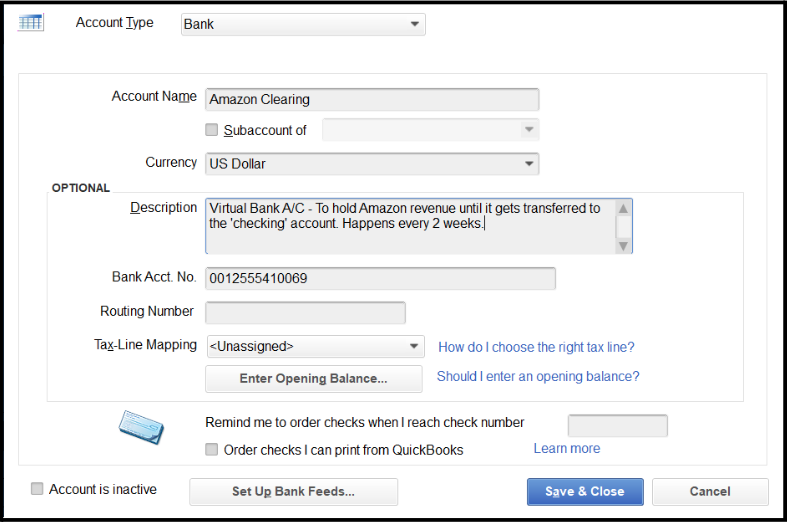
a) Create a Bank Account for Amazon (Amazon Clearing Account)
In QuickBooks Desktop, create a new bank account called "Amazon Clearing." This account will act as a virtual holding account where Amazon's revenue is temporarily stored until the funds are transferred to your actual bank account.
b) Create an Expense Account (Amazon Expenses and Fees)
Next, create an expense account labeled "Amazon Expenses and Fees" to accurately track all costs associated with Amazon, such as commissions, FBA fees, advertising, and shipping.
c) Create a Vendor (Amazon Vendor)
Add a new vendor named "Amazon Vendor" in QuickBooks Desktop. This will help you manage and categorize Amazon-specific expenses more effectively.
2. Configure Webgility Desktop for Amazon Orders & Settlements
Webgility Desktop simplifies the process of downloading and posting Amazon orders and settlement reports directly into QuickBooks Desktop. Here’s how you can set up Webgility Desktop to streamline this process:
a) Configure Daily Order Downloads
Set Webgility Desktop to automatically download Amazon orders each day, ensuring your sales records are always current in QuickBooks Desktop. For detailed setup instructions, refer to the article [How to Download Orders in Webgility Desktop].
b) Recommended Settings for Amazon
Webgility Desktop provides specific settings optimized for Amazon order downloads. Use the recommended configurations to streamline this process and ensure accuracy. See the guide on [Recommeded Settings for Amazon] for further details.
c) Posting Orders to QuickBooks Desktop
Once orders have been downloaded, the next step is to post them to QuickBooks Desktop. Webgility Desktop offers recommended posting settings to ensure the smooth transfer of data to your accounting software. For step-by-step instructions, refer to [How to Post Orders to Your Accounting].
3. Handling Amazon Settlement Reports
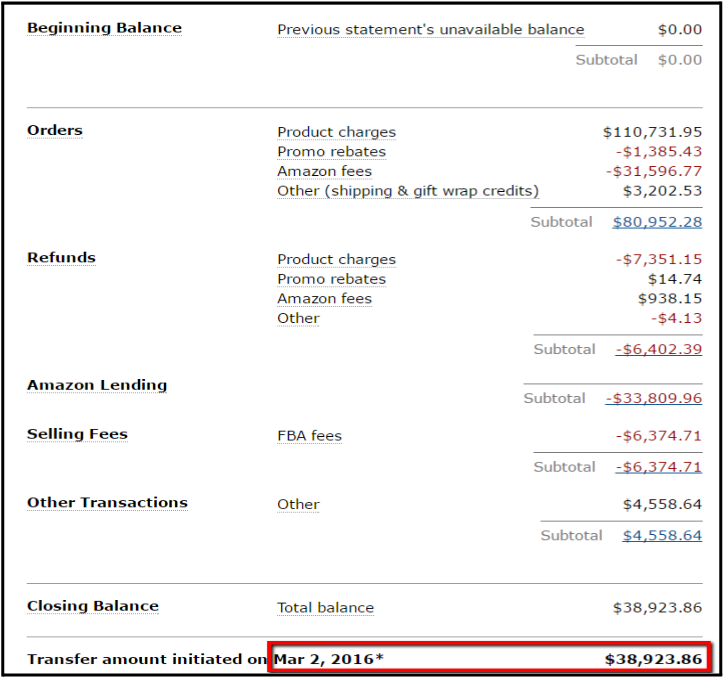
Every two weeks, Amazon provides a settlement report that includes all sales, fees, refunds, and other financial transactions for that period. Webgility Desktop can help you import this settlement report into QuickBooks Desktop.
When posting the settlement report:
-
Debit the "Amazon Expenses and Fees" account to increase your expense tracking.
-
Credit the "Amazon Clearing" account for the total of fees and expenses, reducing the clearing account balance.
For instructions on downloading and posting settlement reports, see [How to Download and Post Amazon Settlement Reports with Webgility Desktop].
4. Transferring Funds to Your Bank Account
After posting the settlement report in QuickBooks Desktop, Webgility Desktop will record the payment transactions in the Amazon Clearing account.
-
Go to Banking > Transfer Funds.
-
Transfer the amount from the "Amazon Clearing" account to your actual bank account.
-
Ensure the transfer date and amount match the settlement report.
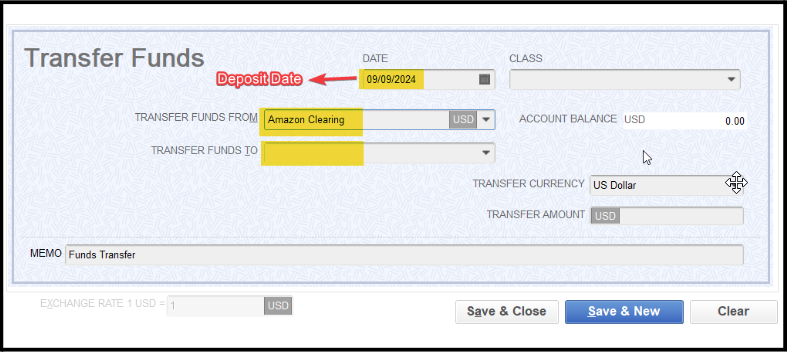
Note: The date and transfer amount should match the transfer amount (closing balance), in the Amazon settlement report.
Clearing account wrap-up
Master equation:
Total revenue - $ deposited by Amazon - expenses and fees charged by Amazon = $0
This is why this is called a clearing account.
Conclusion
This step-by-step process ensures that your Amazon revenue, fees, and transfers are correctly recorded in QuickBooks Desktop, simplifying the reconciliation process and providing clear visibility into your financials. For more information on related tasks, see the linked articles for detailed instructions on downloading and posting data using Webgility Desktop.