
 Step 1: Open Orders → New Orders
Step 2: Check the orders you want to ship together
Step 3: Click Process Shipping
Step 4: On the Single Shipment tab, set details and click Generate Label
Overview
Webgility Desktop can generate a shipping label for every order in your selection in a single pass. Pick the orders from New Orders, click Process Shipping, and the Single Shipment tab inside the Generate Shipping Label dialog walks you through one label per order using a shared carrier and service.
When This Applies
Use this when a group of orders in New Orders is going out the same way — same carrier, same service level, same package weight rule — and you want to spend one action generating labels for all of them instead of one action per order. Your shipping provider (Stamps, UPS, FedEx, ShipStation, ShippingEasy, etc.) must already be connected under Connections → Shipping → Shipping Settings; see How to Integrate UPS with Webgility Desktop or How to Integrate Stamps with Webgility Desktop for the integration setup.
Steps to Generate Labels for Multiple Orders
Step 1: Open the New Orders view
In Webgility Desktop, go to Orders → New Orders. This is the same view you post orders from — the checkbox column on the left lets you select orders in bulk.
Step 2: Select the orders you want to ship together
Use the checkboxes to pick two or more orders that will ship with the same carrier and service. Sort or filter the list first so the orders you want sit together — the time saving grows with batch size.
Step 3: Click Process Shipping
Click Process Shipping. The Generate Shipping Label dialog opens with the orders you selected listed at the top left (ORDER #, DATE, ORDER TOTAL $, SHIP STATUS). The dialog opens on the Single Shipment tab, which is the tab you want for shipping multiple orders — each selected order gets its own label, printed in sequence using the shared Shipment Details on the right.
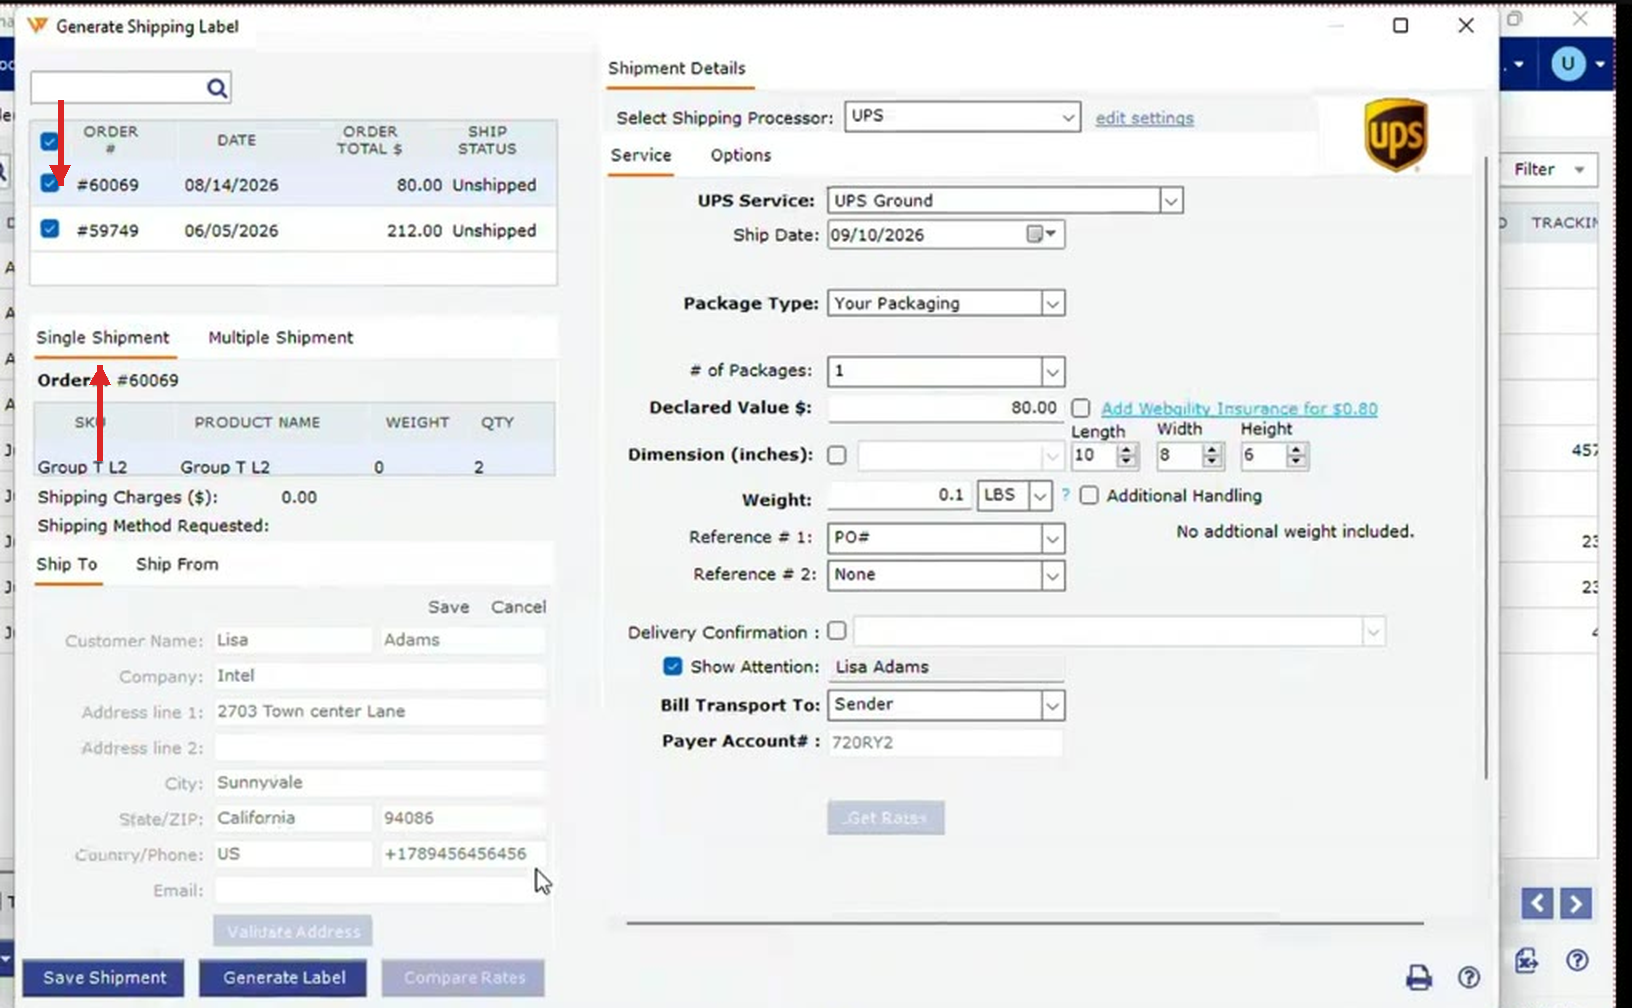 The Generate Shipping Label dialog with the Single Shipment tab active — one label per selected order.
Step 4: Set the shared shipping details
On the right side of the dialog, confirm the shared values for the batch:
| Select Shipping Processor | The carrier that will label every selected order (for example, UPS). All selected orders must use the same processor. |
|---|---|
| UPS Service / FedEx Service | The service level for the batch (for example, UPS Ground). |
| Ship Date | The date Webgility stamps on every label in the batch. |
| Package Type | The package type for the batch (defaults to Your Packaging). |
| # of Packages | How many packages each order ships in. Keep at 1 unless an order genuinely needs more. |
| Weight | The default weight Webgility applies when an order does not carry one of its own. |
| Reference # 1 / Reference # 2 | Optional reference values printed on every label in the batch. |
If you need to change a per-processor default like insurance, VAT, or international label settings, click edit settings next to the processor dropdown; see How to Configure Default Shipping Settings.
Step 5: Generate labels for the batch
Click Generate Label. Webgility creates one label per selected order using the shared Shipment Details and marks each order Ready to Ship. Use Save Shipment first if you want to record the shipment details without printing a label yet, or Compare Rates to preview carrier pricing before printing.
Tab names, explained
The Single Shipment tab means one shipment per order — so a batch of five selected orders produces five labels. The Multiple Shipment tab, next to it, is for a different case: splitting the items of a single order across multiple shipments (for example, when one order has to go out in two packages from two warehouses). Pick Single Shipment when you want one label per order, which is the right tab for batch label printing.
Carriers cannot be mixed in one batch
Multi-order shipping requires that every selected order uses the same shipping provider — you cannot mix carriers (for example, UPS and FedEx) in one batch. For a mixed batch, ship each carrier’s orders in a separate selection.
Key Recommendation
Sort or filter your New Orders view by carrier and service before you start selecting, so each batch you ship together is as large as possible. One carrier and service pick covers every order in the selection, so the time saving grows with batch size.
Additional Support
If labels fail to generate for part of the batch, open the orders that failed, check their shipping address and weight, and re-run the shipping step on just those orders. Contact Webgility Support with the failing order numbers if the error persists.