
Overview
A small, growing discrepancy in your Shopify clearing account in QuickBooks Desktop often traces back to a Shopify order that was paid through PayPal, where PayPal's processing fee was not mapped in Webgility and is sitting unrecorded. Mapping the PayPal fee and reposting the affected order usually zeroes out the gap (for the recommended Shopify + PayPal fee combo, see Recommended Settings for Shopify and PayPal Fees in Webgility Desktop).
When This Applies
You post Shopify orders and payouts into QuickBooks Desktop through Webgility Desktop, your Shopify clearing account shows a few dollars short, and at least one order in the period was paid using PayPal.
Why This Happens
When a Shopify order is paid through PayPal, PayPal takes a processing fee that Webgility needs to post as its own expense entry. If no PayPal fee mapping exists in Webgility for the Shopify sales channel, the fee is downloaded with the payout but never posted — so Shopify's deposit matches the bank but the clearing account carries the unposted fee amount as a small balance.
Steps to Add the PayPal Fee Mapping and Clear the DiscrepancyStep 1: In Webgility Desktop, identify the Shopify order whose PayPal fee has not posted (the clearing account's open balance will match or exceed the fee amount).
Step 2: Open the PayPal fee configuration in Sync Settings > Expense and fee (for the surrounding payment-processor fee anatomy, see Track Payment Processor Fees with Webgility Desktop).
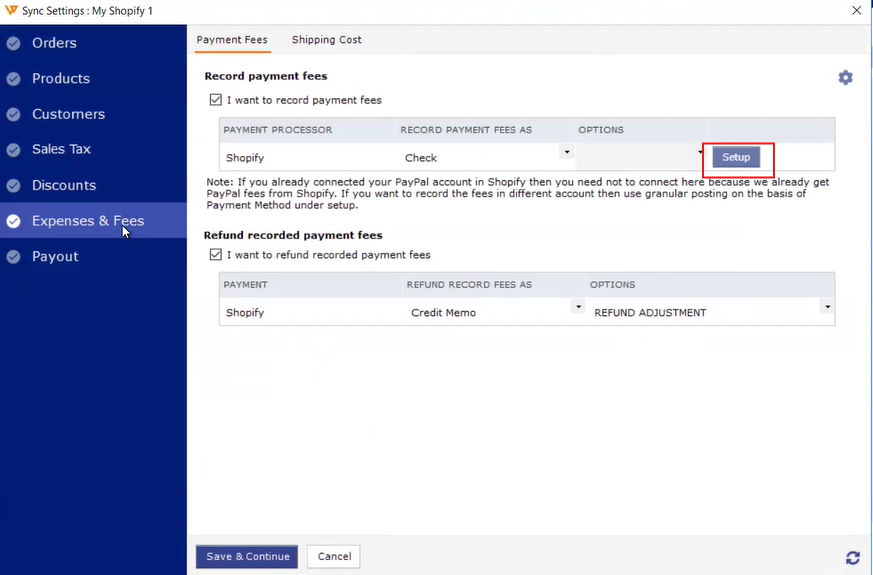
Step 3: Add a mapping for PayPal fees — pick Credit Card Fees (or the equivalent QuickBooks expense account you use for processing fees) as the expense account and Shopify as the payee — then Save.
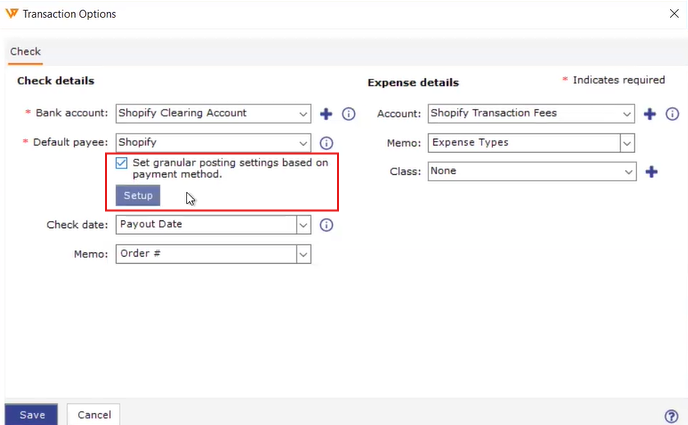
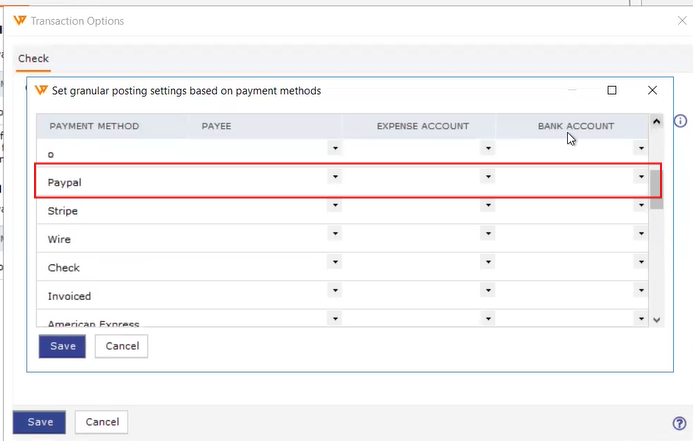
Step 4: Open the affected order, click Undo Sync, then repost it so the new PayPal fee mapping takes effect (see How to Unpost Transactions from Webgility Desktop with Undo Sync).
Step 5: Confirm in QuickBooks Desktop that the clearing account now shows zero (or the exact balance of other pending transfers only). The PayPal fee should appear as its own expense entry under Credit Card Fees.
Important Note
"If you have more than one Shopify order paid through PayPal in the same period, repeat Steps 4–5 for each one. The mapping only needs to be set up once, but each already-posted order has to be unsynced and reposted so Webgility applies the new mapping."
Key Recommendation
When you first set up Shopify in Webgility Desktop, walk every payment method your store accepts (Shopify Payments, PayPal, Shop Pay, Amazon Pay, etc.) and confirm each has a fee mapping — doing it upfront prevents the slow clearing-account drift that this fix clears up after the fact.
Additional Support
If the clearing account still carries a balance after you have mapped PayPal fees and reposted the affected orders, write to support@webgility.com with the payout IDs for the period and the current clearing-account balance.