
Overview
Incorrect or duplicate inventory updates in Webgility Desktop with QuickBooks Desktop Enterprise may result from incorrect product mappings or Webgility Scheduler issues.
This article explains how to review product mappings, verify the Webgility Scheduler, and monitor inventory synchronization to ensure inventory updates correctly without duplicate adjustments.
Symptoms
You may experience one or more of the following symptoms:
- Inventory quantities are changing unexpectedly.
- The same inventory appears to be updated more than once.
- Duplicate inventory adjustments are observed.
- Inventory quantities in QuickBooks and the connected sales channel do not match.
- Inventory synchronization produces unexpected quantity changes.
- Inventory continues to change after the expected synchronization has completed.
Possible Causes
- Incorrect product mappings: Incorrect mappings can cause inventory to sync with the wrong QuickBooks item.
- Multiple Scheduler processes: Multiple
unifyscheduler.exeprocesses may contribute to unexpected synchronization behavior.
Troubleshooting Steps
Step 1: Make Sure Webgility Desktop Is Up to Date
Using the latest Webgility Desktop version helps ensure compatibility, performance improvements, and applicable bug fixes. Webgility's current documentation recommends checking for updates from within the application.
- Open Webgility Desktop and log in.
- Go to Help > Check for Updates.
- If an update is available, select Update.
- Keep the option to Take Webgility database backup before proceeding with the update enabled.
- Complete the update.
- After the update, log back in and verify the installed version from Help > Terms and Privacy.
Why this matters: Troubleshooting an inventory issue on an outdated application can make it difficult to determine whether the behavior is related to an existing software issue.
Update Webgility Desktop Using Check for Updates Option
Step 2: Identify the Affected Products
Before changing a mapping, identify exactly which products are receiving incorrect inventory updates.
- Note the affected SKU or item.
- Compare its inventory quantity between the sales channel and QuickBooks.
- Check whether the item is currently involved in an order that has not yet been posted.
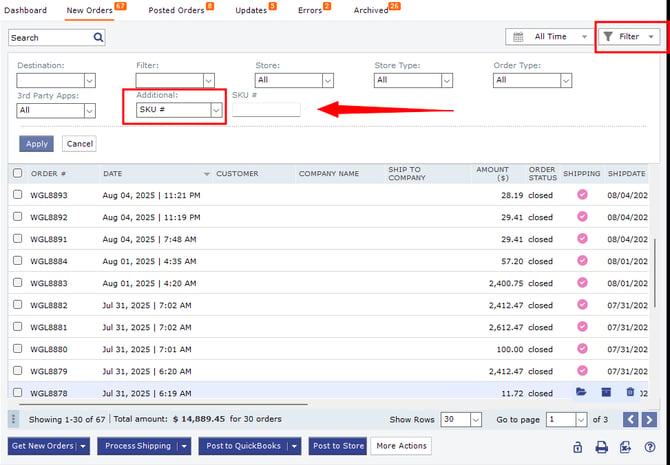
Why this matters: This helps distinguish an actual mapping or Scheduler problem from a quantity difference caused by an order that is still being processed
Step 3: Review the Product Mapping
Review the mapping for each affected SKU.
- In Webgility Desktop, go to Products > All Products.
- Apply the Mapped filter.
- Locate the affected product.
- Review the QuickBooks item to which the sales-channel product is mapped.
- Confirm that the mapping points to the correct QuickBooks inventory item.
Why this matters: Webgility uses product mappings to determine which products correspond across the sales channel and QuickBooks. An incorrect mapping can therefore result in inventory being synchronized against an unintended item.
How to Map Products or Inventory in Webgility Desktop
Step 4: Remove an Incorrect Mapping
If you identify an incorrect or invalid mapping:
- Select the affected product.
- Use the option to remove or unmap the incorrect mapping.
- Verify that the incorrect QuickBooks item is no longer associated with the sales-channel product.
- Map the product again only after confirming the correct QuickBooks item.
Webgility also provides a specific inventory-sync troubleshooting workflow that recommends verifying active mappings and removing incorrect mappings before attempting another synchronization.
How to solve Item Mapping and Inventory Sync Issues with Webgility Desktop
Why this matters: Removing an incorrect mapping prevents Webgility from continuing to associate the product with the wrong QuickBooks inventory item.
Important: Do not remove a mapping unless you have verified that it is incorrect. If you are unsure which QuickBooks item should be mapped, contact Webgility support team before making the change.
Step 5: Restart the Webgility Scheduler
- In Webgility Desktop.
- Locate the Clock icon in the Webgility interface.
- Click the Clock icon to restart the Scheduler.
- Wait for the icon to turn green, indicating that the Scheduler is active.
These are the Webgility Scheduler restart steps.
Why this matters: Restarting the Scheduler provides a clean starting point for monitoring subsequent synchronization activity.
Ensuring Proper Functioning of the Webgility Scheduler
Step 8: Perform a Controlled Inventory Synchronization
Once the mappings and Scheduler have been verified:
- Select one affected product.
- Check whether its quantity is shown as Quantity Out of Sync.
- Review which system is configured as the master inventory source.
- If appropriate, perform a manual synchronization for the affected product.
- Verify the resulting quantity in the destination system.
Why this matters: Testing one affected item first reduces the risk of making broad inventory changes before confirming that the synchronization is working correctly.
How to Sync Products with Webgility Desktop
Step 9: Monitor Automatic Synchronization
After completing the troubleshooting steps, monitor the application for 1–2 days.
During this period:
- Check the affected SKUs periodically.
- Confirm that inventory quantities are changing as expected.
- Verify that the same inventory adjustment is not being applied more than once.
- Compare inventory quantities between QuickBooks and the connected sales channel.
Why this matters: Monitoring over time helps confirm the issue is resolved and not recurring during subsequent scheduled synchronization cycles.
If the issue remains resolved after monitoring, continue normal inventory synchronization.