Note1 : First, post a few orders manually to confirm that everything syncs correctly with QuickBooks. Once verified, you can proceed with automation.
Step 1: Sign In into your Webgility Online
Visit my.webgility.com and log in to your Webgility Online account.
Step 2: Open Automation Settings
In the bottom-left corner of the dashboard, open the Automation dropdown and select Scheduler Rules.
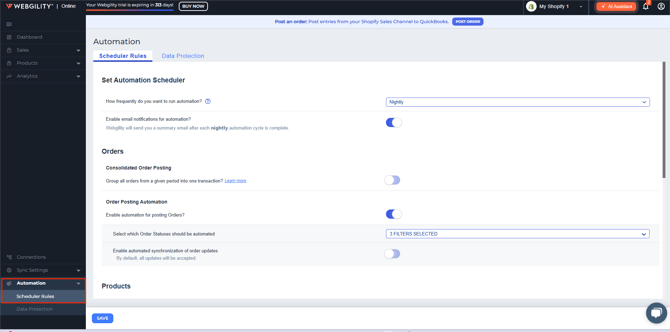
Step 3: Configure Scheduler Rules
Automation Frequency
Choose how often automation should run:
-
Every 15 minutes
-
Nightly (once per day)

Note2 : Available options may vary based on your plan and connected sales channel.
Enable Email Notifications
Turn this on to receive a summary email after each automation cycle.

Step 4: Set Up Order Posting
Consolidate Orders Posting: Combines multiple orders into one transaction per day. Ideal for high-volume stores or when customer-level tracking isn’t needed.

To consolidate:
-
Enable "Consolidate Orders"
-
Choose a start date for consolidation
-
Follow the steps in this helpful article on: Consolidated Sync Overview

Additionally, activate the “Enable Automation for posting option” within the Orders tab

Select the order statuses (e.g., Paid, Shipped, Complete) that should be included in automation.

Note3 : the order statuses in the above screenshot are for Etsy, and they may vary depending on the sales channel.
Step 5: Set Up Product Sync
Webgility Online treats QuickBooks Online as your source of truth. You can sync:
-
Inventory Quantity
-
Sales Price
-
Cost Price (Shopify and BigCommerce only)
You’ll be prompted to confirm when enabling sync. You can then choose which fields to sync.
If inventory in QuickBooks reaches 0 or less, Webgility Online will update the sales channel to reflect that.

Step 6: Automate Refund Posting
If your connection supports refunds:
-
Enable refund automation.

- Choose between consolidated or individual refund transactions.

Note4 : Expenses and fees settings are valid only for specific sales channel like Amazon, Shopify, etc.
Step 7: Automate Expenses & Fees Posting
-
Enable toggle for 'Sync marketPlace Fees automatically'
- Create Sales receipt If Amazon Refund amount is greater than expense amount
- Sync Shipping Fees automatically

Final Step: Save Your Settings
Click Save. Automation will now run according to the frequency you’ve set.

Note: Nightly automation typically runs just after midnight.