Overview
Product mapping in Webgility Desktop allows you to connect items from your online store (like Shopify) to corresponding items in QuickBooks. This ensures accurate syncing of orders, inventory, and financial data—especially when SKUs in your store don't exactly match item names or numbers in QuickBooks.
Why is Product Mapping Important?
When your store’s product SKUs and your QuickBooks item names don’t align, data sync issues can occur. Product mapping serves as a bridge between these systems, allowing Webgility to accurately match products during order posting and inventory sync.
How to Map Products
-
Open Webgility Desktop and navigate to the Products section, then select Missing in QuickBooks.
-
Review the list of products from your online store (e.g., Shopify) that are not currently linked to any items in QuickBooks.
-
Select the products you want to map.
-
Click the Map Product button at the bottom of the screen to start the mapping process.
In Webgility Desktop, go to the Products section and select Missing in QuickBooks.
This page displays a list of products from your online store (such as Shopify) that are not currently matched with any items in QuickBooks.
Choose the products you want to map, then click the Map Product button at the bottom to begin the mapping process.
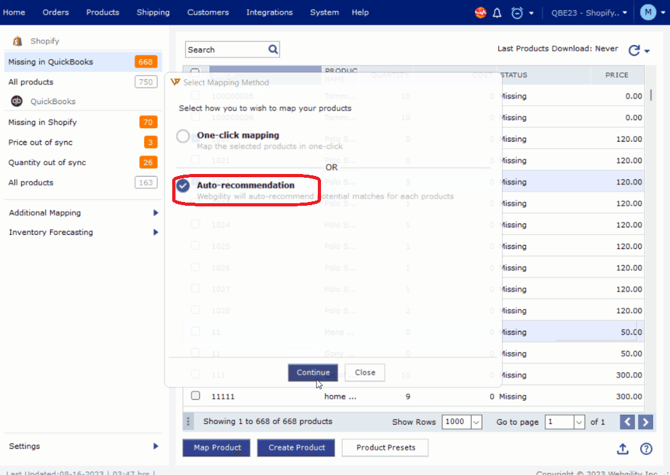
After you click Map Product, a pop-up window will appear that prompts you to select One Click Mapping or Auto-recommendation.
One-Click Mapping
With one-click mapping, you can align your online store's product SKU with any of the following QuickBooks options:
-
Manufacturer Part#
-
Barcode
-
Sub-Item (use this for product categories listed as Parent Products in QuickBooks)
Manufacturer Part#
Barcode
Sub-Item (use this for product categories listed as Parent Products in QuickBooks)
If your online store's product SKUs match any of these QuickBooks options, select the corresponding one and click Continue.


After a successful mapping, Webgility will provide a prompt. You can choose to continue mapping unmatched store products in the same way by clicking Yes, Continue, or opt for a different mapping approach by selecting Skip for Now.
Auto-Recommendation
This feature scans your online store's selected product SKU/name across multiple fields in QuickBooks product details, including description, barcode, and manufacturer. It then suggests matching options for mapping.
If you want to map the store SKU with the found matches in QuickBooks, select them and click on Map Product.
Once you select the products for mapping or search and select the products for mapping, you can save the mapping by selecting the “Map Product” button.
Manual mapping
If no matches are found in QuickBooks for the selected SKU from the store through the auto-recommendation option, then you can click on the “Search for correct match” option to find the relevant QuickBooks item and map them.

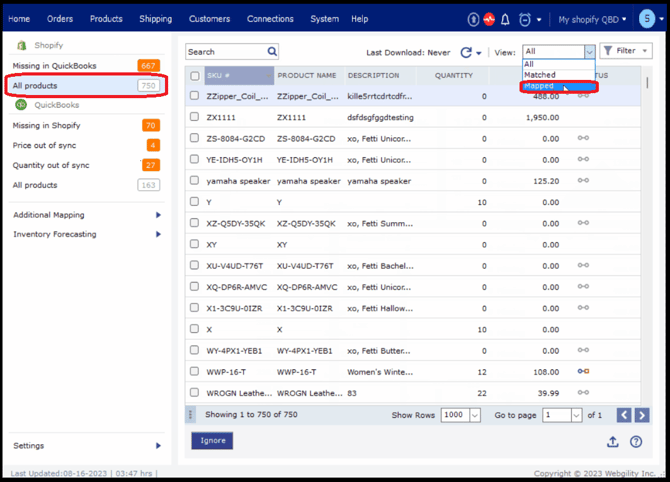
How to find mapped products in Webgility
You can view all the mapped products by going to the Products section, selecting All Products, and then applying the Mapped filter.

If you need to unmap an item or remove any mapping from the list, follow the instructions mentioned in this article, How to Un-map a Product in Webgility Desktop.
Note: If you notice mapped items appearing in red, it indicates an invalid mapping. In such cases, start by un-mapping the product and attempting the mapping process again. If the issue continues, please don't hesitate to contact Webgility support for more help.