Map Payment Method with QuickBooks
Overview:
Payment method mapping in Webgility is essential for accurately tracking online order payments in QuickBooks. Since the nomenclature may differ between systems, mapping aligns payment methods, allowing you to group online store payments with specific QuickBooks methods. This streamlines accounting, enhances reconciliation, reduces discrepancies, and improves overall financial management.
Follow these steps to map the payment method with QuickBooks.
Map Payment Method with QuickBooks
-
To get started, navigate to Integrations, select Accounting/POS/ERP, and then choose Sync Settings.
-
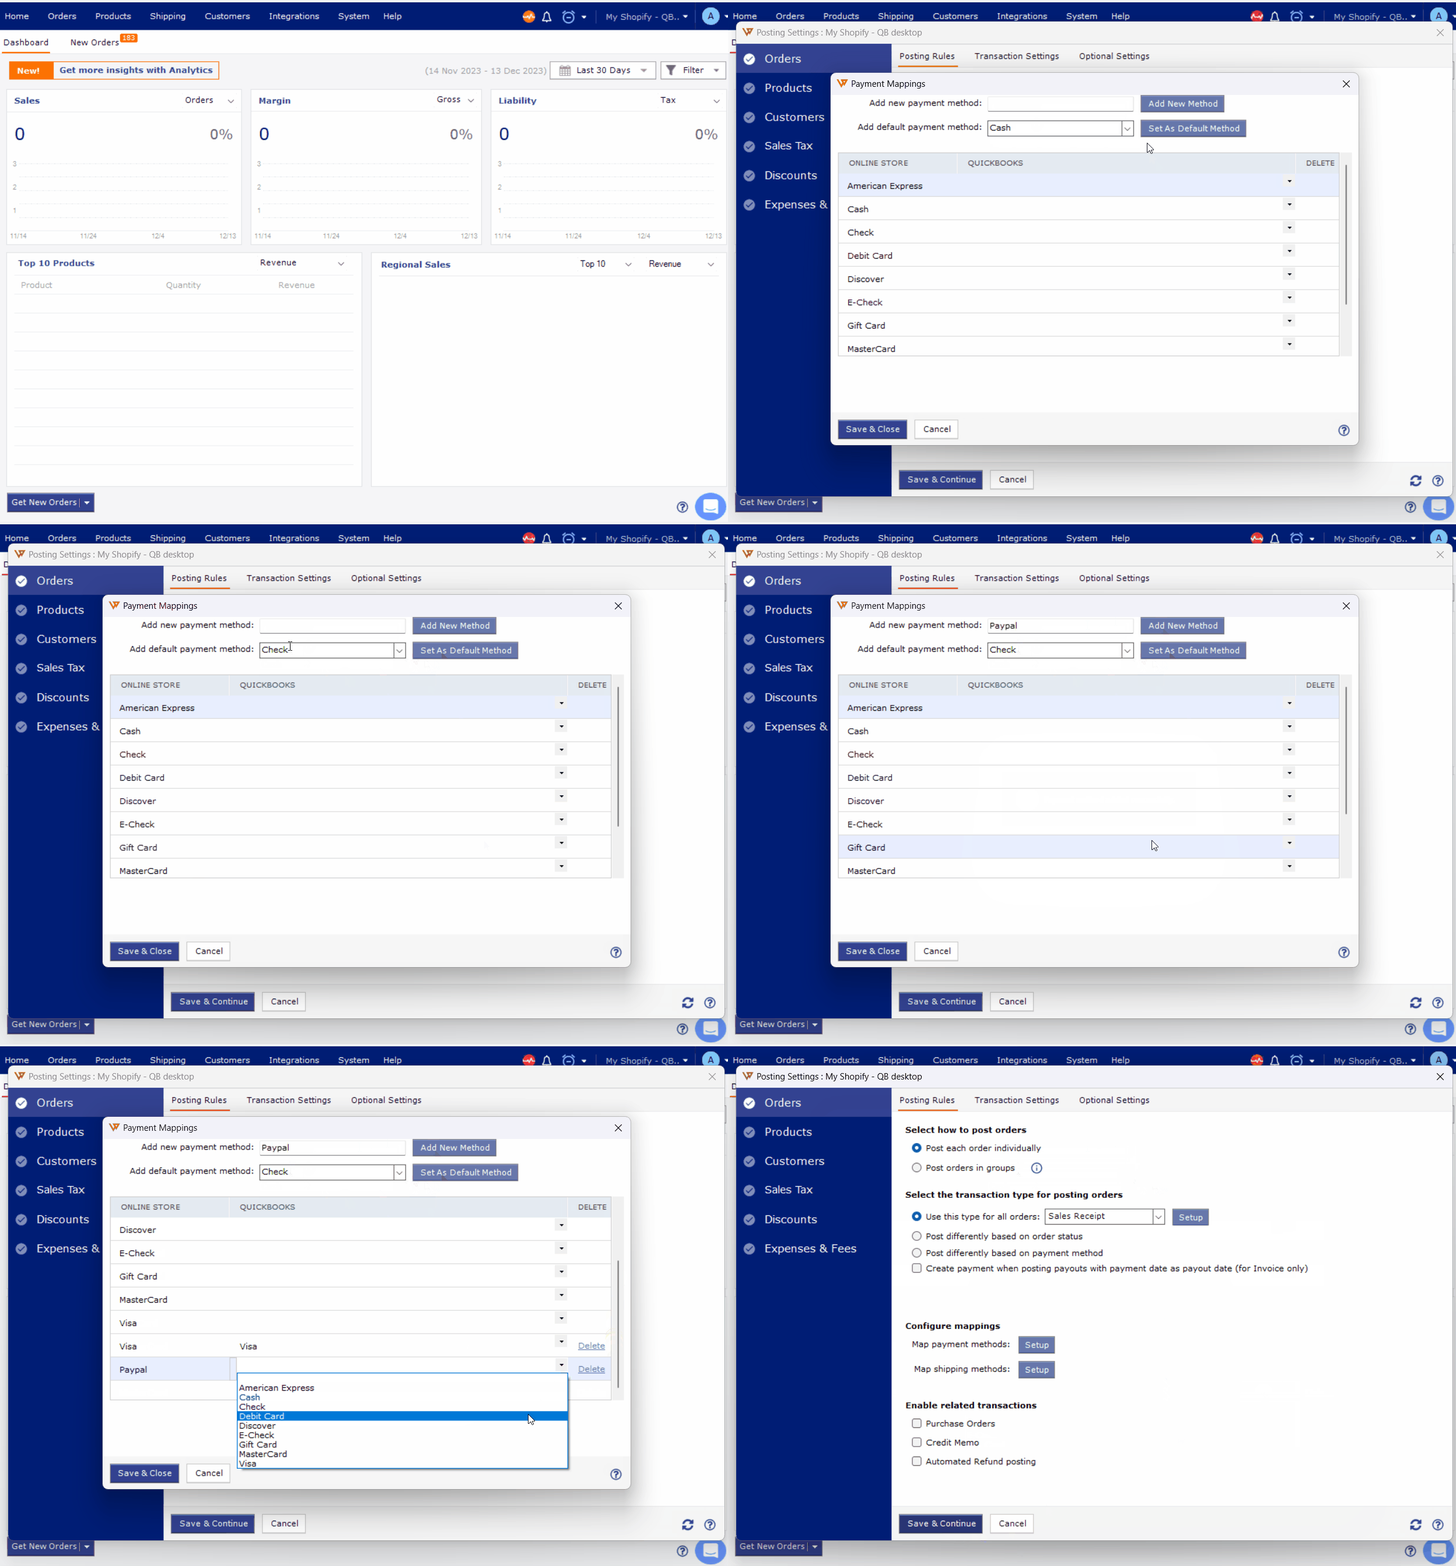
Now under the order section, click on Set up for Configure Mappings option
-
Here you can configure the following:
-
Add a new payment method.
-
Add a default payment method.
-
-
Map the online sales channel method with QuickBooks, by selecting the desired option from the drop-down. Then click Save and Close, Save & Continue under Posting settings, and close.
To get started, navigate to Integrations, select Accounting/POS/ERP, and then choose Sync Settings.
Now under the order section, click on Set up for Configure Mappings option
Here you can configure the following:
-
Add a new payment method.
Add a new payment method.
-
Add a default payment method.
Add a default payment method.
Map the online sales channel method with QuickBooks, by selecting the desired option from the drop-down. Then click Save and Close, Save & Continue under Posting settings, and close.
Refer to the following GIF for your reference on the steps:
Mapping Card Types by Payment Gateway
Webgility Desktop lets you map different credit card types to their payment gateways, such as Shopify, PayPal, or Stripe. This mapping is used to post orders from multiple card types within a single payment gateway according to specific rules.
Note: This type of mapping is necessary only when you want to track credit card types and apply specific posting rules for accounting purposes. For example, if you have orders processed through different gateways, such as PayPal or Stripe, that all use the same card type, like Visa or MasterCard, you will need this mapping to ensure accurate tracking and accounting for each transaction.
Enable Mapping Option
-
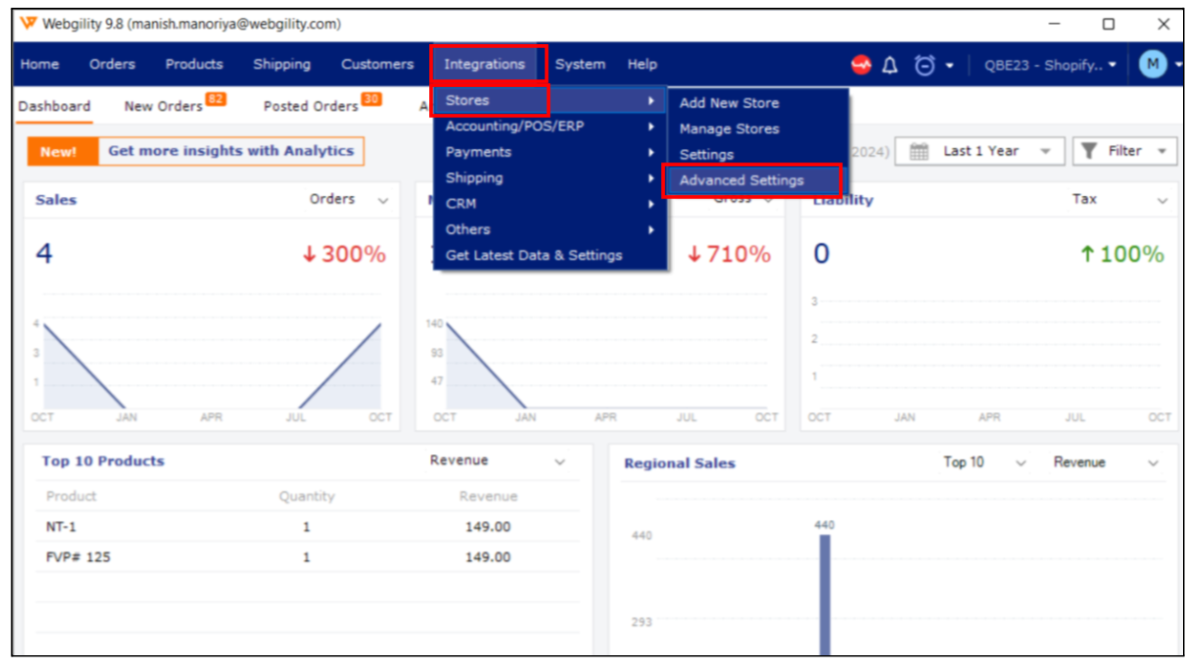
Go to Integration, click on Store, and select Advanced Settings.
-
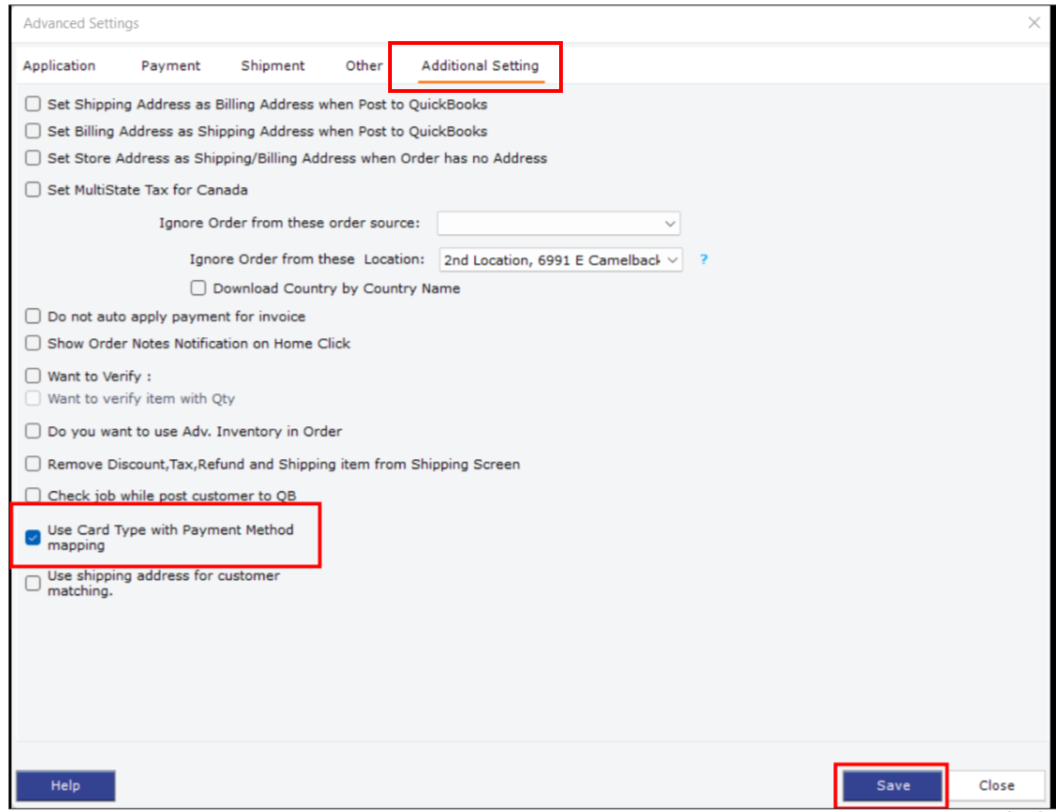
In the Advanced Settings page, navigate to the Additional Settings tab.
-
Check the box for “Use card type with Payment method mapping.”
-
Click Save and close the window.
Go to Integration, click on Store, and select Advanced Settings.
In the Advanced Settings page, navigate to the Additional Settings tab.
Check the box for “Use card type with Payment method mapping.”
Click Save and close the window.
Mapping Explained
To add a new payment method:
-
Identify the Payment Gateway: Determine the name of the payment gateway (e.g., Shopify, PayPal, Stripe).
-
Specify the Card Type: Specify the card type (e.g., Visa, Mastercard, American Express).
-
Combine Gateway and Card Type: Combine the gateway and card type using a colon (:) as a separator without spaces. For example:
-
Shopify:Visa -
PayPal:Mastercard -
Stripe:American Express
-
Identify the Payment Gateway: Determine the name of the payment gateway (e.g., Shopify, PayPal, Stripe).
Specify the Card Type: Specify the card type (e.g., Visa, Mastercard, American Express).
Combine Gateway and Card Type: Combine the gateway and card type using a colon (:) as a separator without spaces. For example:
-
Shopify:Visa
Shopify:Visa
-
PayPal:Mastercard
PayPal:Mastercard
-
Stripe:American Express
Stripe:American Express
Add New Payment Method
-
Navigate to Integrations, select Accounting/POS/ERP, and then choose Posting Settings.
-
Now under the order section, click on Set up for Configure Mappings option
-
On the payment mapping page, enter the combined gateway and card type (e.g.,
Shopify:Visa) in the "Add New Payment Method" section. -
Click "Add New Method."
-
Click Save at the bottom left corner.
Navigate to Integrations, select Accounting/POS/ERP, and then choose Posting Settings.
Now under the order section, click on Set up for Configure Mappings option
On the payment mapping page, enter the combined gateway and card type (e.g., Shopify:Visa) in the "Add New Payment Method" section.
Click "Add New Method."
Click Save at the bottom left corner.
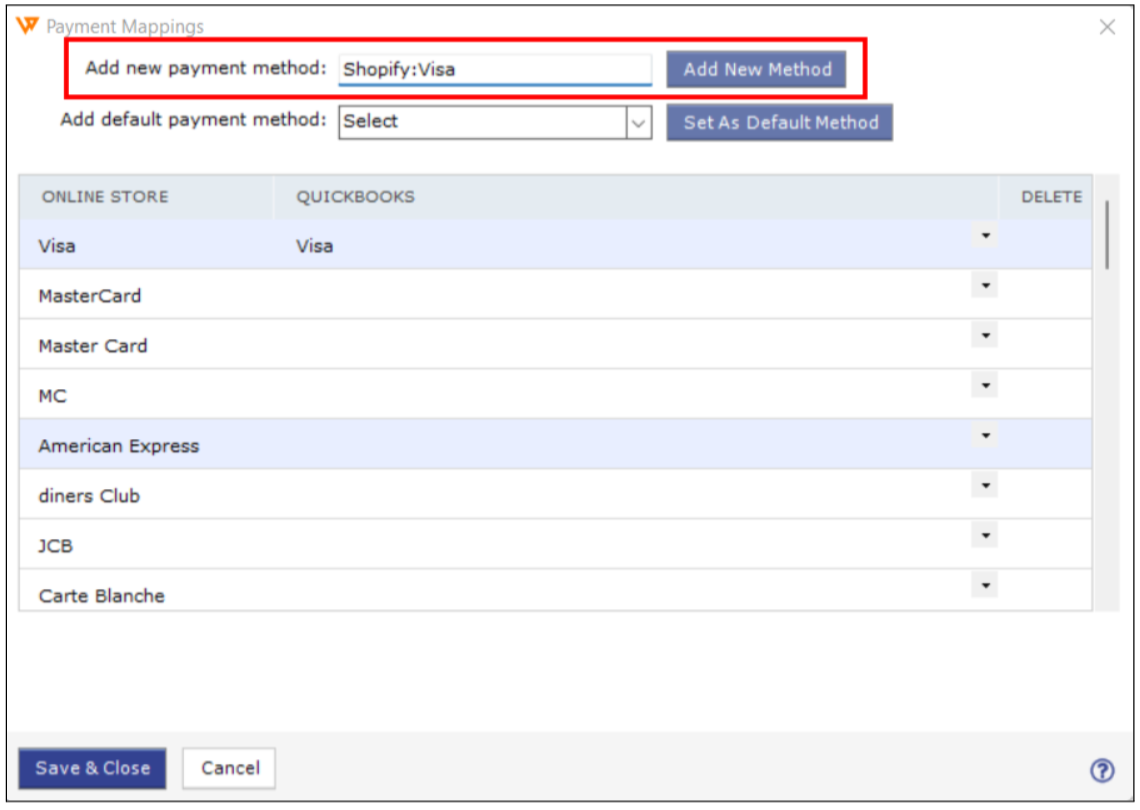
Once added, you can map them with their relevant QuickBooks payment methods and click Save.
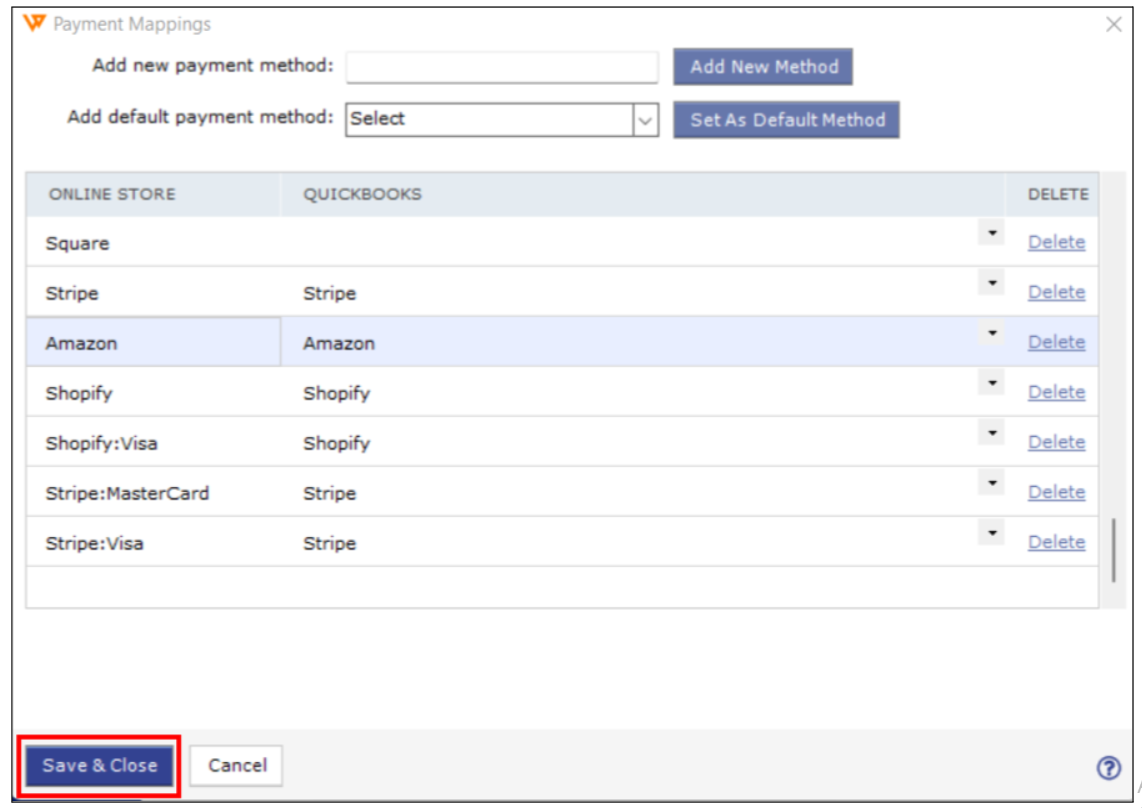
Ensure you click "Save and Continue" on the main order posting settings window. This will save your changes and allow you to move forward.
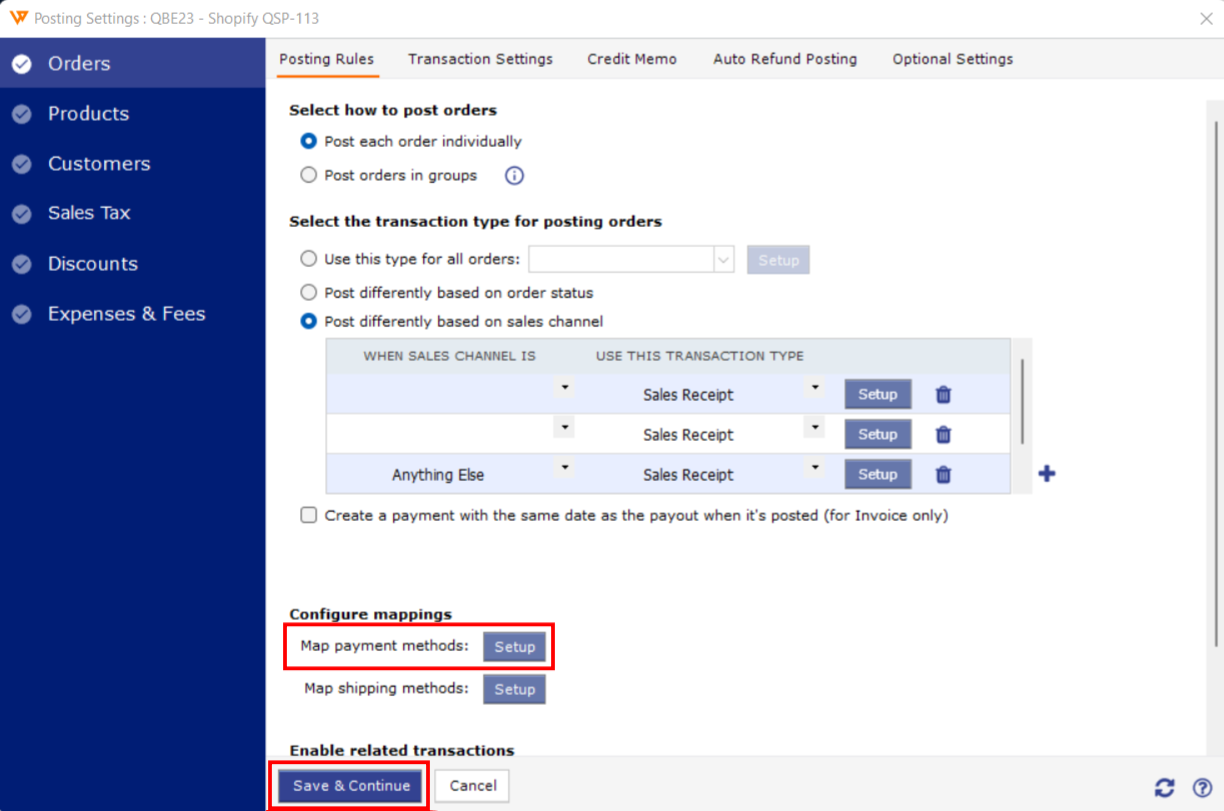
By following these steps, you can effectively map card types to their corresponding payment gateways in Webgility Desktop.
Posting Rules Based on Payment Method and Card Type
This mapping helps group various card types to their relevant payment gateways, allowing you to post all orders in QuickBooks according to your preferences.
Apply Posting Rules
-
Go to Integrations, select Accounting/POS/ERP, and then choose Posting Settings.
-
In the posting rule window, navigate to Orders, and click on Posting rules, and select Post orders differently based on payment method.
-
Here, all your mappings will appear in the payment method dropdown. On the right side, you can apply posting rules through the “Use this transaction type” and “Set up” options.
Go to Integrations, select Accounting/POS/ERP, and then choose Posting Settings.
In the posting rule window, navigate to Orders, and click on Posting rules, and select Post orders differently based on payment method.
Here, all your mappings will appear in the payment method dropdown. On the right side, you can apply posting rules through the “Use this transaction type” and “Set up” options.
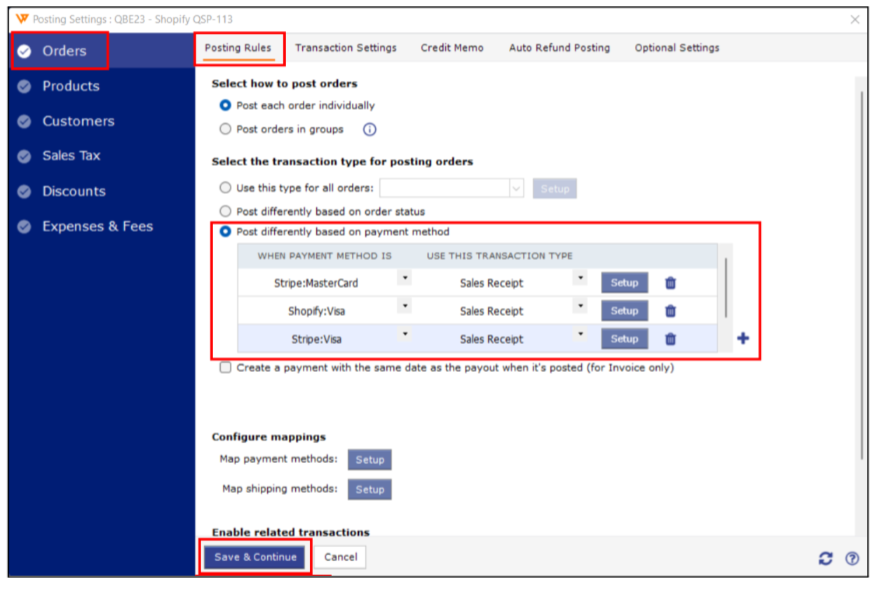
For more information on posting rules, refer to the help article below:
How to Post Transactions Based on Payment Methods in Webgility Desktop
If you need further help, please reach out to Support using the chat option.