
Root Cause
QuickBooks Enterprise caps the total number of names in each list (Customers, Vendors, Employees) at 14,500 by default. When Webgility Desktop tries to create a new customer, vendor, or employee record for an incoming order and that list is already at the cap, QuickBooks refuses the record and returns the error above. Webgility Desktop cannot bypass the limit — the limit is enforced inside QuickBooks itself. For the current list limits per QuickBooks version, see QuickBooks Company File Size Limitations.
Solution Steps
-
Read the error dialog and note the list name it points to (usually Customers). This tells you which list needs headroom.
-
Contact Intuit and request an increase to your Customers, Vendors, or Employees list limit. Intuit is the only party that can raise the cap; Webgility Support cannot do it on Intuit's behalf. Have your QuickBooks license number and company file name ready when you call.
- While you wait for Intuit to raise the limit, open QuickBooks and clean up the list Webgility Desktop is trying to add to. Deactivate customers you no longer trade with by opening the customer record, clicking Edit, and marking it inactive. Deactivated records still keep their history but do not count against the active-list cap in newer QuickBooks builds.
- Once Intuit confirms the limit is raised, restart Webgility Desktop and retry the failed order. It will post to QuickBooks against the new record it needed to create.
Important Note
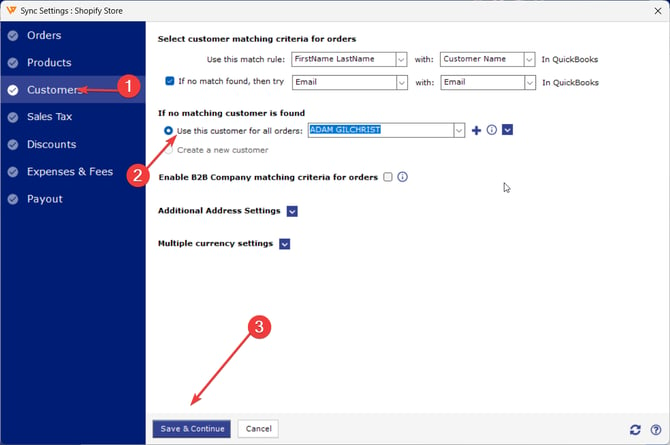
"Configuring Webgility Desktop to reuse a Standard Customer for all orders (instead of creating a new QuickBooks customer per shopper) is the long-term way to keep the list from filling up again. That setting lives under the Customer Settings tab in Sync Settings; make the change once, and every future order posts under the standard customer."
- In Webgility, go to Connections, then Accounting and Sync Settings.
- Go to the Customers Tab and select the standard customer.
Contact support@webgility.com with the exact error text, the QuickBooks list name that hit the limit, and confirmation from Intuit that the limit has been raised.