
A few formatting fixes to the source file are usually all that stands between a failed import and a full tax mapping. Once the file is clean, follow How to Import Tax Mapping Through CSV File in Webgility Desktop for the import steps.
Step 1: Open your tax file in Excel
Open the source spreadsheet that holds your tax jurisdictions and rates. Confirm each row has a value in the State Name, State Code, Tax Name, and Tax Rate columns.
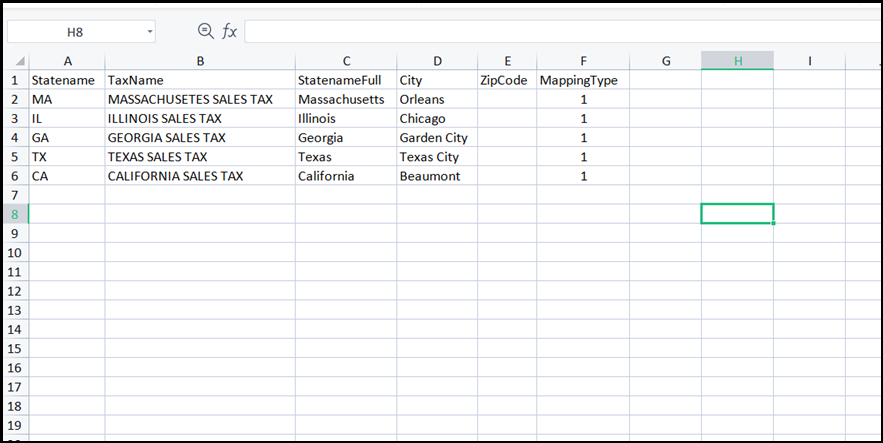
Step 2: Fill in blank State Name and State Code cells
Sort each column and delete any row that is missing the state name or the two-letter state code — those rows are the most common reason the importer reports missing-state errors.
Step 3: Remove duplicate jurisdictions
Use Excel's Remove Duplicates option on the combination of State Code and Tax Name so the file has one row per jurisdiction. Duplicate rows cause the importer to fail on the second read of the same code.
Step 4: Save the file as CSV (Comma delimited)
Choose File > Save As and pick CSV (Comma delimited) (*.csv) as the file type. Saving as an .xlsx workbook or CSV UTF-8 variant will cause the importer to reject the file.
Step 5: Import the file in Webgility Desktop
Open How to Import Tax Mapping Through CSV File in Webgility Desktop and follow it from Step 1 to bring the clean CSV into Webgility. You should see the tax rows appear in Setup Tax Locations once the import finishes.
If the importer still reports missing state names after a clean CSV, save the file to your desktop, close and reopen Webgility Desktop, and run the import again — Webgility may hold a lock on the previously imported file.Prepare a Tax Location File Before Importing It in Webgility Desktop
This article helps Webgility Desktop users build a clean tax location CSV so the import completes without missing-state or duplicate-code errors. A few formatting fixes to the source file are usually all that stands between a failed import and a full tax mapping. Once the file is clean, follow How to Import Tax Mapping Through CSV File in Webgility Desktop for the import steps.
Step 1: Open your tax file in Excel
Open the source spreadsheet that holds your tax jurisdictions and rates. Confirm each row has a value in the State Name, State Code, Tax Name, and Tax Rate columns.
Step 2: Fill in blank State Name and State Code cells
Sort each column and delete any row that is missing the state name or the two-letter state code — those rows are the most common reason the importer reports missing-state errors.
Step 3: Remove duplicate jurisdictions
Use Excel's Remove Duplicates option on the combination of State Code and Tax Name so the file has one row per jurisdiction. Duplicate rows cause the importer to fail on the second read of the same code.
Step 4: Save the file as CSV (Comma delimited)
Choose File > Save As and pick CSV (Comma delimited) (*.csv) as the file type. Saving as an .xlsx workbook or CSV UTF-8 variant will cause the importer to reject the file.
Step 5: Import the file in Webgility Desktop
Open How to Import Tax Mapping Through CSV File in Webgility Desktop and follow it from Step 1 to bring the clean CSV into Webgility. You should see the tax rows appear in Setup Tax Locations once the import finishes.
If the importer still reports missing state names after a clean CSV, save the file to your desktop, close and reopen Webgility Desktop, and run the import again — Webgility may hold a lock on the previously imported file.