
Overview
When Shopify refunds post to your main operating bank account instead of the Shopify Clearing Account, your payout no longer reconciles — the refund is already netted inside Shopify's deposited payout, but QuickBooks sees it as a second withdrawal from the operating account. Setting the refund posting to the Shopify Clearing Account in Webgility Desktop keeps the sale, the payout deposit, and the refund in the same clearing bucket, so the account balances to zero after each payout.
When This Applies
Use these steps when Shopify refunds posted through Webgility Desktop are landing in your main operating bank account in QuickBooks Desktop (for example, Chase Business Operating), and the Shopify payout no longer matches, leaving a gap between the refund amount and the payout deposit.
Why This Happens
Shopify's payout already nets refunds against sales before depositing the balance. If Webgility Desktop posts the refund to a different account from the one the payout is deposited to, the two sides never cancel out: the refund appears as a withdrawal from the operating bank, and the payout deposit shows the full net amount. Pointing the refund posting at the Shopify Clearing Account keeps every piece of a single payout in one place.
Important Note
If a Shopify Clearing Account does not yet exist in QuickBooks, create one as a Bank-type account in the QuickBooks Chart of Accounts first. The Select bank account dropdown in Webgility only lists Bank-type accounts from QuickBooks.
Steps to Point Shopify Refunds at the Shopify Clearing Account
- Open Webgility Desktop and go to Connections > Accounting / POS / ERP > Sync Settings > Orders > Posting Rules.
- Under Enable Related Transactions, check Credit Memo and Automated Refund Posting. These two checkboxes reveal the Credit Memo and Auto Refund Posting horizontal tabs where the account and behavior are set. The full refund workflow — including the shopping-cart-side refund that must come first — is in How to Process Returns and Refunds with Webgility Desktop.
- Open the Credit Memo tab and fill in your QuickBooks defaults — A/R Account, Transaction Class, Sales Rep, Credit Memo Template, and Terms — then click Save & Continue.
- Open the Auto Refund Posting tab, select Create credit memo (recommended for Shopify refunds), and set Select bank account to the Shopify Clearing Account. Click Save & Continue.
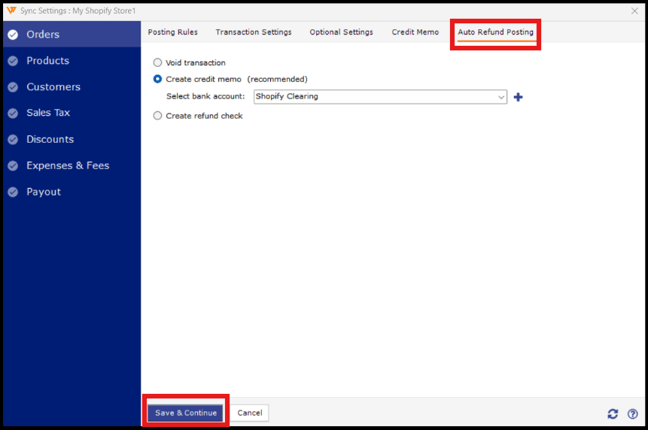
- Verify the deposit account is the same across Invoice, Payout, and Refund settings. Open each of the following and confirm all three point at the Shopify Clearing Account:
- Sync Settings > Orders > Posting Rules — the Invoice (or Sales Receipt) setup — the account the sale deposits to.
- Sync Settings > Payouts — the account where the Shopify payout deposit is recorded.
- Sync Settings > Orders > Auto Refund Posting — the Select bank account dropdown you set in Step 4.
- Repost one recent refund from the Posted Orders tab and open the resulting QuickBooks transaction to confirm it posts to the Shopify Clearing Account.
Key Recommendation
After the first refund posts correctly, pull the payout report for that payout date and confirm the Shopify Clearing Account balance returns to zero once the payout deposit is also posted. A zero balance after each payout is the reconciliation signal that the refund mapping is working.
Additional Support
If refunds continue to post to the operating bank after the setting change, open a Webgility support ticket with the refund order number, the matching Shopify payout ID, and a screenshot of the Auto Refund Posting tab showing the Select bank account value.