
You can configure Webgility Desktop to carry the full combined sales tax your sales channel calculated — state tax plus any county, city, or district surtax — through to QuickBooks on each posted transaction. One setting lives on the sales channel (how tax is downloaded) and the other lives in Sync Settings (how tax posts).
When This Applies
Use these steps when your sales channel shows the full combined rate (for example, 7.5% in Hillsborough County, Florida — 6% state plus 1.5% county) but QuickBooks is only receiving the state portion. The data on both sides is usually correct when viewed separately; the gap is in how the combined tax is downloaded and then posted.
How It Works
If the Download Options setting Get sales tax as a line item is on, Webgility Desktop pulls the tax into the order as a regular line item and the order's tax box downloads as zero. The Sync Settings > Sales Tax mode then decides what Webgility sends into QuickBooks' tax field at the bottom-right of the transaction while the tax lines pass through as part of the order.
Steps to Post Combined Tax as Line Items
Step 1: In Webgility Desktop's top-right, switch to the sales channel that collects the combined tax (if you have more than one connected).
Step 2: Go to Connections > Sales Channels > Settings and open Download Options. Turn on Get sales tax as a line item and pick the QuickBooks item you want the tax to post against (see How to configure the Sales Channel Settings in Webgility Desktop for the full set of Download Options on this screen). Save.
Step 3: Go to Connections > Accounting/POS/ERP > Sync Settings and open the Sales Tax sub-tab. Select Record sales tax calculated from Sales Channel in QuickBooks, then fill Select a sales tax item for taxable orders and Select a sales tax item for non taxable orders with your QuickBooks tax items (for example, TAX and NON). Because the order's tax box downloads as zero (Download Options is sending the tax amount as line items), Webgility sends the non-taxable item into QuickBooks' tax field at the bottom-right of the transaction while the tax lines themselves post as part of the order (see Recommended Settings for Sales Tax for Webgility Desktop for the fuller walk-through of each item pick).
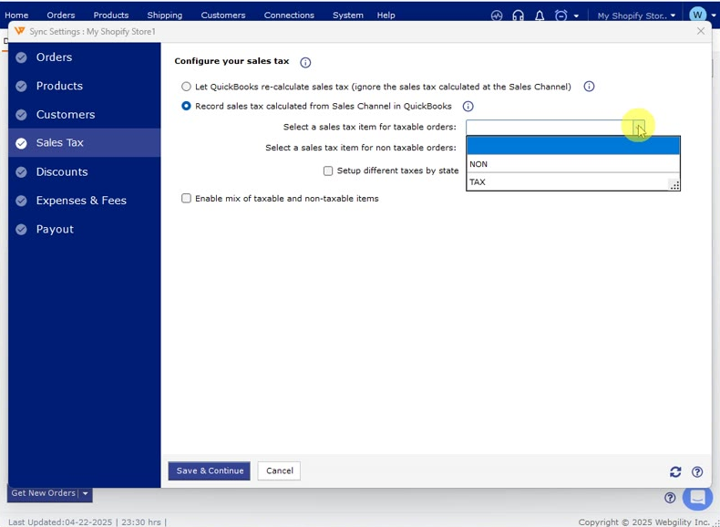
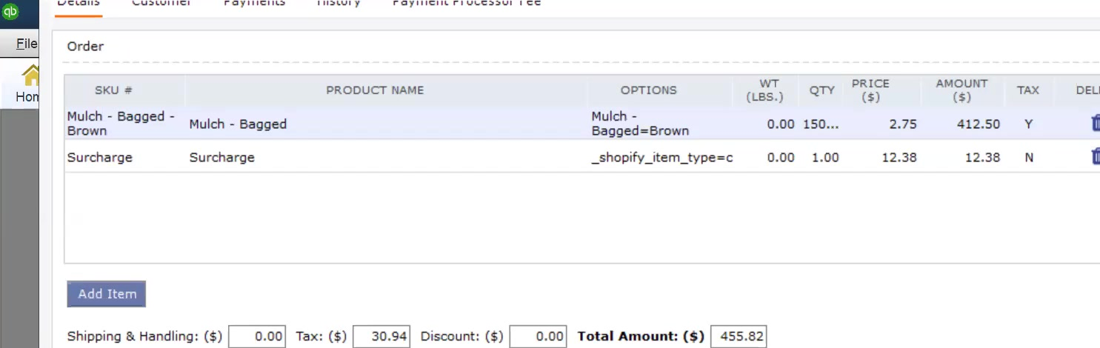
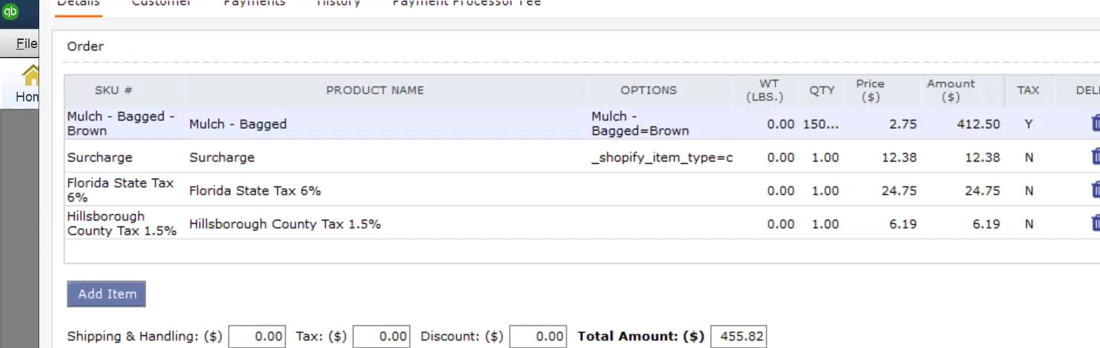
Step 4: Save & Continue, then redownload one test order from a county that includes the surtax. The order should now show separate line items for the state tax and the county tax, with the Tax box dropping to $0.00 and the Total Amount staying the same. Post it to QuickBooks and open the resulting transaction — the two tax lines should add up to the combined rate your sales channel calculated.
Before — the same order downloads with the combined tax ($30.94) sitting in the Tax box and no per-jurisdiction line items:
After — the same order downloads with the state and county portions as their own line items, the Tax box drops to $0.00, and the Total Amount is unchanged:
Important Note
Note: Pick a QuickBooks non-taxable item for the "Select a sales tax item for non taxable orders" dropdown. With Download Options sending the tax as line items, the order's tax box is zero, so Webgility routes that non-taxable item into QuickBooks' tax field at the bottom-right of the transaction — that tells QuickBooks not to add any address-based tax on top of the line items Webgility already sent. "Setup different taxes by state" (the Tax Nexus mapping grid) is only needed when you want Webgility Desktop to map state and county to specific QuickBooks tax items itself — if your channel is already sending tax as line items, leave that checkbox off.
Key Recommendation
Run one test order per unique jurisdiction combination you ship to before posting live orders. That surfaces any missing county or district on the channel side while you can still correct it quickly, instead of after a batch of transactions has already posted and needs reversing. Repeat Step 2 for every sales channel that collects combined tax — the Download Options setting is per channel.
Further Assistance
If the QuickBooks total still does not match the combined tax after you complete these steps, contact Support with the order number, the sales channel's tax breakdown for that order (state and each surtax), and a screenshot of your Sync Settings sales-tax section so we can walk the mapping with you.