
Problem Description
A customer uses QuickBooks Advanced Inventory with several inventory sites and has mapped their sales channel products to one specific site/bin location. Webgility does not show the quantity of the mapped site.
Typical symptoms
- Quantity in Webgility does not match the quantity of the mapped site in QuickBooks. In the example, QuickBooks showed 0 at the mapped site, but Webgility showed 3.
- The mismatch affects all store products, not just a single SKU.
- No error message appears. Only the quantities are wrong.
- The problem started right after a previous fix or update.
Root Cause
Webgility was downloading and displaying the quantity from the wrong inventory site. The product sync settings did not have the correct default inventory site selected, so the quantity did not come from the site the store products are mapped to. Quantities that were already downloaded stayed stale until the data was refreshed.
Resolution
Before you start
- Confirm which QuickBooks inventory site the sales channel products are mapped to.
- Choose a sample item and compare its quantity at that site in QuickBooks with the quantity shown in Webgility.
Steps
- Verify the mismatch. In QuickBooks, open the sample item and check its inventory site information. Note the quantity at the mapped site. Compare it with the quantity in Webgility.
- Open the product sync settings. In Webgility, go to the sync settings under the Product tab.
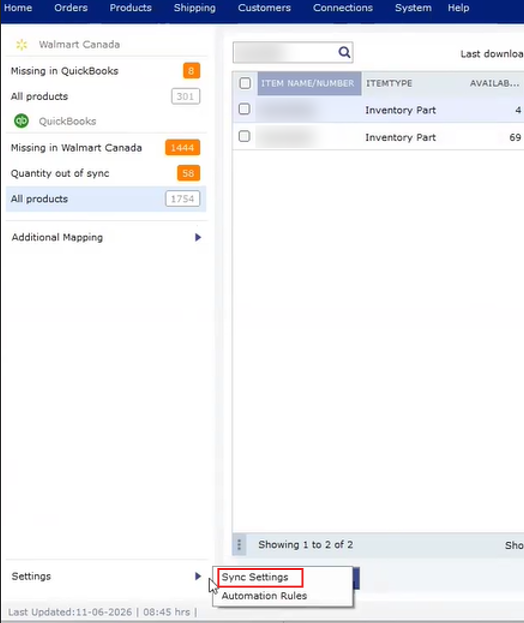
- Select the correct default inventory site. Set the default inventory site for syncing to the site your store products are mapped to. Save the settings.
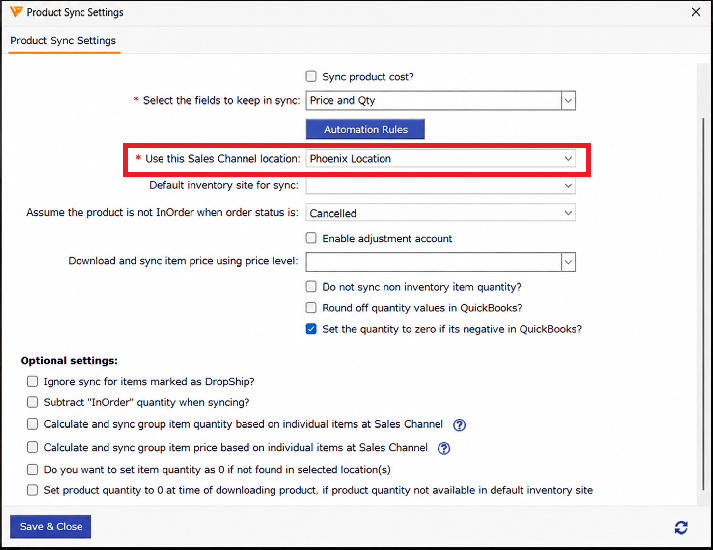
- Download the data from scratch. Run a full download of the data, so Webgility replaces the old quantities instead of reusing them. Refe to this help doc for instructions.
- Verify the result. Reopen the sample item in Webgility and confirm the quantity now matches the mapped site in QuickBooks. Spot check a few more items.
Expected result
Webgility shows the correct quantity for all Store items, matching the mapped inventory site in QuickBooks.
Prevention and Tips
- After any Webgility update or fix, check that the default inventory site in the product sync settings is still correct.
- If quantities look wrong again, repeat steps 2 to 4 before escalating.
If the Issue Continues
Collect the following and contact Webgility Support
- Screenshots of the item's inventory site details in QuickBooks and the matching quantity in Webgility
- Your product sync settings screen
- The Webgility logs and a database backup