
Overview
Webgility Desktop's Multi-Channel Product Sync allows you to control how product prices from QuickBooks are synchronized to connected sales channels.
You can configure price rules at the store level when the same pricing adjustment should apply to products on a sales channel. You can also use item-level settings when individual products require different price adjustments.
Price adjustments are applied during synchronization and do not change the actual price stored in QuickBooks. Webgility recalculates the price sent to the sales channel based on the configured rule.
Note: The exact price-rule options available may depend on your Webgility Desktop configuration and connected sales channels.
Step 1: Open Automation Rules
- Open Webgility Desktop.
- Go to Products > Settings > Automation Rules.
- The Automation Rules window contains settings for synchronizing product information between QuickBooks and connected sales channels.
Related article: How to Prevent Overselling with Inventory Automation
Step 2: Configure the Price Rule
Configure the Price setting for the eBay store according to the pricing adjustment you need.
If the available options include the following rules:
| Price Rule | When to use it | Example |
|---|---|---|
| More than QuickBooks | Add a fixed amount to the QuickBooks price | QuickBooks $50 + $5 = $55 |
| Percent more than QuickBooks | Increase the QuickBooks price by a percentage | QuickBooks $50 + 10% = $55 |
For example, if a product is $50.00 in QuickBooks and you configure More than QuickBooks with a value of $5.00, the synchronized price would be $55.00.
If you configure a 10% increase instead, a $50.00 QuickBooks price would result in a $55.00 synchronized price.
Important: The values above are examples only. Use the value appropriate for your pricing requirements.
Webgility's confirms that price rules can be used to adjust prices when synchronizing QuickBooks data to individual sales channels.
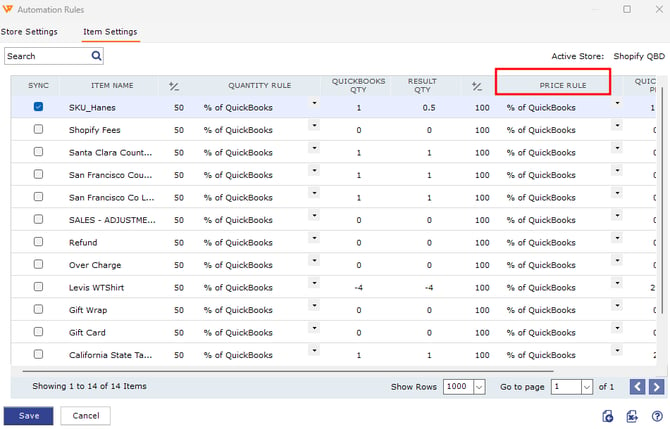
Step 3: Save the Configuration
After configuring the Price Rule:
- Review the selected eBay store and price rule.
- Click Save.
Step 4: Run the Price Synchronization
After saving the rule, run the applicable product/price synchronization from QuickBooks to the sales channel.
You can also manually sync products that are out of sync. The steps are: Products > Quantity/Price Out of Sync to identify and manually synchronize products with price or quantity discrepancies.
Once the synchronization completes, verify the updated price on the Sales Channel listing.
Related article: How to Automate Product Price Sync Between QuickBooks and Sales Channel