
Shopify orders download into Webgility Desktop as expected, but they stay in the pending view instead of being posted to QuickBooks, even with the Automator enabled and QuickBooks open. Restarting Webgility and the Automator posts the queued orders, but the problem returns. This article walks you through refreshing the QuickBooks connection and verifying the QuickBooks company file so posting stays automatic.
When This AppliesUse this guide when the pattern matches all of the following: orders are downloading into Webgility, the Automator shows as running, QuickBooks is open on the same machine, and the orders still need to be posted by hand. The pattern often starts after a QuickBooks reauthentication or a QuickBooks file move. The Scheduler log and Windows Event Viewer typically show QuickBooks connection errors around the posting attempts.
Why This HappensAutomatic posting depends on three things working together: a healthy integrated-application certificate between Webgility and QuickBooks, the "allow access even when QuickBooks is not running" permission on that certificate, and a QuickBooks company file that is not reporting integrity errors. If the certificate was invalidated during a prior reauthentication, the Automator posts intermittently or only when a user triggers an interactive QuickBooks session. If the company file has unresolved data issues, QuickBooks rejects the posting call, which Webgility reports as a connection error in the log.
Important Note
The Verify Data and Rebuild Data steps run on the QuickBooks company file itself. Make sure the file has a current backup and coordinate with whoever manages QuickBooks on your side before running Rebuild Data, because it edits the file in place.
Steps to Restore Automatic Posting
Step 1 — Regenerate the Webgility certificate inside QuickBooks
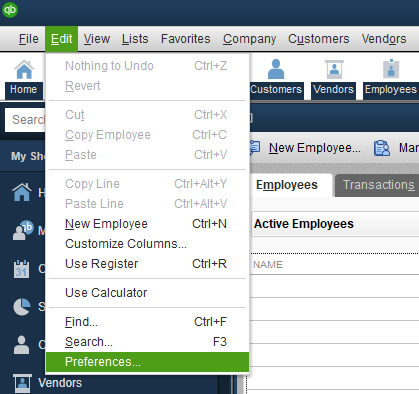
- In QuickBooks Desktop, open the company file as Admin in single-user mode and go to Edit > Preferences > Integrated Applications.
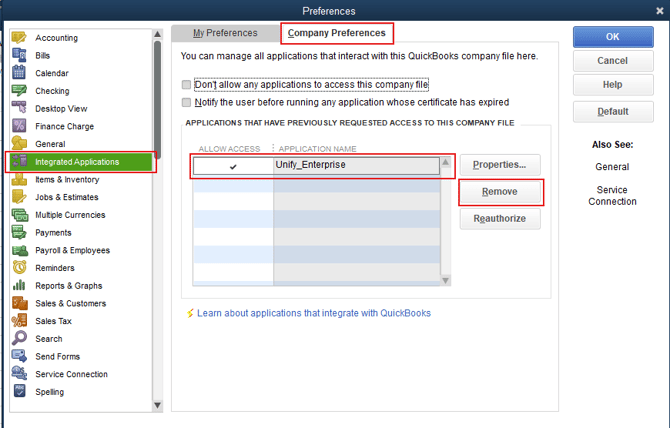
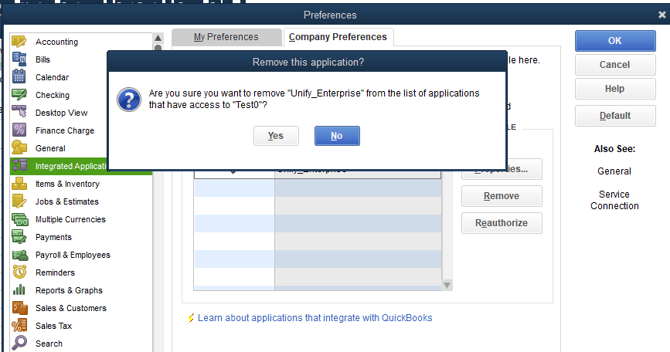
- On the Company Preferences tab, find Unify_Enterprise in the list, select it, and click Remove, then click OK.
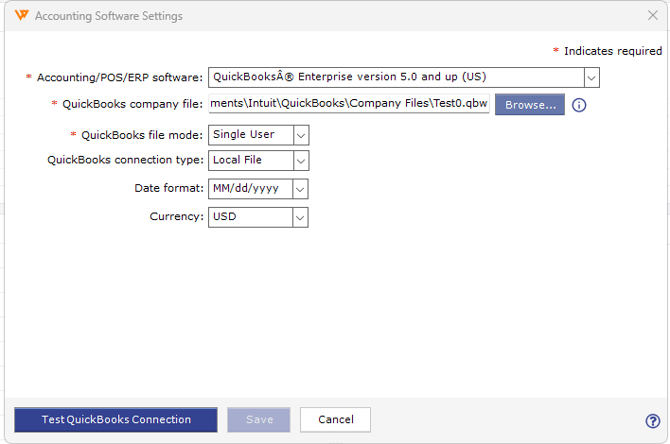
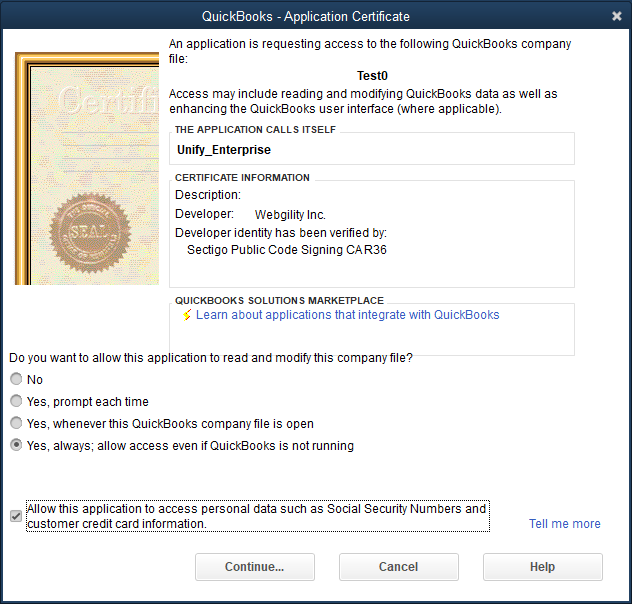
- Open Webgility Desktop and go to Connections > Accounting > Edit Connection, confirm the company file path, and reconnect. When QuickBooks displays the certificate prompt, choose Yes, always allow access even if QuickBooks is not running, and tick Allow this application to access personal data such as Social Security Numbers and customer credit card information only if your business requires it. For the full reconnection flow and screenshots, see How to Reconnect Webgility with QuickBooks Desktop.
Step 2 — Confirm Scheduler posts without manual intervention
- Open Webgility Desktop and start the scheduler from the Scheduler controls. For the general Scheduler setup and controls, see Scheduler Settings Overview.
- Place a small test order in Shopify, or pick an existing pending order, and let the Automator run through the next download and post cycle without a restart.
- After the cycle, confirm the order appears as posted in Webgility and shows in QuickBooks. If it does, the certificate refresh resolved the pattern.
Additional Support
If orders still post only after a manual Webgility restart once Steps 1 to 2 are complete, email the Webgility Scheduler log for the posting window plus a screenshot of the Integrated Applications Properties screen to support@webgility.com, and we will review the configuration with you.