
Problem Description
Your Shopify orders post to QuickBooks and the invoice ends up with a credit balance. The invoice total looks lower than the payment amount recorded against it, so QuickBooks flags the invoice as overpaid. You did not receive an extra payment — the difference is exactly the Shopify processing fee.
Root Cause
Your Webgility Desktop fee-posting setting is configured to record the Shopify (or PayPal / other processor) fee as a line item on the invoice. That line item reduces the invoice total by the fee amount, but the payment Webgility records against the invoice is the original gross amount from your sales channel — the amount before the processor took its cut. The payment (gross) is now higher than the invoice (net of the fee), so QuickBooks marks the invoice as overpaid, creating a credit balance. The fix is to switch the fee-posting setting from Line Item to a separate Bill (Paid) or Expense transaction, so the invoice keeps its full gross amount and matches the payment exactly.
Solution Steps
Step 1: Before changing settings, take a database backup from Webgility Desktop so you can roll back if needed.
Follow the help article to create a database backup. If you are not sure how? Learn here
Then confirm on one affected order in QuickBooks: the invoice line items add up to the gross Shopify order total minus the processor fee, and the payment attached is the full gross Shopify total. That difference is the credit balance you are seeing.
Step 2: In Webgility Desktop, open Sync Settings > Expenses & Fees > Payment Fees (the full field reference for this screen is at How to Configure PayPal Fee Posting Settings in Webgility Desktop — the same screen and options apply to Shopify fees). Find the row for the payment processor that is causing the credit balance (Shopify, PayPal, or another). Change Record payment fees as from Line Item to Bill (Paid). This tells Webgility to post the fee as its own separate Bill (already paid) transaction in QuickBooks instead of adding it as a line to the sales invoice. Save the setting.
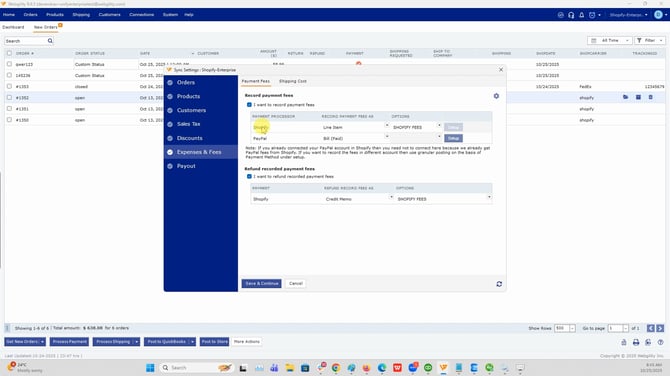
Step 3: Unpost and repost a test order that was previously showing the credit balance. Open the resulting invoice in QuickBooks and confirm the invoice total is now the full gross Shopify amount, the payment attached matches it exactly (no credit balance), and the fee appears as its own Bill (Paid) transaction against the account you selected in the fee posting settings.
Important Note
Do this change during off-hours and test on one order first — switching fee posting from Line Item to Bill (Paid) affects every future order for that payment processor, and any historical invoices already posted with the Line Item approach will not automatically adjust. If you want the historical invoices corrected too, they need to be unposted and reposted one by one after the setting is saved. If your business intentionally uses the Line Item approach for some reporting workflow, coordinate with your accountant before switching.
Further Assistance
If invoices continue to show a credit balance after the Payment Fees setting is switched to Bill (Paid) and a test order is reposted, contact Webgility Support with the affected sales channel order number, the QuickBooks invoice number, a screenshot of your Sync Settings > Expenses & Fees > Payment Fees configuration, and a database backup so Support can trace how the payment and fee are being posted.