Overview:
A Pick List is a document used in warehouse management to guide staff in retrieving items for orders. Displaying both the inventory site (warehouse location) and bin location (specific storage spot) enhances efficiency by enabling faster order fulfillment, reducing errors, optimizing workflow, improving stock visibility, and supporting multi-site operations. This ensures accurate picking, minimizes delays, and streamlines warehouse operations. To ensure your picklist includes Inventory Site and Bin Location details, a specific configuration process is required. Without this configuration, your picklist will display in its default format, as illustrated below.
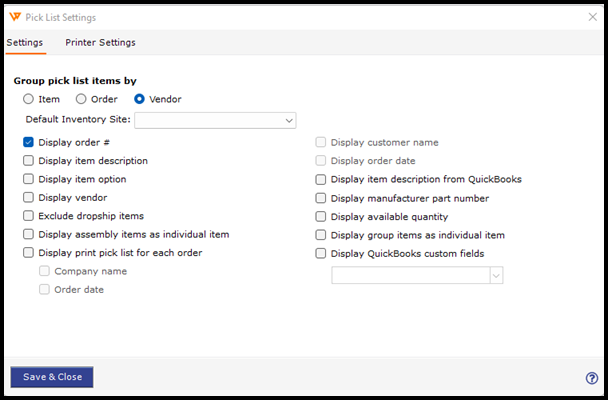
To configure Pick List settings in Webgility Desktop navigate to Shipping in the menu option and goto Pick List. This will open a window where you can select all the options for the order and item related data that you want to show on the Pick List.
Verifying Advance Inventory in QuickBooks Desktop
To incorporate Inventory Site and Bin Location data into your Pick-Lists, it is necessary to activate the Advanced Inventory features within QuickBooks Desktop. Here are the steps to access these settings directly within QuickBooks Desktop
Note: You can't completely disable the Advanced Inventory module itself once activated.
-
Open QuickBooks Desktop. with Admin user in single-user-mode.
-
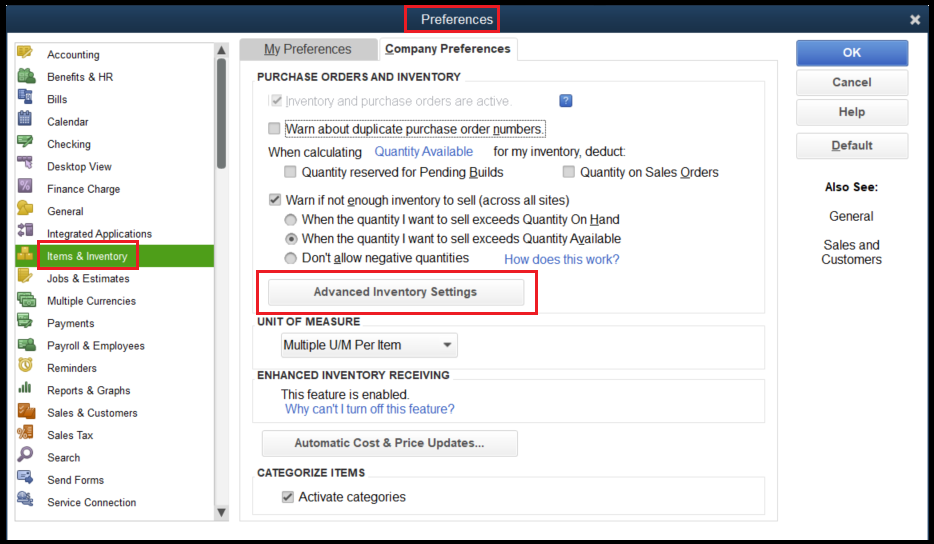
From the Edit menu, select Preferences.
-
In the left pane, choose Items & Inventory, then go to the Company Preferences tab.
-
Ensure the Inventory and Purchase Orders are Active box is checked.
- Click on the Advanced Inventory Settings button.

-
Enable the option of Multiple inventory site by checking the box. Once done then click on Ok and then Ok again.
Note: If the Advanced Inventory Settings button is grayed out, you may need to sync your license data online to activate it.
Accounting Data Refresh in Webgility Desktop
Following the activation of Advanced Inventory settings within QuickBooks Desktop, please synchronize this information with Webgility by downloading latest accounting data.
Follow the steps in this helpful article on How to Download the Latest Accounting Data from Scratch - Webgility Desktop
Verify Advance Inventory on Pick list
After downloading the data from QuickBooks Desktop in Webgility desktop, check the Picklist settings under Picklist in Shipping tab.
Pick List settings should now allow you to configure the Inventory site & bin location.