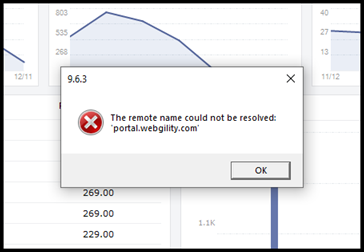
In this article, we will learn about how to resolve the error, “The Remote Name Could Not Be Resolved ‘portal.Webgility Desktop.com’”
Cause of the error:
-
The error message "Remote name could not be resolved" typically indicates a problem with DNS resolution.
-
This usually occurs when Webgility Desktop is unable to resolve the domain name (remote name) of [https://portal.Webgility.com/] to its corresponding IP address.
-
Without a valid IP address, Webgility Desktop cannot establish a connection to the remote server (portal.Webgility.com).
Common reasons for these errors:
-
DNS Issues
-
Network Connectivity Issues
-
Server Unavailability
-
Typo in the domain name
Steps to fix this error:
Note: These steps need to be followed in the presence of a System Administrator.
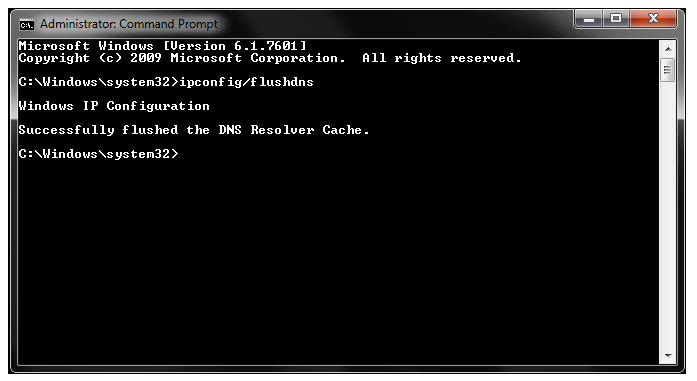
1). On the computer where Webgility Desktop is installed (aka server computer for Webgility Desktop), launch the command prompt with “Run as Administrator”
2). On the command prompt, enter the command, “ipconfig /flush DNS”. Press Enter.
3). Close the command prompt after you see the message, Successfully flushed the DNS Resolved Cache.
4). On the same computer machine, C:\Windows\System32\drivers\etc.
5). Find a file with the name, hosts.
6). Right-click on the file “hosts”.
7). Click Open with Notepad.
8). Now at the very bottom of the file content add the IP address 34.215.85.106 portal.Webgility Desktop.com
9). Save the file.
10). Once the above steps are complete, launch Webgility Desktop.