Overview:
When posting orders to QuickBooks, there might be a situation where the orders are posting correctly but the inventory is not getting deducted from the correct inventory site. This is a common scenario when using advanced inventory in QuickBooks, however, the QuickBooks inventory sites are not correctly configured in Webgility Desktop.
In this article, we will show the steps needed to make sure the orders get posted to the correct inventory site.
There are two scenarios and we will go through each one of them one by one.
Case A:
Using Advance Inventory in Webgility Desktop and setting Item Level Mapping of the items in Webgility Desktop to have them use a specified inventory location in QuickBooks.
First, download the latest data and settings by going to Connections > Get Latest Data and Settings and Re-Download all the data.
For help on re-downloading all data, you can refer this article
Once this is done, go to Products> Additional Mappings> Inventory Site
When Inventory Site is selected you will get a new window. Here check the order items which are not getting posted to the correct inventory site. Map them with the correct Inventory site and Bin location.
You can leave the Bin Location blank if you are not using bin locations. Once the mapping is done, save your mapping selections by clicking Save.
Case B:
This is the case where you set up a Default Inventory Site and want to deduct the item quantity from this specified inventory site for all products.
1). This will be the site from where the quantity will be deducted while posting orders.
2). If the quantity is not available in the Default Inventory Site (quantity is zero) then it will create a negative entry in Unassigned.
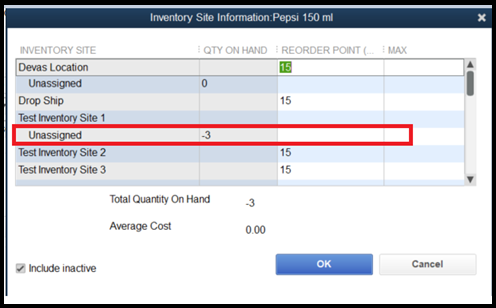
If you have opted to track inventory in multiple locations (as shown in the screenshot below), and have mapped the locations with the correct inventory site in QuickBooks, make sure that the quantities are updated in the mapped inventory sites.
Advanced inventory in Webgility Desktop, using multiple inventory sites, has a default that if the quantities are not available in the mapped inventory sites, they will be deducted from the default inventory site.
Note: If the quantities are not available in the mapped inventory site, Webgility Desktop will check the default inventory site. If the quantities are not available in the default inventory site as well, it will create a negative entry and record it in the Unassigned inventory site.