Here’s how you can check and fix it:
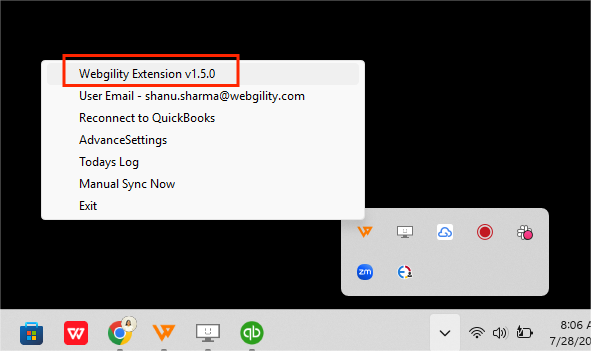
Check Your Webgility Desktop Extension Version:
- Make sure it’s version v1.5.0. To check, look for the Webgility icon in the System Tray (bottom-right corner of your screen). Right-click on it to see the version.
Update if Needed:
-
If your version isn’t v1.5.0, then download and update it. Follow the steps in this helpful article on: Update Your Webgility Desktop Extension
Reconnect Webgility to QuickBooks:
-
After updating, right-click on the Webgility icon in the System Tray and choose “Reconnect to QuickBooks.”
Choose Your QuickBooks Version:
- Pick your QuickBooks version from the dropdown menu.
Find Your QuickBooks File Location:
-
Log in to QuickBooks as Admin. Press F2 to open the “Product Information” window. Look for “Company File Location,” copy it, and click OK to close the window.
Enter File Location in Webgility:
- In Webgility, enter the QuickBooks Company File Location you copied.

Connect to QuickBooks:
-
Click “Connect to QuickBooks” in Webgility.
Allow Access:
- A pop-up will appear in QuickBooks asking for permission. Select “Yes, always; allow access even if QuickBooks is not running.” Choose “Admin” from the dropdown for login, and click “Continue.”
Finish Setup:
-
Click “Done” on the next window.
Confirm Connection:
-
If everything worked, you’ll see a message saying you’re connected to QuickBooks. Click “OK,” then “Save and Close.”
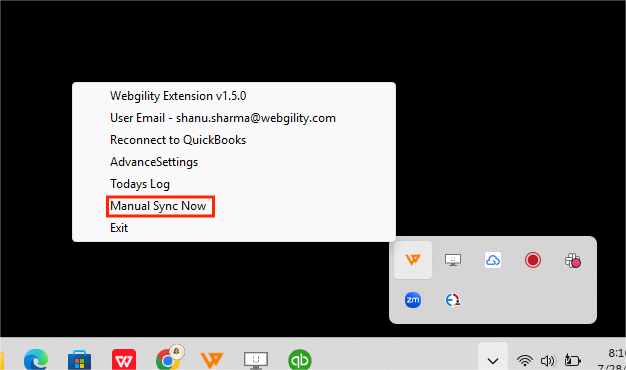
Sync Webgility:
- Open Webgility (if it didn’t open automatically). Right-click the Webgility icon in the System Tray and click “Manual Sync Now.”
Check the Connection:
-
Refresh the Webgility Online screen. You should see a green checkmark on the Webgility Desktop Extension icon.