1. Troubleshooting QuickBooks Online Connection Issues
Webgility Online connects to QuickBooks Online using secure OAuth credentials. If the authentication token expires or is revoked, you'll need to reauthorize the connection.
Steps to Reconnect QuickBooks Online:
1) Log in to Webgility Online and go to: Connections > Accounting Platform
Note: Take screenshots of your current configuration before reconnecting a new company file as this process auto resets the existing configuration.
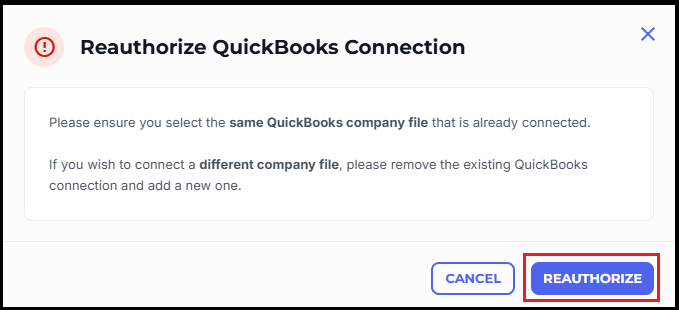
2) Navigate to your existing QuickBooks Online connection and reconnect by clicking on Reauthorize and accept the notification by clicking on the Reauthorize button.
4) Continue further with the reconnection process and reconnect same QuickBooks Online file as the admin into Webgility Online.
2. Troubleshooting QuickBooks Desktop Connection Issues
The Webgility Desktop Extension facilitates communication with QuickBooks Desktop. If you’re encountering sync or connection errors, follow the steps below:
A) Reinstall the Webgility Desktop Extension
-
Use the latest installer provided in link
-
Reconnect and test the connection to QuickBooks after reinstallation.

B) Use Matching Login Credentials
-
Log into the Webgility Desktop Extension using the same credentials as your www.webgility.com login.

C) Confirm the QuickBooks Company File Path
-
Open QuickBooks in Single-User mode using an Admin account.
-
Press F2 and copy the path listed under "File Information".
-
In the system tray, right-click the Webgility Desktop Extension > Remove old file path > Paste the new one.
-
Click Connect to QuickBooks. If successful, you’ll see a “Successfully connected to QuickBooks” message.

If you encounter a “COM Class” error during this step, continue with the following fix.
3. Connect Webgility Desktop Extension to QuickBooks Desktop
A) Close all Webgility Desktop Extensions and QuickBooks Desktop applications.
-
Navigate to: C:\Webgility\UnifyExtension
-
Right-click UnifyMergeModule.msi and select Install.
B) Launch the Webgility Desktop Extension and open the connection window.
-
Click Connect to QuickBooks.
C) When QuickBooks prompts with an Application Certificate:
-
Select “Yes, always allow access even if QuickBooks is not running”.
-
Under “Login as”, select Admin.
-
Confirm by clicking Yes.
D) Finalize the connection:
-
Click Continue > Done in QuickBooks.
-
In Webgility, click OK, then Save & Close.
