How to Activate Webgility within QuickBooks Enterprise 2022
This article provides detailed steps to activate Webgility Desktop within QuickBooks Enterprise 2022. It guides users through the activation process starting from QuickBooks Desktop, including navigating to the company page, selecting the e-commerce integration option, and using Webgility Desktop account credentials to complete activation. The article also covers troubleshooting an error that appears if Webgility is accessed before activation and explains how to verify the successful integration by checking for the e-commerce integration tile within QuickBooks Desktop.
Follow these steps to activate Webgility within QuickBooks Enterprise 2022.
In Webgility Desktop:
To get started, you will need to activate your Webgility account from within QuickBooks Enterprise. If you try to log in to Webgility before activating your account, you will see the following error message.
-4.jpg)
In QuickBooks Desktop:
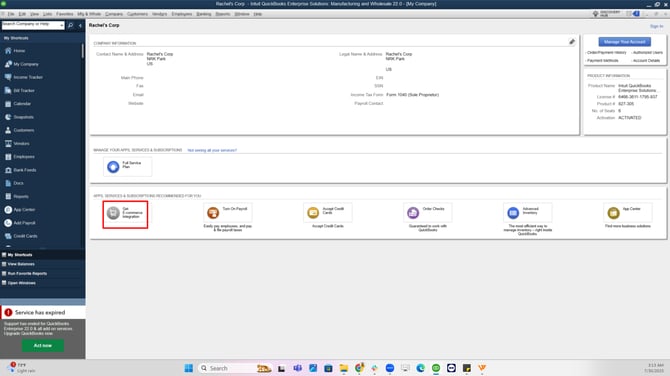
1. To activate your Webgility account, log in to QuickBooks as the admin user and access the company page by navigating to Company > My Company.
2. Then, select the Get E-commerce Integration option. After making this selection, you will be taken to the activation screen.

3. Click Activate button and use your Webgility account credentials to activate the integration.
-4.jpg?width=566&height=938&name=rtaImage+(87)-4.jpg)
4. Alternatively, you can learn more about this integration and create a new account using the Learn More link.
-3.jpg?width=571&height=945&name=rtaImage+(88)-3.jpg)
5. After clicking Activate, you will be redirected to a login page where you will activate the integration with your Webgility account. Simply enter your Webgility credentials and click Sign in.
-2.jpg?width=580&height=312&name=rtaImage+(89)-2.jpg)
6. Webgility will then connect to QuickBooks, and activate your integration.
-3.jpg?width=593&height=379&name=rtaImage+(91)-3.jpg)
7. Upon successful activation, click Done and log in to QuickBooks again.
-3.jpg?width=597&height=1018&name=rtaImage+(92)-3.jpg)
8. To verify the activation, go to the My Company page in QuickBooks Desktop. You should see an E-commerce Integration tile.
-3.jpg)
Note: Reopening the company file is required in order to see the update for the E-Commerce Integration tile.