Overview:
Integrate your BigCommerce store with Webgility Desktop to streamline operations, whether you serve B2C or B2B customers. Follow these steps to get connected and optimize your sales management.
Steps for the connection:
Step 1.
If you are connecting your first sales channel in Webgility, after you log in you will be prompted to Add Store.
If you're adding an additional sales channel, navigate to Connections, then Sales Channels, and select Add a New Sales Channel.
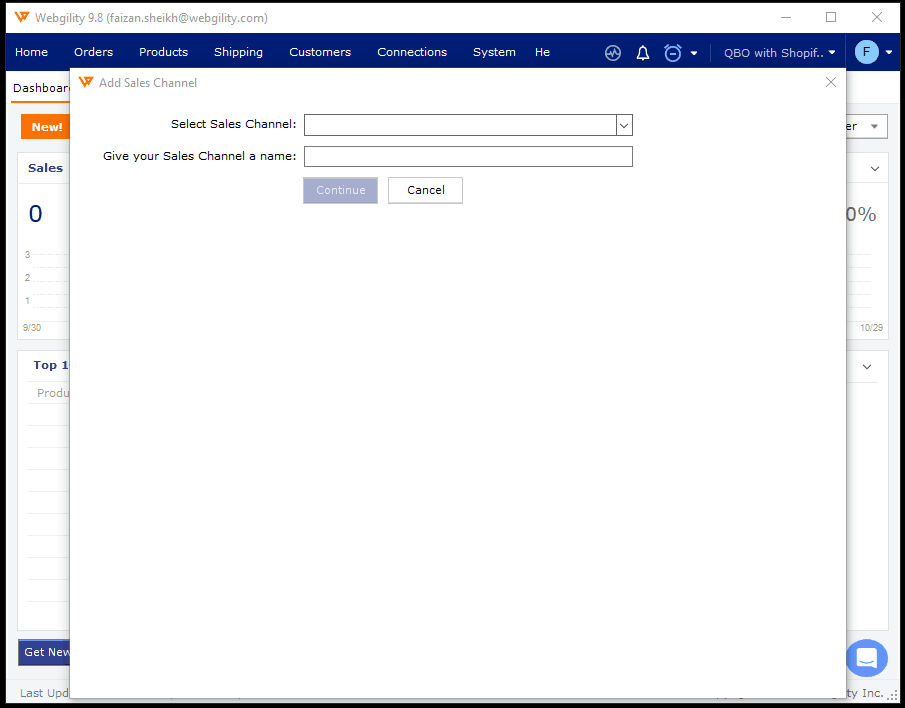
Step 2.
In the Add Sales Channel screen, select the sales channel type as Bigcommerce and give your sales channel a name. Click Continue.
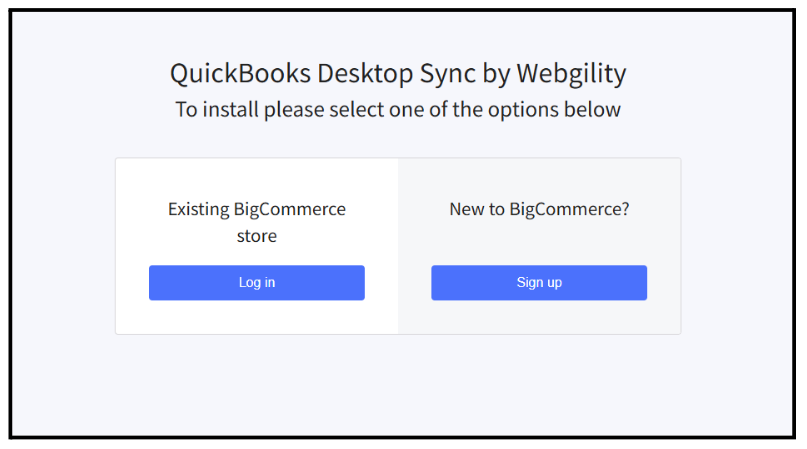
Step 3.
You'll be redirected to the BigCommerce login screen. Select the option to log in to an existing BigCommerce account and proceed.
Step 4.
On the "Log in to Your Store" screen, enter your BigCommerce admin login credentials and select "Login."

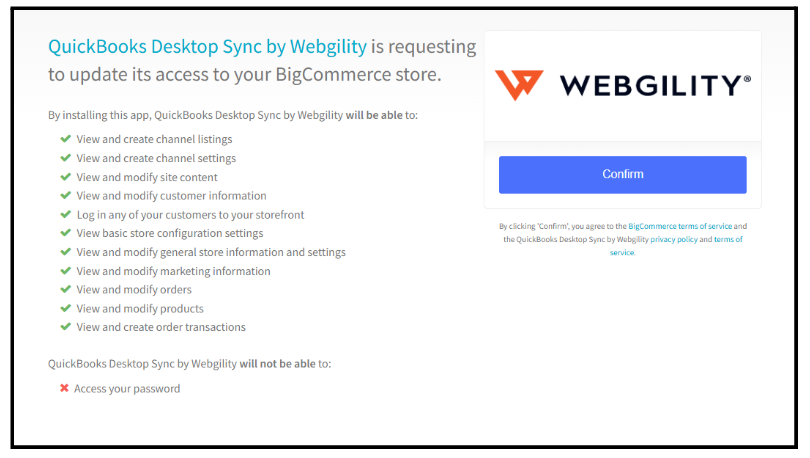
Step 5.
You may need to approve the connection with BigCommerce through two-factor authentication. Once complete, Confirm the connection and Webgility will connect to your BigCommerce store.
Step 6.
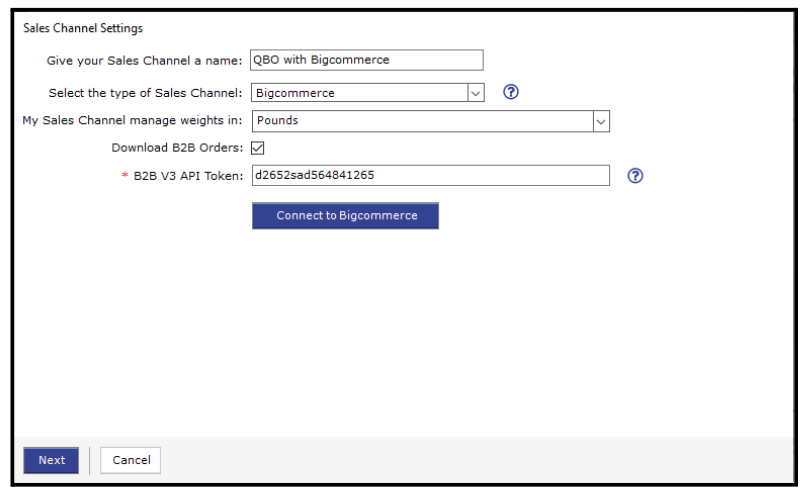
After Webgility successfully integrates with BigCommerce, you'll be redirected to the app where you'll find a "Sales Channel Settings" tab.
-
In the "Give your sales channel a name" field, enter a specific name of your choice.
-
No updates are needed in the "Select the type of Sales Channel" field, as BigCommerce is already connected.
-
Choose your preferred unit of measurement for managing weight such as pounds, grams, or kilograms.
-
To download and record BigCommerce B2B orders, you must first enable the option “Download B2B orders” and generate the B2B v3 API token on the BigCommerce platform.
In the "Give your sales channel a name" field, enter a specific name of your choice.
No updates are needed in the "Select the type of Sales Channel" field, as BigCommerce is already connected.
Choose your preferred unit of measurement for managing weight such as pounds, grams, or kilograms.
To download and record BigCommerce B2B orders, you must first enable the option “Download B2B orders” and generate the B2B v3 API token on the BigCommerce platform.
Generate the B2B API Token (for B2B users)
-
If you’re setting up a B2B connection, follow these steps to create an API token:
-
In BigCommerce, go to the B2B Edition.
-
Create a new API account and generate a BigCommerce V3 API Token.
-
If you’re setting up a B2B connection, follow these steps to create an API token:
-
In BigCommerce, go to the B2B Edition.
In BigCommerce, go to the B2B Edition.
-
Create a new API account and generate a BigCommerce V3 API Token.
Create a new API account and generate a BigCommerce V3 API Token.
Note: If you need additional guidance, see the “How to Create an API Token” section below.

Step 7.
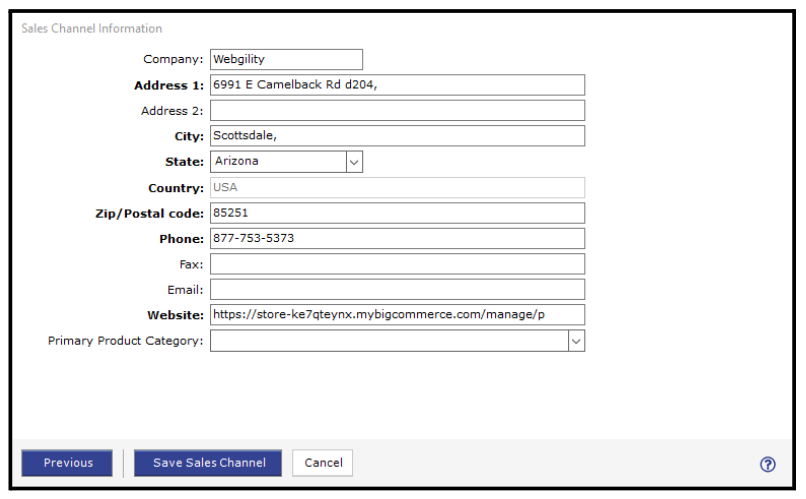
Next, enter the Sales Channel information and click Save Sales Channel.
Reauthorize the existing BigCommerce and Webgility Desktop connection to start downloading B2B orders
Existing customers must reconnect Webgility Desktop with BigCommerce to download B2B Edition orders; otherwise, Webgility will not retrieve these orders.
To enable this option, follow the steps outlined below:
-
Navigate to Connection, Sales Channels, and Manage Sales Channels
-
Check the box to enable B2B, then enter the API Token key in the B2B V3 API field.
-
Select "Next" to move to the store address section, then click "Save Sales Channels" to finalize the connection.
Navigate to Connection, Sales Channels, and Manage Sales Channels
Check the box to enable B2B, then enter the API Token key in the B2B V3 API field.
Select "Next" to move to the store address section, then click "Save Sales Channels" to finalize the connection.

Next Step:
Next, you will want to connect your Accounting, ERP, or POS system to Webgility.
Connect your Accounting system with Webgility.
Feel free to reach out to our support team if you need further assistance.