
Overview
When Webgility Desktop fails to post an order to QuickBooks, it logs the exact cause in the order’s History tab. This feature removes the guesswork by showing you precisely why an order failed so you can resolve the root cause quickly.
This guide is especially important if you rely on the Scheduler to post orders automatically in the background, where error pop-ups don't appear in real time.
When to Use This Article
Use these steps if:
- Your orders are not showing up in QuickBooks.
- You use the Scheduler to download and post orders automatically.
- The Errors tab shows a count next to it, such as Errors 3.
Step 1: Check the Errors Tab
- Open Webgility Desktop.
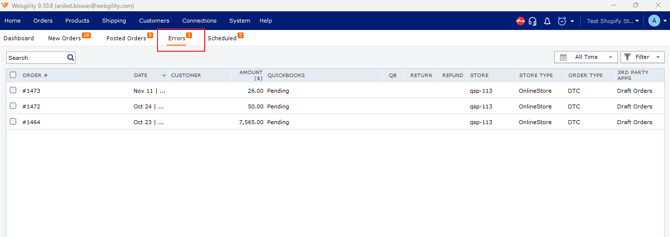
- At the top, locate the Dashboard, New Orders, Posted Orders, Errors, and Archived tabs.
- Click the Errors tab. The number next to it indicates how many orders failed to post.
The Errors tab lists each failed order with details such as the order number, date, customer, amount, and store. A red warning icon appears in the POS column, and the QuickBooks POS column shows the status as Error.
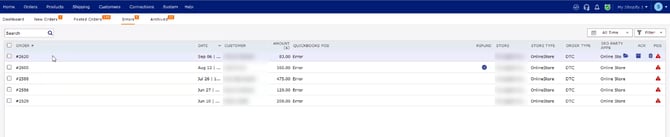
Tip: If the Errors tab shows a number, some orders have not been posted to QuickBooks. Check this tab regularly if you rely on the Scheduler.
Step 2: Open the Order and Go to the History Tab
- Double-click the order from the Errors list.
- In the order window, click the History tab.
The order window also includes tabs such as Details, Customer, and Payment Processor Fee.
Step 3: Read the Order Logs
The Order Logs section lists every action taken on the order, each with a timestamp, the user or process involved, and the result. It typically shows:
- When the order was received and downloaded, and whether the order was processed by the Scheduler.
- Any changes made to the order details
- The QuickBooks Posting Status, which tells you exactly why the order was rejected
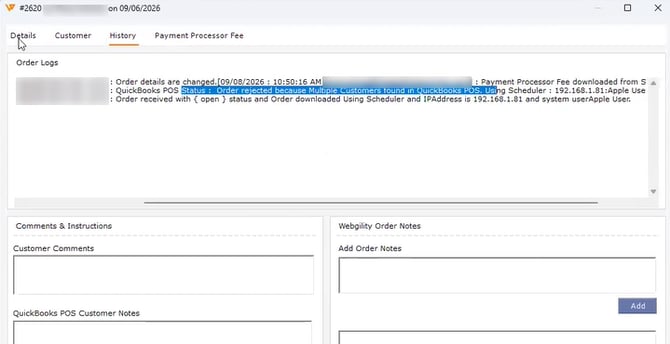
Some log entries may be longer than the available space. Use the horizontal scroll bar at the bottom of the Order Logs section to view the complete message.
Example
For example, the log for an order may show:
QuickBooks Status: Order rejected because Multiple Customers found in QuickBooks. Using Scheduler...
This indicates that Webgility found more than one matching customer in QuickBooks. Since it could not determine which customer to use, the order was not posted.
Step 4: Correct the Error
Once you identify the cause from the History tab, take the appropriate action based on the error message.
For the "Multiple Customers found" error:
- Open the customer records in QuickBooks and check for duplicate customer records.
- Merge or remove duplicate records so there is only one matching customer.
- In Webgility, go to Connections > Get Latest Data and Settings to refresh the customer data.
- If you are manually posting the order, select the correct customer before posting it.
- If you use the Scheduler, you can enable the option to select the first customer in case of multiple customers when posting orders, if appropriate for your workflow.
Note: The resolution depends on the error shown in the Order Logs. Always review the complete error message before making changes.
Step 5: Reprocess the Order
After correcting the underlying issue:
- Return to the Errors tab.
- Open the affected order and verify that the issue has been resolved.
- Reprocess or post the order again.
- Verify that the order is successfully posted to QuickBooks.
If you use the Scheduler, make sure the order is included in the next scheduled accounting posting.
Best Practices
- Check the Errors tab every day, especially if you use the Scheduler.
- Always read the History tab first. The log names the cause, so you don't have to troubleshoot blindly.
- Add an order note describing the fix, so your team knows what was done.
- Fix the root cause. If the same error keeps appearing, such as duplicate customers, correct the source of the problem in QuickBooks.
Need More Help?
If the History tab shows an error you can't resolve, contact Webgility Support and include the order number and the full text of the error from the Order Logs. This helps them diagnose the problem faster.