Before You Begin
Make sure the following are in place before enabling this feature:
- Your store is connected to Webgility Online and is a Shopify store.
- Your Shopify store is configured to accept orders in more than one currency.
- QuickBooks Multi-Currency must be enabled in your QuickBooks Online account. This is a QuickBooks requirement — once enabled, it cannot be turned off. Confirm this is what you need before proceeding. How to enable Multi-Currency in QuickBooks Online →
- You have separate clearing accounts in QuickBooks for each currency your store accepts (for example, one USD clearing account and one CAD clearing account).
Step 1: Enable Multiple Currencies in Webgility Online
-
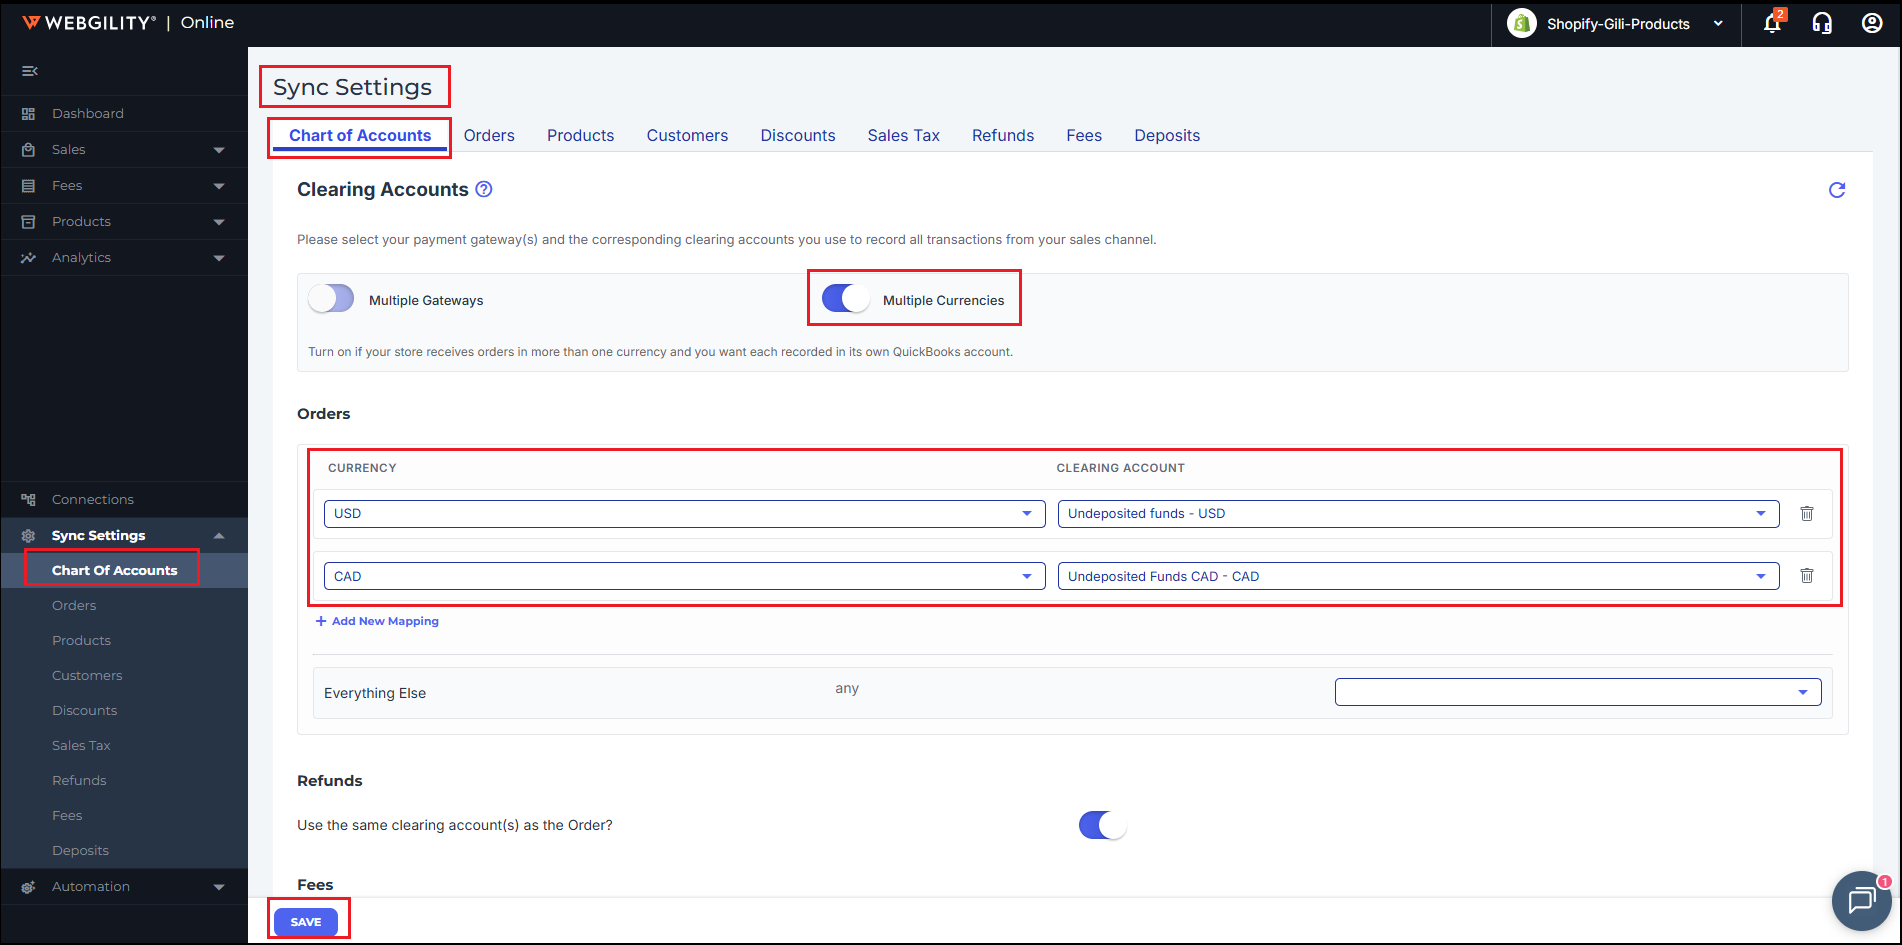
In Webgility Online, go to Sync Settings and select the Chart of Accounts tab.
-
In the Clearing Accounts section, find the Multiple Currencies toggle and turn it on.
Note 1: A reminder will appear confirming that QuickBooks Multi-Currency must be enabled. If you haven't done this yet in QuickBooks, do so before continuing.
- Once the toggle is on, the clearing account table expands to show a row for each currency your store accepts (for example, USD and CAD).
Note 2: The currencies shown in the dropdowns reflect payment currencies from your already-downloaded orders. If a currency is missing, it will appear here once those orders are downloaded into Webgility Online. If you're still not seeing it, go to the **Orders** page and click **Refresh** to download any pending orders.
-
For each currency, select the appropriate QuickBooks clearing account from the dropdown. This tells Webgility Online where to record payments made in that currency.
-
Click Save.
Notes:
- Changes apply to future orders automatically. Any order downloaded after this point that carries a configured currency will be posted to the accounts mapped here.
- For existing unposted orders: These won't reflect the new currency mapping until refreshed. To apply your currency settings, go to the 'Orders' page and click 'Refresh' — this will re-download all unposted orders with their original payment currencies and route them to the correct accounts.
- For already-posted orders: If an order was previously posted to the wrong accounts, you'll need to unpost it and post it again for the new currency mapping to take effect.
Step 2: Set Up Deposit Account Mappings (Shopify Payouts)
When Shopify Payments sends a payout to your bank, Webgility Online creates a Transfer in QuickBooks to move the funds from your clearing account to your bank account. If you accept multiple currencies, each currency's payout can route to its own pair of accounts.
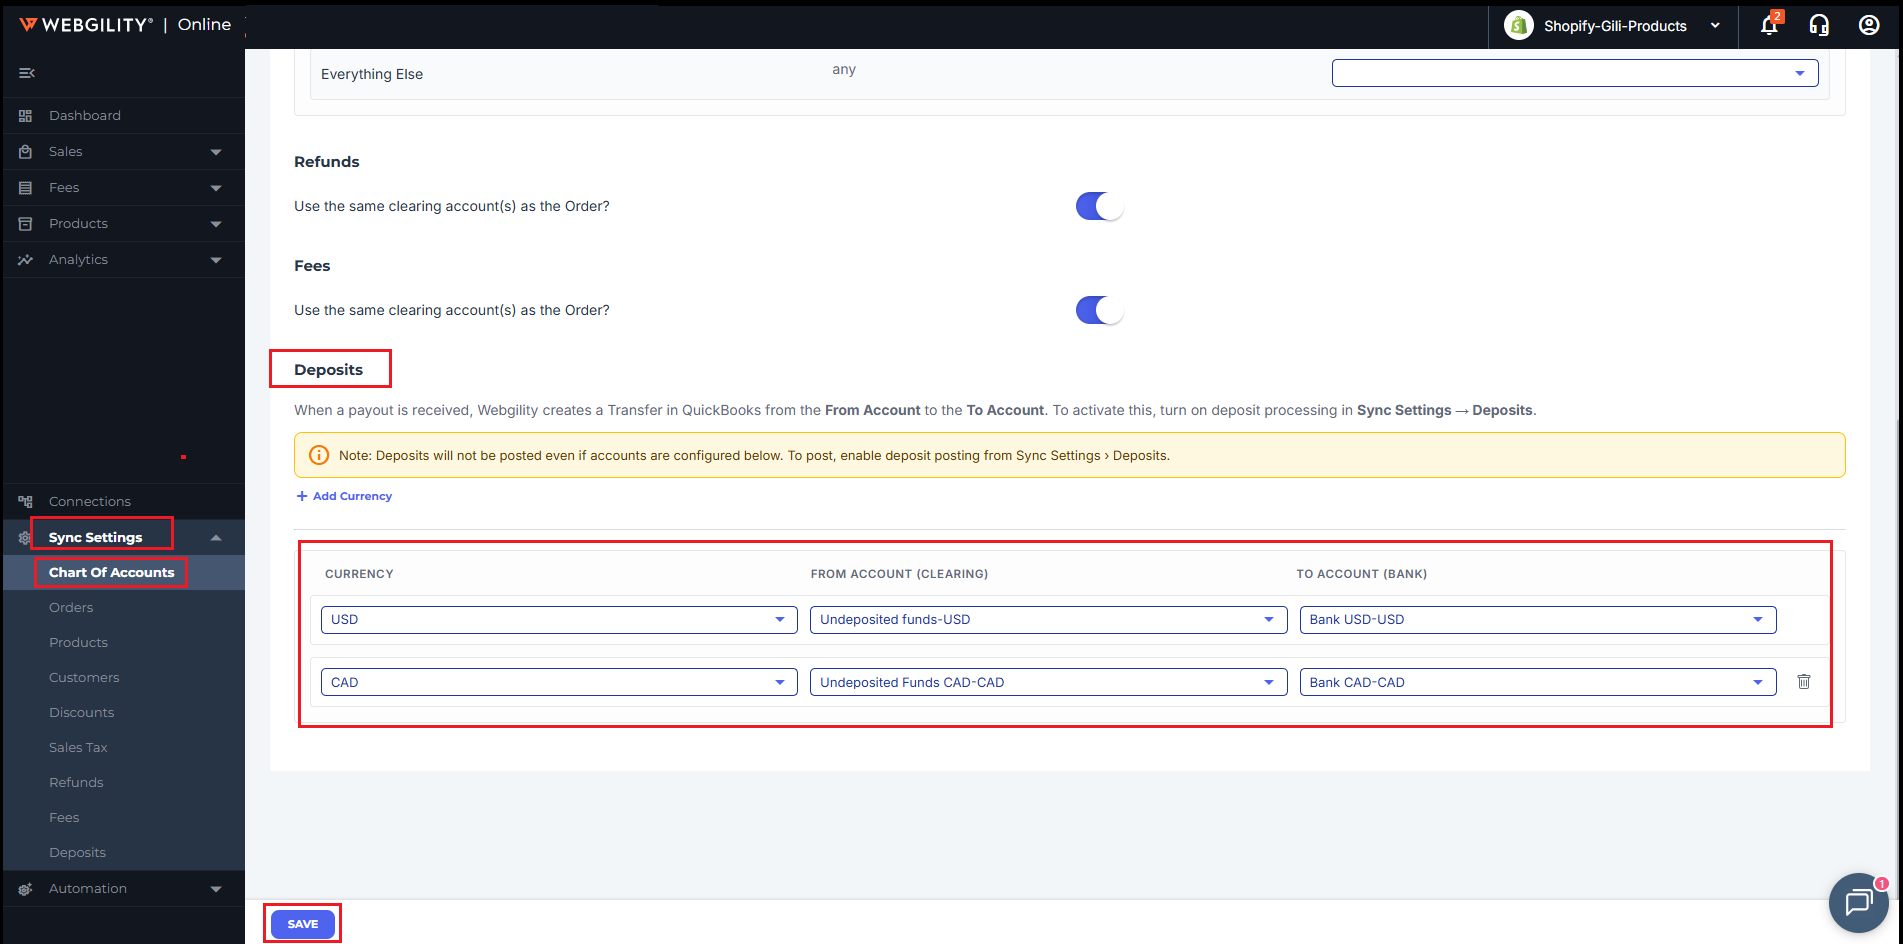
Deposit account mappings are configured in Sync Settings > Chart of Accounts, in the Deposits section at the bottom of the page.
Note 4: The on/off switch for deposit processing is in **Sync Settings > Deposits** — not in Chart of Accounts. You must turn that on separately to activate payout posting. If it's off, Webgility Online will show a reminder even when your accounts are configured here.
Configure Your Deposit Accounts
-
Go to Sync Settings > Chart of Accounts.
-
Scroll to the Deposits section.
-
For each row, select:
-
From Account — the clearing account where Shopify Payments holds funds before the payout settles (for example, your Shopify Payments clearing account in QuickBooks).
-
To Account — the bank account where the payout is ultimately deposited (for example, your checking account).
-
-
If Multiple Currencies is enabled, you'll see a Currency column and an Add Currency button. Add a separate row for each currency your store settles in.
-
Click Save.
Activate Deposit Processing
-
Go to Sync Settings > Deposits.
-
Turn on Download and process the net deposit?
-
Click Save.

When a Shopify payout arrives, Webgility Online will automatically create a Transfer in QuickBooks using the matching currency row.
Step 3: Set Up Multi-Currency Fee Payments (Optional)
If your payment processor charges fees in more than one currency — for example, Shopify/Stripe fees in both USD and EUR — you can tell Webgility Online which QuickBooks accounts and vendors to use for each currency. Without this, all fees land in your default accounts regardless of currency.
Note 5: This setting applies to Shopify stores connected to QuickBooks Online only.
Enable the Toggle
-
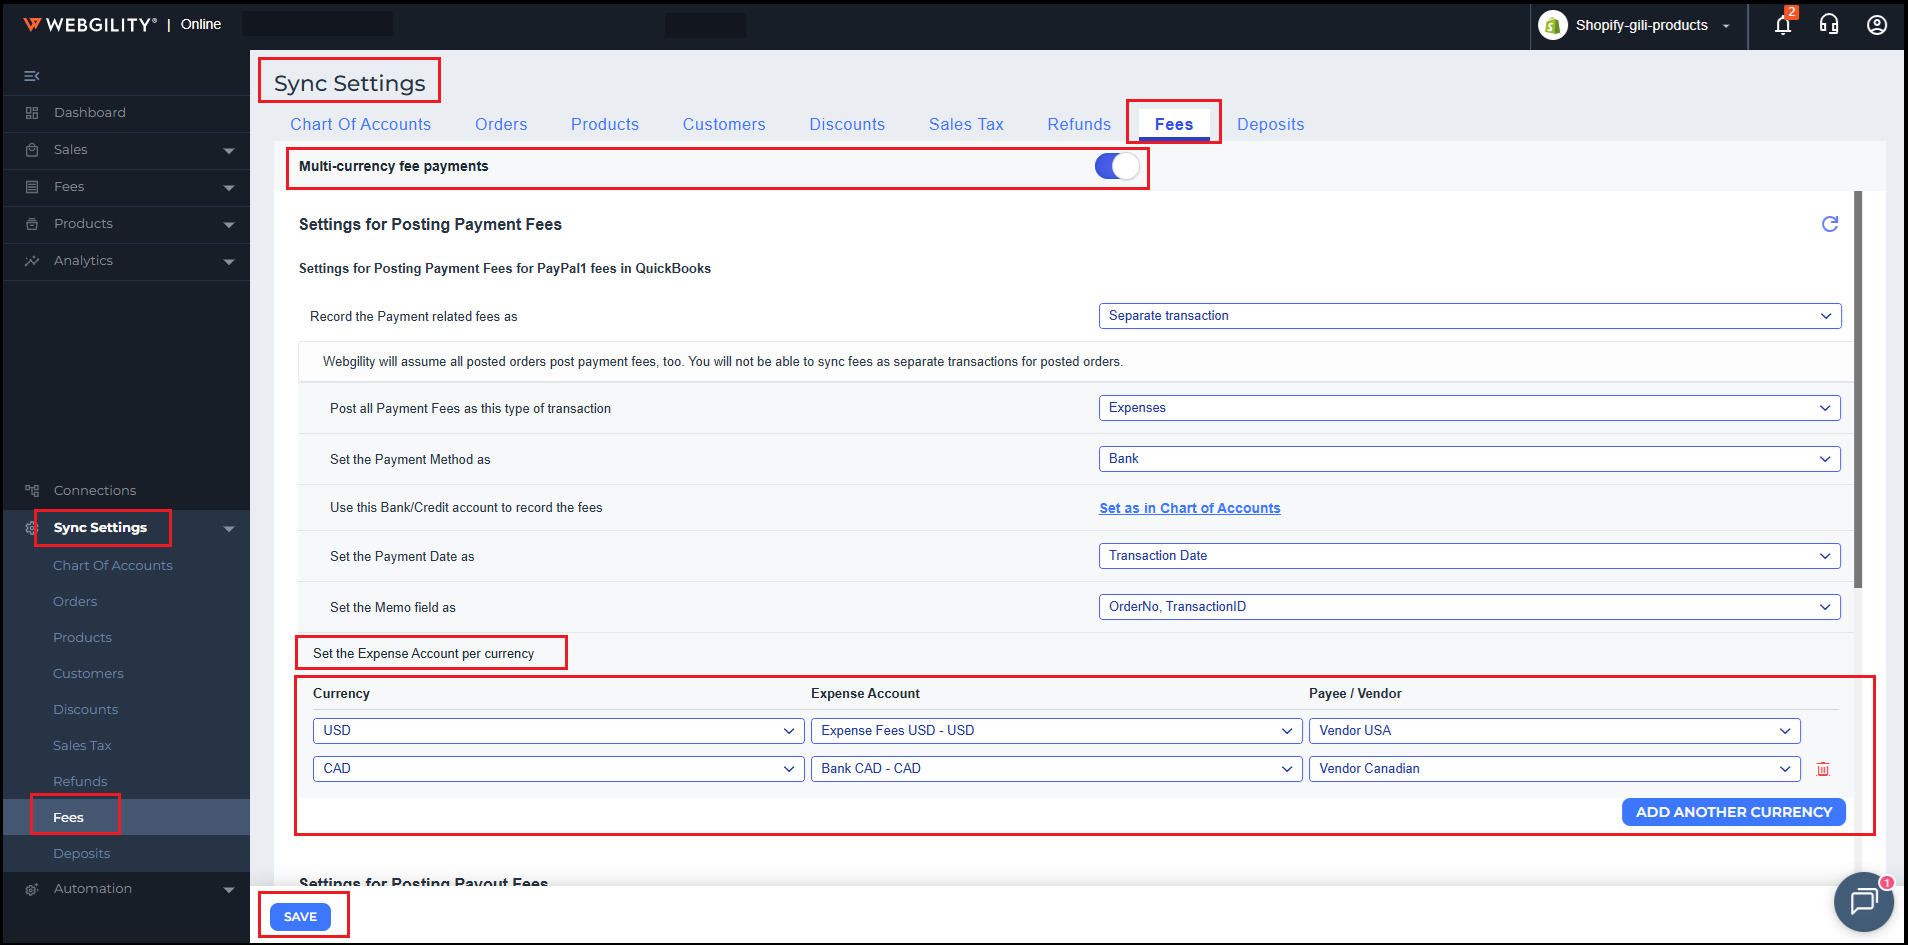
Go to Sync Settings > Fees.
-
At the top of the page, find the Multi-currency fee payments toggle and turn it on. This setting applies to all fee types on this page.
-
A table appears with one row already added. Each row represents one currency your fees can arrive in.
Configure Each Currency Row
For each row, fill in the following:
- Currency — the currency this row applies to (for example, EUR or CAD).
- Expense Account — the QuickBooks expense account where the fee amount is posted.
- Vendor — the QuickBooks vendor the fee is recorded against. This field appears when your transaction type is set to Bill.
- Bank Account — the account the payment comes out of. This field appears when your transaction type is Bill and Mark Bill as Paid is turned on. Click Add Another Currency to add a row for each additional currency. To remove a row, click the delete icon on the right side of that row.
IMP: If you switch your transaction type between Expense and Bill, your currency rows will be cleared. The two types use different account fields, so existing entries are not carried over. You'll need to re-add your rows after switching.
How Webgility Online Uses These Settings
When a fee posts to QuickBooks, Webgility Online checks whether the fee's currency matches a row in your table. If a match is found, it uses that row's accounts. If no match is found, it falls back to your default fee settings.
How Multi-Currency Orders Appear in Webgility Online
Once Multiple Currencies is enabled:
-
Orders are downloaded in the currency the customer paid in. For example, if a customer paid CAD 120.00, the order will show CAD 120.00 in Webgility Online not a converted USD amount.
-
Line item prices, taxes, and discounts reflect the original amounts in that currency.
-
Each currency posts to its own clearing account in QuickBooks, keeping foreign-currency transactions separate from your home currency.
-
Refunds for multi-currency orders are also recorded in the original payment currency.
-
Orders placed in your home currency are not affected and will continue to sync as before.
If You've Used Webgility Online Before
Deposit account mappings have moved.
-
In a previous version of Webgility Online, deposit account mappings were configured only in the Deposits settings tab. They are now managed in Sync Settings > Chart of Accounts, in the Deposits section at the bottom of the page. The on/off switch for deposit processing remains in Sync Settings > Deposits as before.
Do I need to reconfigure my deposit accounts?
- No. Your existing deposit account selections have been carried over automatically. You only need to revisit this section if you're adding new currency rows or changing your account assignments.
Frequently Asked Questions
Can I turn this off after enabling it?
You can turn off the Multiple Currencies toggle in Webgility Online at any time. However, QuickBooks Multi-Currency, once enabled in QuickBooks, cannot be disabled. Orders already synced to QuickBooks will remain as-is.
What if I haven't mapped a clearing account for a currency?
Orders in that currency will not post to QuickBooks until a clearing account is assigned. Make sure every currency your store accepts has a mapping set up before syncing.
Will this affect orders that have already been synced?
No. This setting only affects orders downloaded after it's saved. Previously synced orders are not modified.
My store sells in USD only — do I need this?
No. If all your Shopify orders are placed in your home currency, there is nothing to configure here. This feature only applies when your store receives orders in more than one currency.
What currencies are supported?
Any currency your Shopify store accepts and that has a corresponding clearing account in QuickBooks can be mapped in Webgility Online.
I set up my deposit accounts but Webgility Online isn't posting my payouts. What should I check?
Make sure deposit processing is turned on in Sync Settings > Deposits — the toggle labeled "Download and process the net deposit?" must be enabled. Account configuration in Chart of Accounts is required, but that toggle is what activates posting.
I switched my fee transaction type from Expense to Bill (or vice versa) and my currency rows disappeared. Is that normal?
Yes, this is expected. Expense and Bill transactions use different account fields, so rows configured for one type aren't compatible with the other. Re-add your currency rows after switching and save.
I have multi-currency fee rows set up, but fees for one currency are still posting to my default accounts. What should I check?
Make sure the currency code in your table row exactly matches the currency of the incoming fees. If no matching row is found, Webgility Online falls back to your default fee settings. Verify the currency code and save again.
What's the difference between the fee settings in Chart of Accounts and the fee settings in Sync Settings > Fees?
Chart of Accounts includes a Fees section where you can map the expense account per currency — but this only applies to payment fees configured as Separate Expense (not as a line item on the order). For everything else — payout fee accounts and currency-specific fields like Vendor — configure those in Sync Settings > Fees. This is also true for payment fees using Separate Expense: the Vendor and Bank Account fields for each currency are still set in Sync Settings > Fees.