
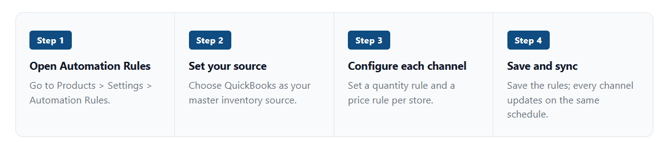
Go to Products > Settings > Automation Rules.
Step 2 Set your sourceChoose QuickBooks as your master inventory source.
Step 3 Configure each channelSet a quantity rule and a price rule per store.
Step 4 Save and syncSave the rules; every channel updates on the same schedule.
Overview
Multi-Channel Inventory Sync lets Webgility Desktop push inventory and price updates to every connected sales channel simultaneously, using QuickBooks as the single source of truth. It replaces the sequential channel-by-channel sync so stock levels stay consistent across all your storefronts.
When This AppliesTurn on Multi-Channel Inventory Sync when you sell the same items across two or more connected sales channels (for example, Shopify and BigCommerce) and manage inventory in QuickBooks. It is especially useful when your standard sync interval leaves one channel with an outdated stock level long enough to risk overselling.
Why This HelpsWithout Multi-Channel Inventory Sync, Webgility Desktop processes each connected channel one after another in alphabetical order. If an order comes in on the first channel and reduces stock in QuickBooks, the other channels only pick up the change on their next scheduled turn, which can leave them showing stock that is no longer available. Multi-Channel Inventory Sync applies the QuickBooks change to every channel in the same run so all your storefronts stay aligned.
Steps to Set Up Multi-Channel Inventory Sync
Step 1
Open Automation Rules
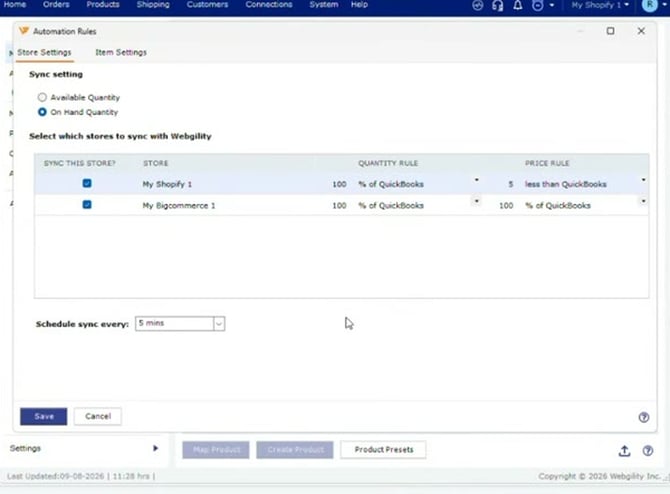
In Webgility Desktop, open Products, click Settings, and choose Automation Rules. The rules dialog opens on the Store Settings tab.
Step 2 Choose the inventory value to sync
Under Sync setting, pick Available Quantity or On Hand Quantity based on which QuickBooks value should drive your sales channels.
Step 3 Select the stores to include
In the Select which stores to sync with Webgility table, check 'Sync This Store?' for every sales channel you want to include in the multi-channel run.
Step 4 Set a quantity rule and a price rule per store
For each selected store, fill in the Quantity Rule and the Price Rule. The rule is entered as a value plus a comparison to QuickBooks — for example, 100 % of QuickBooks pushes the QuickBooks value as-is, while 5 less than QuickBooks pushes the QuickBooks price minus five.
Step 5 Set the sync schedule
Choose how often the multi-channel sync should run from the Schedule sync every dropdown at the bottom of the dialog.
Step 6 Save the configuration
Click Save. Webgility Desktop now pushes inventory and price updates to every selected store at the same interval, using QuickBooks as the master source.
Anatomy of the Store Settings Tab| Field | What it does |
|---|---|
| Available Quantity / On Hand Quantity | Chooses which QuickBooks inventory value Webgility uses as the number to push to your sales channels. |
| Sync This Store? | Checkbox that includes or excludes each sales channel from the multi-channel run. |
| Quantity Rule | The formula Webgility applies to the QuickBooks quantity before sending it to that store (for example, 100 % of QuickBooks). |
| Price Rule | The formula Webgility applies to the QuickBooks price before sending it to that store (for example, 5 less than QuickBooks, or 100 % of QuickBooks). |
| Schedule sync every | How often the multi-channel sync runs across all selected stores. |
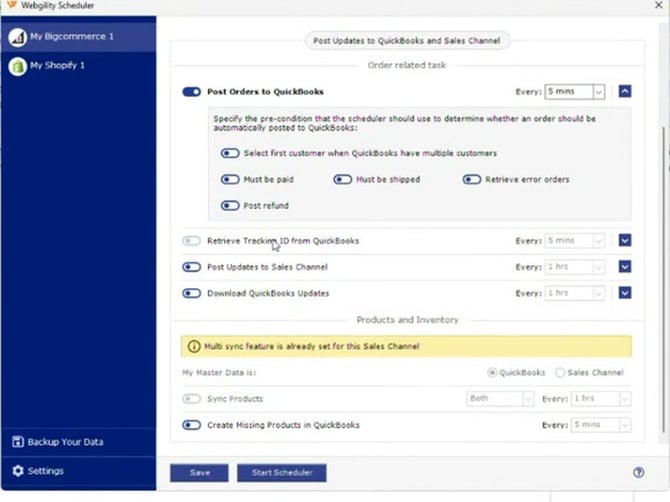
Open the Webgility Scheduler for the sales channel and confirm the callout Multi sync feature is already set for this Sales Channel appears above the Products and Inventory section, and that My Master Data is: QuickBooks is selected. That is your signal this channel is being handled by the multi-channel run instead of the standard per-channel scheduler.
Use the Price Rule to adjust for each channel's fee structure while keeping a single price in QuickBooks. For example, a channel with higher marketplace fees can be set to a lower percentage or a fixed reduction so your net remains the same across every storefront.
Additional SupportIf a channel does not update after saving the rules, verify that Sync This Store? is checked for that channel and that its Quantity Rule and Price Rule are filled in. For further help, contact support@webgility.com with the store name and the last successful sync time.