A Simple Guide to Matching Your Shopify Sales in QuickBooks
Think of this process, called "reconciliation," as simply making sure the numbers in your Shopify store match the numbers in your QuickBooks account. It ensures your bookkeeping is accurate. Here’s how to do it in three easy steps.
Step 1: Match Your Sales, Refunds, and Discounts
Your Goal: To confirm that the total sales, refunds, and discounts you see in Shopify have been correctly recorded in QuickBooks.
- Find Your Shopify Sales Summary:
- In Shopify, go to your Finances summary report for the time period you're checking (e.g., last month).
- Look for three key numbers: Gross sales, Returns, and Discounts. These are your main income numbers.

For example: In Shopify Finance Summary, Gross sales totaled $72. After a discount of $10.80, the net sales were $61.20, with an additional $4.74 in taxes.
- Check Them in QuickBooks:
- In QuickBooks, pull up your Profit and Loss statement.
- You should see a line for Sales that matches your Shopify sales number(Difference of Gross Sales and Returns).

Following this example, your QuickBooks Profit and Loss statement should reflect a Gross Sales figure of $72.00 in your income account and a separate "contra-income" line item for Discounts Given of $10.80. This correctly results in a Net Sales figure of $61.20.
- You should also see a line for Discounts given that matches the discounts from Shopify. Refunds will typically reduce your "Sales" income.
- For a more detailed view, you can use the Transaction Detail by Account report to see every individual sale and discount by Account

Step 2: Match Your Sales Tax
Your Goal: To ensure the sales tax Shopify collected from customers matches what QuickBooks shows you owe to the government.
- Find Your Shopify Tax Total:
- In your Shopify Finances summary, find the line item for Taxes. This is the total amount of sales tax you collected from all your customers across all states during that period.
For example, your Shopify Finance Summary report shows $4.74 in Collected Taxes.
- Verify the Tax Breakdown in QuickBooks:
- The easiest way to check this is to run the Sales Tax Liability Report in QuickBooks.
- This report gives you a clear breakdown of the tax you owe to each state or county (like California and New York in the examples).
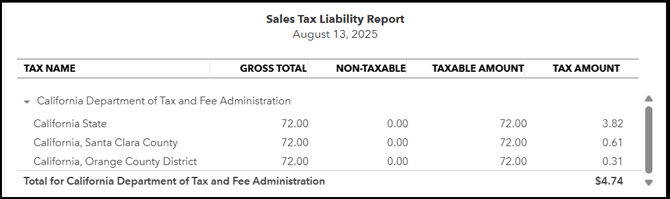
Following the example, The Sales Tax Liability report then shows the breakdown of the $4.74 in collected tax by each state or county.
- The total tax in this report should match the total tax number from your Shopify Finances summary. You can also see these amounts grouped by state in the Transaction Detail by Account report
Step 3: Match Your Customer Payments (Collections)
Your Goal: To verify that the money received through different payment methods (like Shopify Payments, PayPal, credit cards, etc.) has been accounted for in QuickBooks.
- Find Your Shopify Payment Summary:
- In Shopify's Finances summary, look for the Payments by gateway summary section.
- This shows you exactly how much money came in from each payment gateways(source), like Shopify Payments, PayPal, or Credit Card.

For example, your Shopify Finance Summary might show $65.62 collected via Shopify Payments and $0.32 via Shop Cash, both of which are posted to the Shopify Clearing Account.
- Check the "Holding Accounts" in QuickBooks:
- In QuickBooks, the money from these gateways is often first recorded in special accounts called "Clearing Accounts". Think of these as temporary waiting rooms for your money.
- For example, all your Shopify Payments transactions go into a "Shopify Payments Clearing" account. When Shopify actually sends the money to your bank, your bookkeeper (or automated system) will move it from this "clearing" account to your actual bank account.
- To verify, run the Transaction Detail by Account report in QuickBooks and look for these clearing accounts to see if their totals match what Shopify's payment summary shows for the period.
Following the example, the Transaction Detail by Account report will show $65.94 in the Shopify Clearing Account, which is the combined total of Shopify Payments ($65.62) and Shop Cash ($0.32).
- Verify with the Balance Sheet: For a high-level view, pull up your Balance Sheet in QuickBooks. Your clearing accounts are listed here under Assets. The balance shown for each clearing account is the total amount of money that has been collected from customers but has not yet been deposited into your bank as of that date. This is a great way to see your "money in transit" at a glance.