
You are in the right place if
You sell the same SKUs on more than one channel — for example Amazon and Shopify — and QuickBooks Desktop's Sales by Item Summary report lumps every unit sold together, so you cannot tell how many units came from each channel. Class tracking is already enabled in QuickBooks (Preferences > Accounting > Class Tracking is on), and your accounting team wants a per-channel breakdown for reporting.
Why this helps
QuickBooks class tracking lets you tag every line on a sales receipt or invoice with a class, and QuickBooks reports can then be filtered by class. Webgility Desktop can stamp the class on each posted order automatically — one class per channel — as long as you tell it which class to use for each sales channel and payment method combination. Once the tags are in place, filtering the Sales by Item Summary report by class gives you the SKU-by-SKU breakdown per channel.
What to do
Step 1: Open QuickBooks Desktop and confirm class tracking is on: Edit > Preferences > Accounting > Company Preferences, then check Use class tracking for transactions. In the same session, add a class for each of your sales channels under Lists > Class List — for example, one class called Amazon and another called Shopify. The class names are how Webgility will match them, so keep them short and clear.
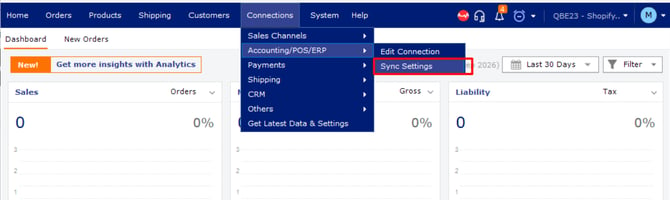
Step 2: Open Webgility Desktop and go to Connections > Accounting/POS/ERP. Click Sync Settings . The Sync Settings screen opens with a tab list across the top.
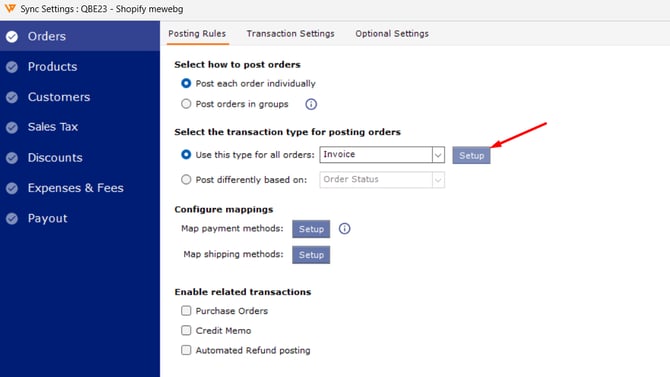
Step 3: Under Sync settings > Orders > Posting rules.
-
Click the Setup button next to the Invoice/Sales receipt, and Configure the Class for example, set every Amazon stores class to Amazon and for Shopify Sales channel class to Shopify.
-
Click Save at the bottom. Webgility confirms the sync settings were saved.
The full walk-through with screenshots for this screen is in Post Multi-Store Orders using QuickBooks Class Tracking with Webgility Desktop.
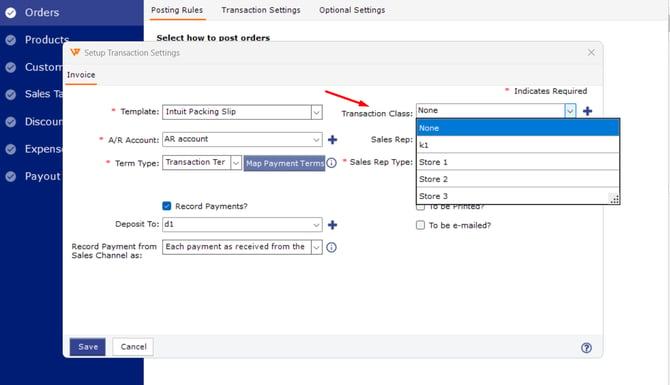
Step 4: Restart the Webgility Scheduler so background posting picks up the new class assignments. From the Webgility Desktop main window, stop and restart the scheduler using the Scheduler menu. New orders that come in and post after the restart carry their channel's class on every line.
Step 5: In QuickBooks Desktop, open Reports > Sales > Sales by Item Summary. Click Customize Report, go to the Filters tab, pick Class, and select the class for the channel you want to see — for example Amazon. Click OK. The report now shows SKU-level unit sales for that channel only. Repeat with the other class name to see the Shopify slice.
Good to know. Class tracking applies to orders Webgility posts after you save the settings — orders that already posted keep whatever class they had at posting time (usually blank). If you need historical orders re-tagged, use Undo Sync on the affected batch and post them again with the new mapping in place. Once you use classes on posted orders, keep the class names in QuickBooks stable — renaming a class after the fact will only relabel new entries, and old entries will still show the previous name in reports.
Still need help?
If the Sales by Item Summary filter is set to a channel class but the report still comes back empty, share the class name you filtered on, a sample recent order number that should carry that class, and a screenshot of your Sync Settings > Transaction Settings tab with Webgility Support. Support can then check whether the row that governs that channel-payment combination still has a blank class value.