

Step 1: Post a payout and see the error list
Step 2: Click Resolve Items
Step 3: Create new items or map to existing ones
Step 4: Click Continue to Post
Overview
When Webgility Desktop posts a payout or settlement to QuickBooks and finds an item that is not mapped in your QuickBooks list, you can resolve the error from inside the posting window — map the item to an existing QuickBooks item, or create a brand-new one on the spot — and continue posting without canceling and starting over.
When This Applies
Use this when you post a Shopify payout or an Amazon settlement that contains one or more orders whose items do not yet exist in QuickBooks, and the posting stops with an item-not-found error. Instead of canceling the posting, opening the Products module to map each missing item one by one, and re-starting the batch from the beginning, you resolve the errors inline and resume where posting stopped.
Steps to Resolve Items During PostingStep 1: Post the payout and review the error list
In Webgility Desktop, go to Orders → Shopify → Payouts (for a Shopify payout) or Orders → Amazon → Settlements (for an Amazon settlement). Select the payout or settlement from the Pending tab and click Post To QuickBooks. If any order carries an item that is not in your QuickBooks list, the Reconciling dialog stops on Error in Post Orders and a second dialog opens listing every order that hit the error, with ORDER #, STATUS, and a MESSAGE like “order have item <SKU> which not found in quickbook”.
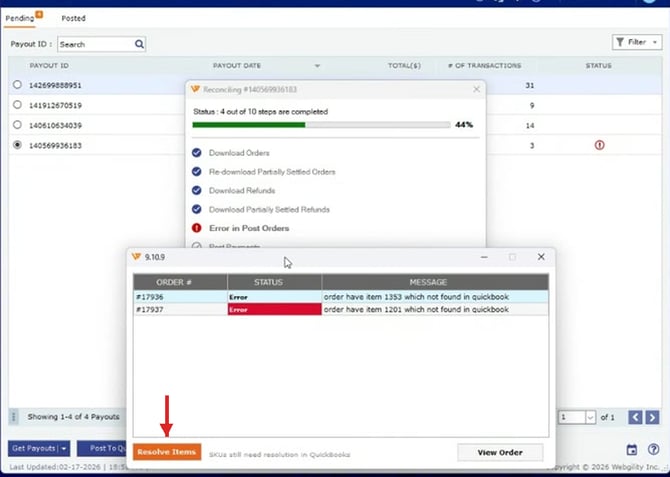 The error list that appears when posting stops. Click Resolve Items to open the resolution dialog.
Step 2: Click Resolve Items
Click the orange Resolve Items button at the bottom of the error-list dialog. The footer status “SKUs still need resolution in QuickBooks” confirms there are items waiting on you. The Resolve Item Errors dialog opens with every missing item listed.
Step 3: Review the item errors
The Resolve Item Errors dialog lists every item that stopped the batch. Each row shows the sales channel order number, the SKU, the item name, the price, the quantity, and a QB STATUS column — rows marked Not found in QB are the ones you need to fix; rows already marked Fixed in QB are done. The counter at the top shows “N errors / N selected / N fixed” so you always know how many items remain.
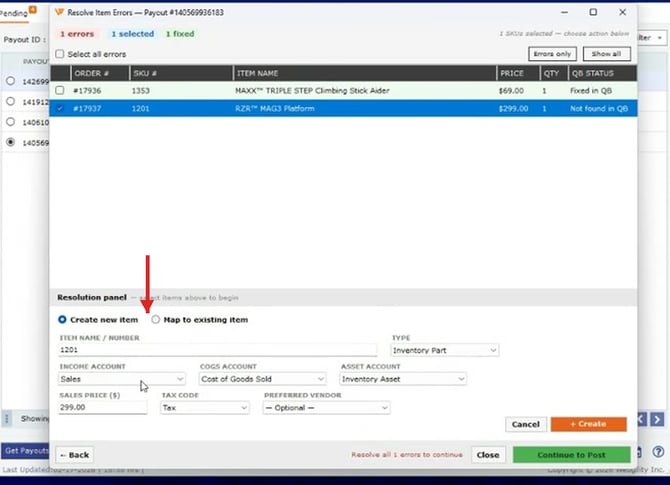 The Resolve Item Errors dialog, with the Resolution panel at the bottom where you fix each item.
Step 4: Create a new QuickBooks item or map to an existing one
Select a Not found in QB row to open the Resolution panel at the bottom of the dialog. Pick one of two options:
| Create new item | Creates a brand-new QuickBooks item using the fields Webgility pre-fills: ITEM NAME / NUMBER, TYPE (defaults to Inventory Part), INCOME ACCOUNT, COGS ACCOUNT, ASSET ACCOUNT, SALES PRICE ($), TAX CODE, and PREFERRED VENDOR. Review each field, change anything you need, and click + Create. |
|---|---|
| Map to existing item | Pick an item that already exists in your QuickBooks list from the dropdown. Use this when the sales channel item is just named or SKU’d differently from its QuickBooks counterpart. |
You can also check Select all errors at the top of the dialog and use + Create once to generate every missing item in bulk from the preset defaults.
Step 5: Continue posting
Once every row is marked Fixed in QB, click Continue to Post. Webgility resumes the batch at the exact point it stopped and finishes the payout or settlement with the newly mapped items in place.
Tip: If the income or expense account fields are blank when you use Create new item, open Products → Preset settings and fill in the default income account, COGS account, and asset account you want new items to use. The next item you create from the Resolve dialog will pick those up automatically.
Key Recommendation
For routine payout and settlement posting, keep Create product automatically turned on in your Product settings — Webgility creates missing items from the preset in the background without even showing the error. Use the manual Resolve Item Errors flow when you prefer to review and map items yourself, or when a single item needs a different income or COGS account than the preset.
Additional SupportIf the Resolve Items button does not appear on the error list, or an item fails to create with the preset accounts, contact Webgility Support with the Payout ID or Settlement ID so the team can check your product-preset mapping.