
You are in the right place if
You use QuickBooks Desktop Enterprise with Advanced Inventory turned on and multi-site inventory tracking configured. You recently added a new inventory site in QuickBooks (or renamed one), and now the Inventory Site option in Webgility Desktop’s Sync Settings is either missing entirely or does not list the new site. Sync Settings otherwise loads normally and other tabs behave as usual.
Why this happens
Webgility Desktop caches the QuickBooks lists (customers, items, inventory sites, payment methods) locally so posting is fast. When you change one of those lists inside QuickBooks — adding a site, renaming a site, activating an inactive one — Webgility’s local snapshot is still on the old version until it refreshes. The Inventory Site dropdown reads from that cached snapshot, so a new site added on the QuickBooks side does not show up until the cache is rebuilt. QuickBooks also needs to be in Single-User Mode for Webgility to fully re-read the site list.
What to do
Step 1: Open QuickBooks Desktop and sign in as the Admin user. Go to the File menu and choose Switch to Single-User Mode. QuickBooks confirms the mode switch. Leave QuickBooks open on this same computer for the rest of the steps.
Step 2: Rebuild Webgility’s cache of QuickBooks lists so the new inventory site is picked up. Go to Connections > Get latest data. Next to Download data, click the dropdown and choose Re-download all data. Webgility pulls a fresh copy of your QuickBooks customers, items, and inventory sites from scratch and shows a progress indicator while it runs.
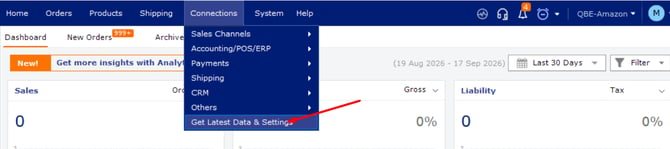
Step 3. Go to Connections > Accounting/POS/ERP > Sync settings > Products and click on the Refresh button
Step 4: Verify the change by opening the dropdown one more time and confirming your new site is on the list. If your account posts orders across multiple sales channels and each channel maps to a different site, repeat the selection on every channel’s Sync Settings.
Good to know. The Single-User Mode step matters because Webgility uses QuickBooks’ exclusive-access session to re-read the site list cleanly. Once the refresh finishes and you have saved the Inventory Site selection, you can switch QuickBooks back to Multi-User Mode from the same File menu — the mapping stays saved. If you host your QuickBooks in a hosted environment such as Rightworks, follow the same steps inside your hosted session; the Sync Settings and Get latest data surfaces are identical.
Still need help?
If the Inventory Site dropdown is still empty after the re-download completes, share the site name you added in QuickBooks, a screenshot of your QuickBooks Advanced Inventory site list, and a screenshot of the Sync Settings Products tab with Webgility Support. Support can then check whether Webgility is picking the site up on the read but filtering it out before the dropdown, which is a separate case worth logging.