
Walmart settles your account on a recurring cycle, netting your order revenue, refunds, commissions, adjustments, and advertising charges into a single payout that lands in your bank account. Webgility Online's Payouts screen shows that full breakdown — Sales, Refunds, Adjustments, and Other activities — in the same shape as the payout report you'd see in Walmart Seller Center, so it's easy to recognize and reconcile.
Important: If you connected your Walmart store before this feature was released, you must reauthorize your Walmart store before Payouts will work. Go to Connections, find your Walmart store under Sales Channels, and click Reauthorize. Without this step, Webgility Online can't download or post your Walmart payouts.
Note: Webgility Online does not post the entire payout amount to QuickBooks. Only the fee-type charges within the payout — commissions, adjustments, and other activities such as advertising — post as a Bill or an Expense (your choice). The Sales and Refunds amounts are shown on the payout detail page for reference and reconciliation only; they are not transacted in QuickBooks by this feature.
Follow these steps to set up and post Walmart payouts in Webgility Online.
Configure Settlement Fee Posting Settings
Step 1: Open the Fees settings
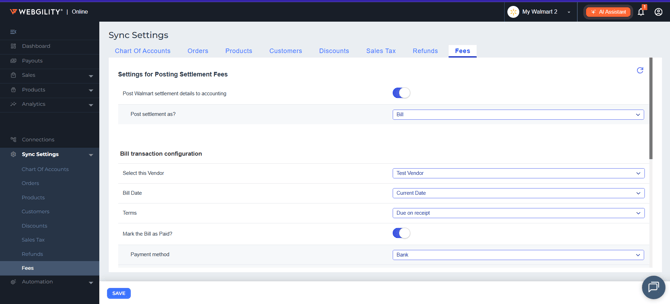
In Webgility Online, go to Sync Settings, then select the Fees tab. This opens Settings for Posting Settlement Fees — the settings on this page control how Walmart's payout fees post to QuickBooks.
Step 2: Turn on settlement posting
Turn on “Post Walmart settlement details to accounting.”
Step 3: Choose Bill or Expense
Under “Post settlement as?”, choose Bill or Expense depending on how you want Walmart's fees to appear in QuickBooks.
Step 4: If you chose Bill
Fill in the Bill transaction configuration: select the Vendor the Bill should be entered under, the Bill Date (for example, Current Date), and Terms (for example, Due on receipt). Turn on “Mark the Bill as Paid?” if you want Webgility Online to also record the payment against the Bill automatically — when this is on, also select the Payment method (for example, Bank) the payment should be recorded against.
Step 5: If you chose Expense
Fill in the Transaction Details: the Payee, Payment Date, Payment Method (for example, Cash), and the Deposit Account the payment should draw from.
Step 6: Set expense and refund accounts
Under Expense Details, select the Expense Account that Walmart's fee amounts (commissions, adjustments, other activities) should post against, along with Class, Location, and Description if you use them. Under Refund Reimbursement, select the account, Class, and Description for any reimbursement-type fee credits that occur within refunds.
Step 7: Save
Click Save.
Note: These settings apply per Walmart store. If you connect more than one Walmart store, configure the Fees tab for each one.
Post a Payout
Step 8: Find the payout
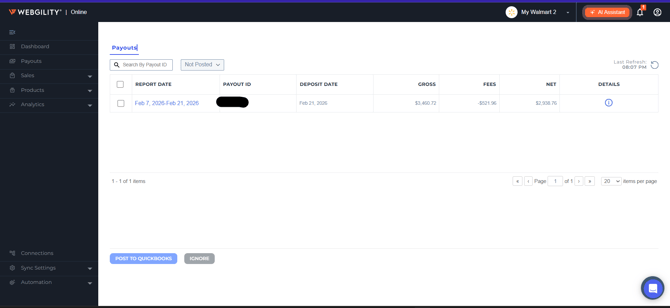
In the left-hand navigation, go to Payouts. Use the status filter (Not Posted, Errors, Posted, Ignored) to find the payout you want to post — new payouts default to Not Posted. Each row shows the Report Date, Payout ID, Deposit Date, Gross, Fees, and Net amount.
Step 9: Review the payout detail
Click the Details icon on any row to open the payout detail page before posting. It breaks the payout down into Sales, Refunds, Adjustments, and Other activities sections, mirroring Walmart's own payout report. Line items with a checkmark (for example, Net commission, and the totals under Adjustments and Other activities) are the fee-type amounts that will actually post to QuickBooks; the Fees total shown at the top of the page is the sum of these checked amounts. The Sales and Refunds line items without a checkmark are shown for reference only.
Step 10: Post to QuickBooks
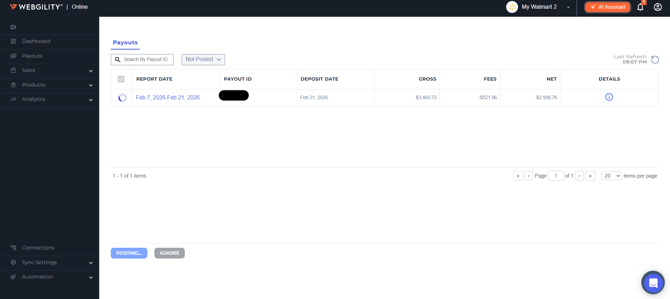
Back on the Payouts grid, select the checkbox next to the payout (or payouts) you want to post, then click POST TO QUICKBOOKS. The button shows a POSTING... state while the transaction is created.
Step 11: Confirm it posted
Once posting completes, the payout no longer appears under the Not Posted filter. Open it from the Posted filter to see the confirmation: a banner reading “Walmart payout fees posted as Bill #[number] (Payout ID: [ID]) to QuickBooks successfully. Bill marked as paid.” (or the equivalent Expense confirmation if you chose Expense), along with a Posted status badge and a checkmark next to the Fees amount.
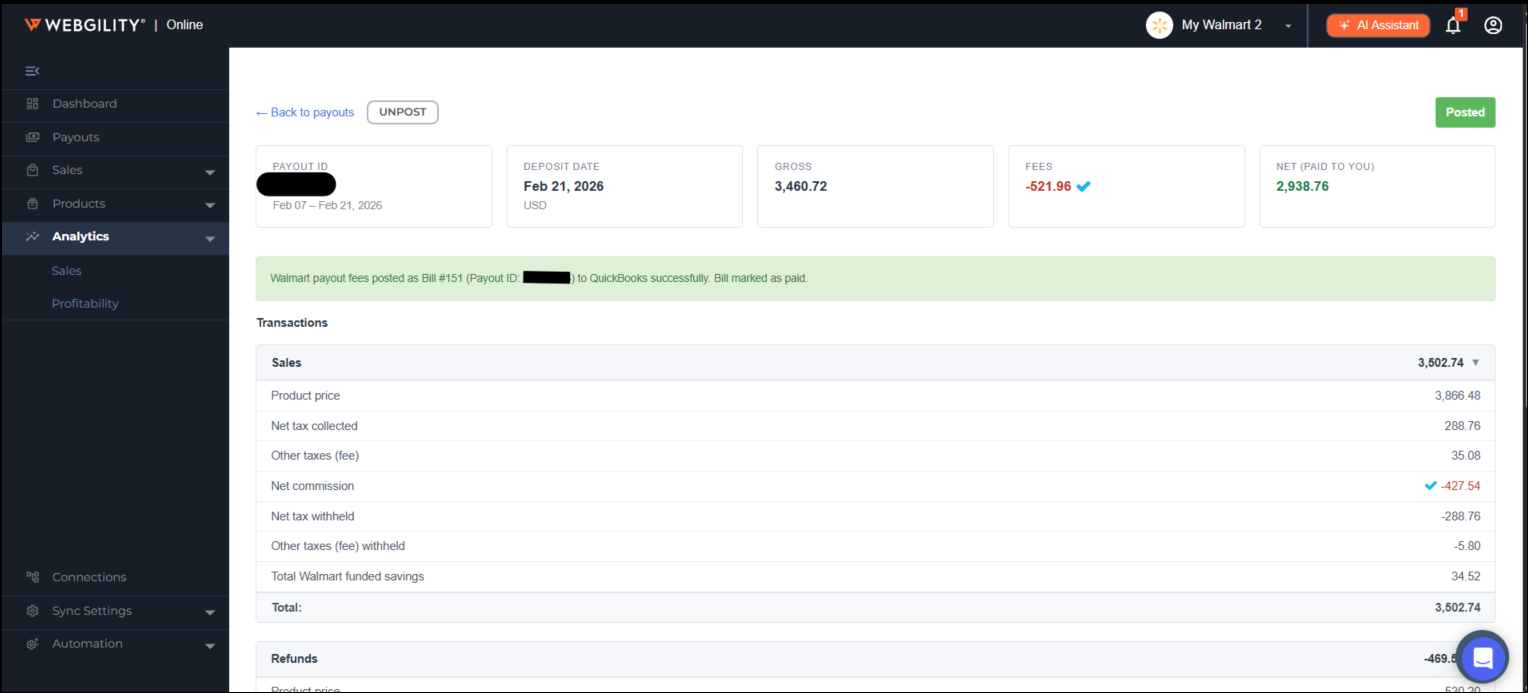
Note: Use IGNORE instead of Post if you don't want Webgility Online to post a particular payout — it removes the payout from your Not Posted list without creating a transaction. Use UNPOST from the Posted filter if you need to reverse a payout you already posted.
Automate Payout Posting (Optional)
Step 12: Open Scheduler Rules
Go to Automation → Scheduler Rules, and find the Expenses & Fees section for your Walmart store.
Step 13: Turn on automatic syncing
Turn on “Sync marketPlace Fees automatically” and click Save.
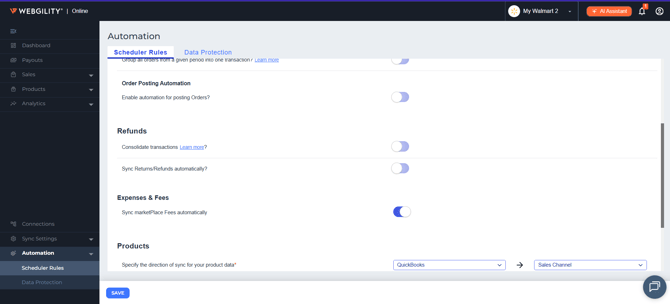
Once enabled, Webgility Online posts each pending payout's fees automatically on your regular sync schedule, using the settings you configured on the Fees tab — no manual posting required.
Frequently Asked Questions
I don't see any payouts, or Payouts won't post — what's wrong?
If your Walmart store was connected before this feature launched, its authorization doesn't yet include payout access. Go to Connections, locate your Walmart store, and click Reauthorize to grant the additional permission — then return to Payouts.
Does the whole payout amount post to QuickBooks?
No. Only the fee-type portion of the payout — commissions, adjustments, and other activities such as advertising — posts as a Bill or Expense. The Sales and Refunds amounts shown on the payout detail page are for reference and reconciliation only, matching what you'd see in your Walmart Seller Center payout report.
Should I choose Bill or Expense?
Either is supported — pick whichever matches how your accountant tracks Walmart's fees in QuickBooks. Bill lets you track it against a Vendor with Terms and optionally mark it paid automatically; Expense records the payment directly against a Payment Method and account with no separate paid step.
Is this the same as how Amazon deposits post?
No. Amazon has a separate Settlement Deposits screen that posts the full net deposit as a Transfer transaction, in addition to fees posting as a Bill or Expense from the Settlement Reports screen. Walmart doesn't have a separate deposit/Transfer step — only the fee portion of the payout posts, from the single Payouts screen.
What happens if I click UNPOST on a posted payout?
Webgility Online reverses the transaction in QuickBooks Online (removing the payment and the Bill or Expense) and returns the payout to your Not Posted list so you can review and re-post it.
What does the IGNORE button do?
It removes a payout from your Not Posted list without posting anything for it — use it for payouts you don't want Webgility Online to record.
Do I need QuickBooks Online for this feature?
Yes, this feature currently requires QuickBooks Online. QuickBooks Desktop is not supported.