
In Webgility, the Filter panel available on the New Orders, Posted Orders, and Archived tabs includes an "Additional" dropdown. This option allows users to filter orders based on a wide range of specific criteria beyond the standard filters like Destination, Store, Store Type, Order Type, and 3rd Party Apps.
The Additional filter is especially useful when you need to search for orders using a specific data point — such as a SKU, customer name, email, phone number, or PO number — rather than browsing through the entire order list manually.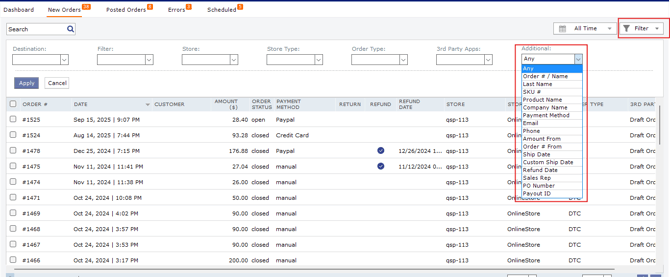
When you select a value from the Additional dropdown, a corresponding search/input field appears just below the filter row. You can then enter the specific value you're searching for, and Webgility will filter the order list to show only the orders that match that criteria within the selected tab (New Orders, Posted Orders, or Archived).
Available "Additional" Filter Options
The dropdown provides the following options to filter orders by:
- Any (default – no additional filtering applied)
- Order # / Name
- Last Name
- SKU #
- Product Name
- Company Name
- Payment Method
- Phone
- Amount From
- Order # From
- Ship Date
- Custom Ship Date
- Refund Date
- Sales Rep
- PO Number
- Payout ID
- Go to the New Orders (or Posted Orders / Archived) tab.
- Click on the Filter dropdown to expand the filter options.
- In the Additional dropdown, select SKU #.
- An input box will appear below the Additional dropdown — enter the SKU you want to search for (e.g.,
KB SH). - Click Apply.
- Webgility will display only the orders that contain the specified SKU, within the selected tab.
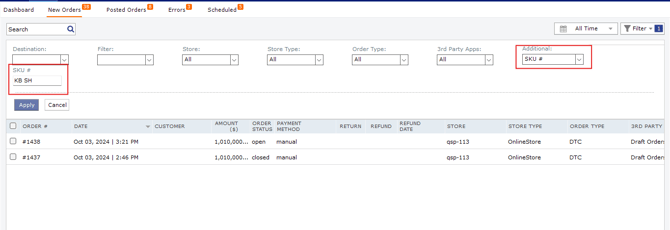
This same process applies to any other option in the Additional dropdown — simply select the desired filter type, enter the relevant value in the field that appears, and click Apply to view matching orders.
Steps to Use the Additional Filter (General)- Navigate to the relevant tab: New Orders, Posted Orders, or Archived.
- Click on Filter (top-right corner) to open the filter panel.
- Locate the Additional dropdown on the right side of the filter row.
- Select the criteria you want to filter by (e.g., Email, Product Name, PO Number, etc.).
- Enter the corresponding value in the input field that appears.
- Click Apply to filter the order list.
- Click Cancel to close the filter panel, or clear the entered value and reapply to reset the filter.
- The Additional filter can be combined with other filters (Destination, Store, Store Type, Order Type, 3rd Party Apps) to narrow down results even further.
- This filter is available independently on each tab (New Orders, Posted Orders, Archived), so the same filtering steps apply regardless of which tab you're working in.
- If no orders match the entered value, the order grid will show no results — double-check the spelling or format of the value entered (e.g., SKU casing, exact PO number).
- Once a filter is applied, an indicator badge (showing the number of active filters) appears next to the Filter button, making it easy to know when a filter is currently active.
- To remove the applied filter and view all orders again, clear the value from the Additional field and click Apply, or reset/cancel the filter panel.