
When Does This Apply?
Use this guide if:
- You are currently using Webgility Desktop with QuickBooks Desktop and want to switch to QuickBooks Online Advanced.
- You are already connected to QuickBooks Online Simple Start, Essentials, or Plus and want to upgrade to QuickBooks Online Advanced.
- You have an active QuickBooks Online Advanced subscription and want to connect it to your existing Webgility Desktop installation.
What You Need Before Upgrading
Before proceeding, make sure you have:
- An active QuickBooks Online Advanced subscription.
- The QuickBooks Online Advanced Admin username and password.
- Access to the QuickBooks company you want to connect.
- A licensed and active Webgility Desktop installation.
Important: Make sure you have access to the QuickBooks Online Advanced company using an Admin account. You will need to authorize Webgility to access your QuickBooks company during the reconnection process.
Steps to Upgrade Your Existing QuickBooks Connection
The steps differ slightly depending on whether you are currently using QuickBooks Desktop or QuickBooks Online.
Scenario 1: Upgrading from QuickBooks Desktop to QuickBooks Online Advanced
If your existing Webgility Desktop integration is connected to QuickBooks Desktop, follow these steps:
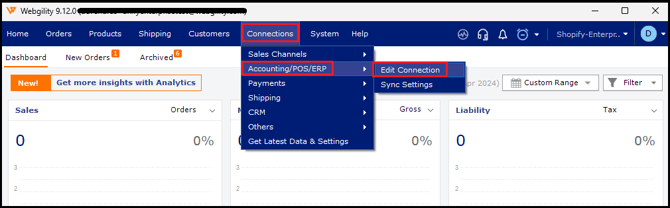
Step 1: Open Accounting Connection Settings
- Launch Webgility Desktop.
- Navigate to Connections > Accounting.
- Click Edit Connection.
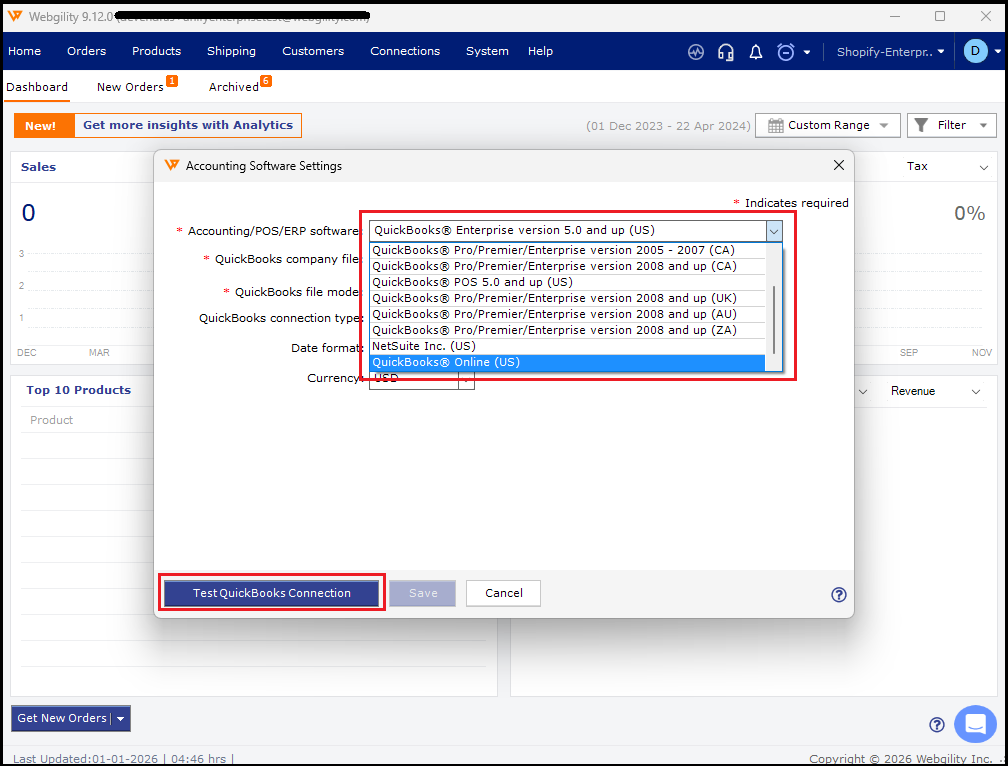
Step 2: Select QuickBooks Online
- Select QuickBooks Online US from the available accounting integration options.
- Click Test QuickBooks Connection.
Step 3: Authorize QuickBooks Online Advanced
- A QuickBooks sign-in window will open.
- Enter your QuickBooks Online Advanced Admin username and password.
- If prompted, select the QuickBooks Online Advanced company you want to connect.
- Review the permissions requested by Webgility and click Approve or Authorize to grant the required access.
- Once authorization is successful, QuickBooks will display a connection success message.
Step 4: Save the New Connection
- Return to Webgility Desktop.
- Click Save to save your new QuickBooks Online Advanced connection.
Your existing QuickBooks Desktop integration will now be replaced with the QuickBooks Online Advanced connection.
Scenario 2: Upgrading from an Existing QuickBooks Online Subscription to QuickBooks Online Advanced
If Webgility Desktop is already connected to QuickBooks Online Simple Start, Essentials, or Plus, follow these steps:
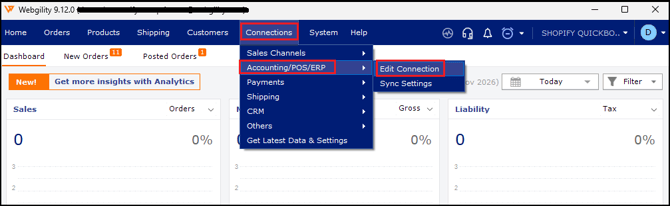
Step 1: Open Accounting Connection Settings
- Launch Webgility Desktop.
- Navigate to Connections > Accounting.
- Click Edit Connection.
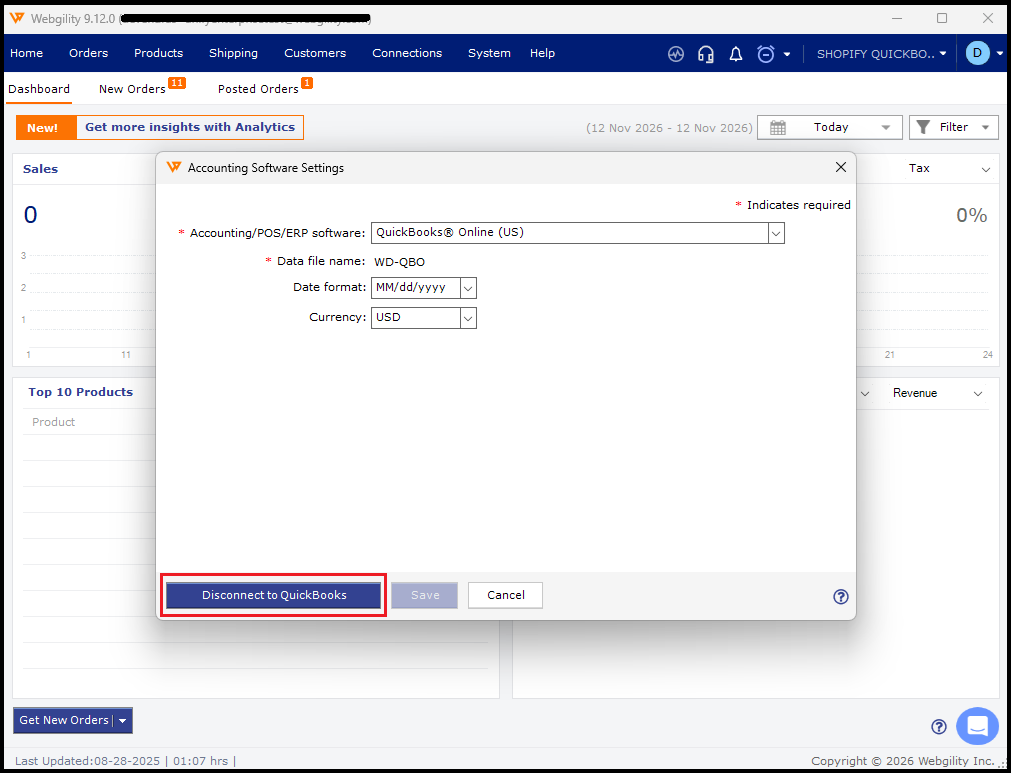
Step 2: Disconnect the Existing QuickBooks Online Integration
- Click Disconnected to disconnect the existing QuickBooks Online integration.
Step 3: Reconnect Using QuickBooks Online Advanced
- Select QuickBooks Online US from the available accounting integration options.
- Click Test QuickBooks Connection.
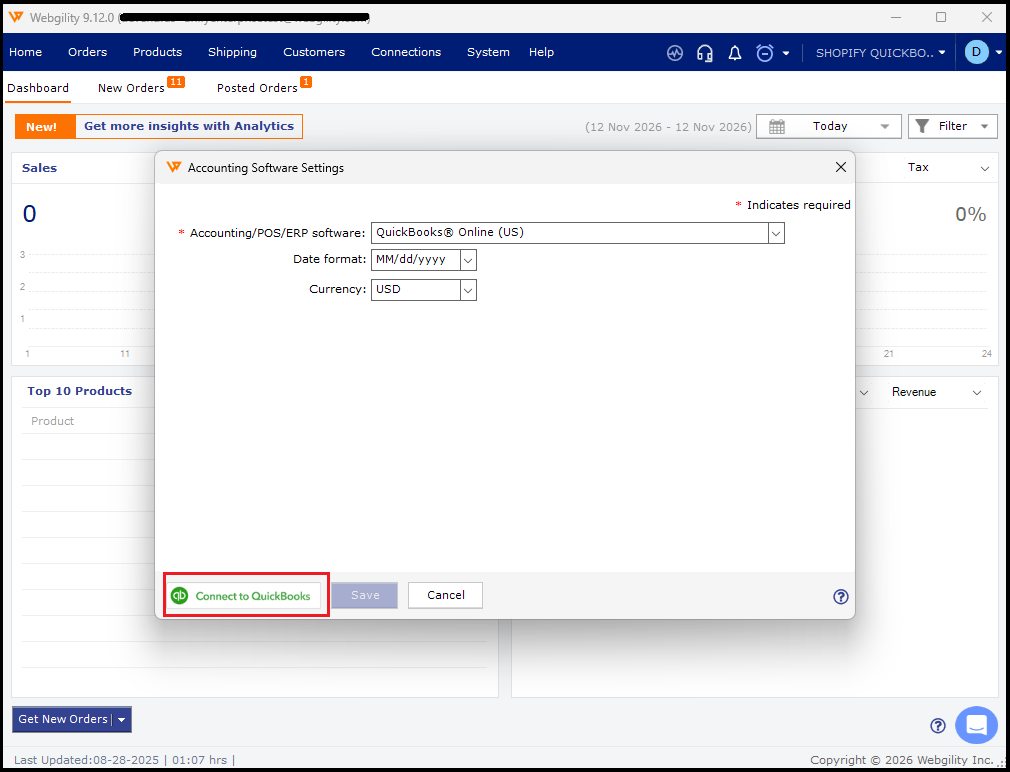
- A QuickBooks sign-in window will open.
- Enter your QuickBooks Online Advanced Admin username and password.
- If prompted, select the QuickBooks Online Advanced company you want to connect.
- Review the permissions requested by Webgility and click Approve or Authorize to grant the required access.
- Once authorization is successful, QuickBooks will display a connection success message.
Step 4: Save the New Connection
- Return to Webgility Desktop.
- Click Save to save your new QuickBooks Online Advanced connection.
Your existing QuickBooks Online integration will now be replaced with the QuickBooks Online Advanced connection.
Verify Your Connection and Sync Settings
After successfully connecting QuickBooks Online Advanced, review your existing Webgility configuration before processing orders.
- Open the Sync Settings section in Webgility Desktop.
- Review the configured preferences for customers, products, orders, payments, and inventory.
- Verify that your accounts and transaction mappings are configured correctly.
- Process one test order and verify that it posts successfully to QuickBooks Online Advanced.
- If applicable, test inventory synchronization and payout posting.
This helps ensure that your accounting workflows are configured correctly after upgrading your connection.
Note : QuickBooks Online Advanced vs. Intuit Enterprise Suite. QuickBooks Online Advanced and Intuit Enterprise Suite are separate products.