
When your orders post as invoices, Webgility i can mark each invoice as paid with one payment for its total, or record one payment for each payment your sales channel collected, such as a split payment or a deposit and a balance paid later. You choose this in the Payments section of an Orders to accounting rule or of the Default, on the Workflows page.
Note: Recording each payment as received is available on Shopify, BigCommerce and Lightspeed X-Series channels, for orders that post as invoices to QuickBooks Online. On other channels the Payments section shows the Mark invoice as paid in QuickBook switch instead, which always records one payment.
Note: The option Each payment as received from sales channel needs the Accounts Receivable(AR) Automation Add-On. Without it, you can still mark invoices as paid with a single payment.
Steps:
- Go to Setup > Workflows.
- On the Orders to accounting card, find the sales channel and click its Default row, or click the rule you want to change.
- Under Then, open the Transaction section and check that Post all orders as this type of transaction is set to Invoices. The payment settings show only for invoices.
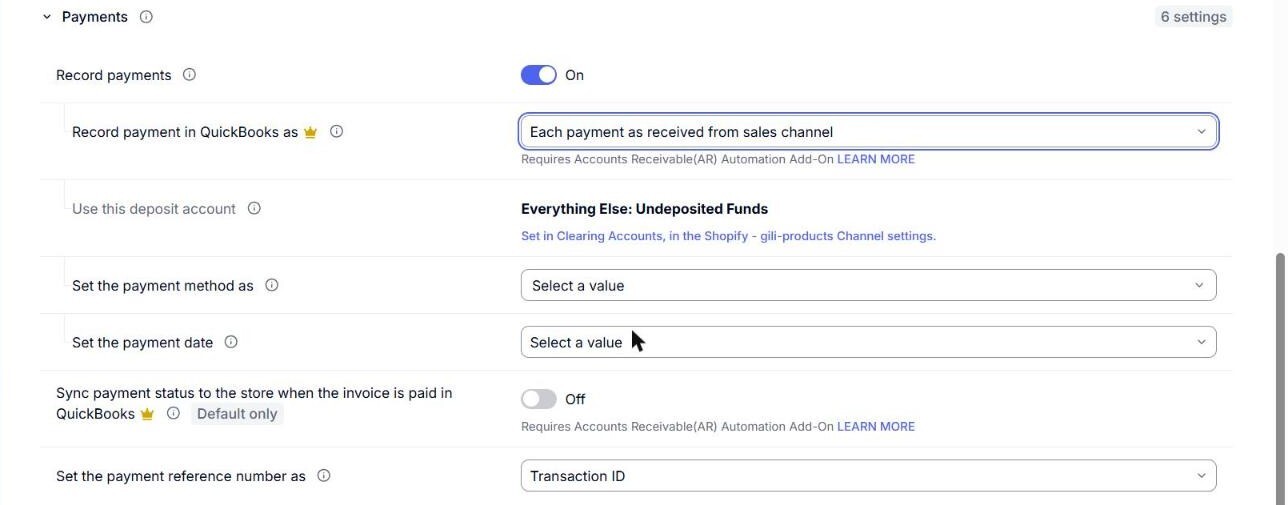
- Open the Payments section and turn on Record payments. While it is off, the invoice posts as unpaid and stays open in QuickBooks Online.

- In Record payment in QuickBooks as, select one of these:
- Mark invoice as paid with single payment: one payment for the invoice's total.
- Each payment as received from sales channel: one payment for each payment the sales channel collected.
Note: Each time you turn Record payments on or off, Record payment in QuickBooks as goes back to Mark invoice as paid with single payment. Select your choice again after you turn the switch on.
- On a Shopify channel, if you chose Each payment as received from sales channel, select Set the payment date: Order date or Payment date.
- In Set the payment method as, select the QuickBooks Online payment method the payments use, or As on sales channel to use the payment method of the order.
- In Set the payment reference number as, select Transaction ID, Order# or Invoice#.
- Check the deposit account. Depending on how your channel posts, you see one of these:
- Use this deposit account: read only. It shows the account from Clearing Accounts, in the channel settings, with a link to change it there.
- Use this deposit account for a paid invoice: select the QuickBooks Online account the payment lands in. You cannot save the Default while this is empty.
- Click Save the Default. For a rule, click Save rule for a new rule or Save changes for a rule you are editing.
Note: The deposit account is marked Default only. A rule cannot change it. The other payment settings can be different in each rule.