
Overview
Each sales channel you connect to Webgility Desktop has two separate settings areas:
- Sales Channel Settings — controls which orders get downloaded from the channel and what happens to them after they're processed (the Download Settings and Order Processing tabs).
- Sync Settings — controls how downloaded orders are posted into your accounting/ERP system, including transaction types, templates, payment and shipping mappings, purchase orders, credit memos, and refunds (the Posting Rules, Transaction Settings, Optional Settings, Purchase Order, Credit Memo, and Auto Refund Posting tabs).
Both areas are configured per sales channel, so if you have more than one store connected, repeat these steps for each one.
Before you begin
- You need admin access to your Webgility Desktop application.
- The sales channel (Shopify, Amazon, BigCommerce, etc.) should already be connected. If it isn't, go to Connections > Sales Channels > Add New Sales Channel first.
- Have your QuickBooks (or other accounting/ERP) terms, payment methods, and shipping carriers ready — you'll be asked to map Webgility's values to the matching ones in your accounting system.
Steps
1. Open your sales channel's settingsFrom the top menu, go to Connections > Sales Channels > Settings. This opens My Sales Channels, a list of every store connected to your account. Find the channel you want to configure and click the pencil/edit icon in its Action column.
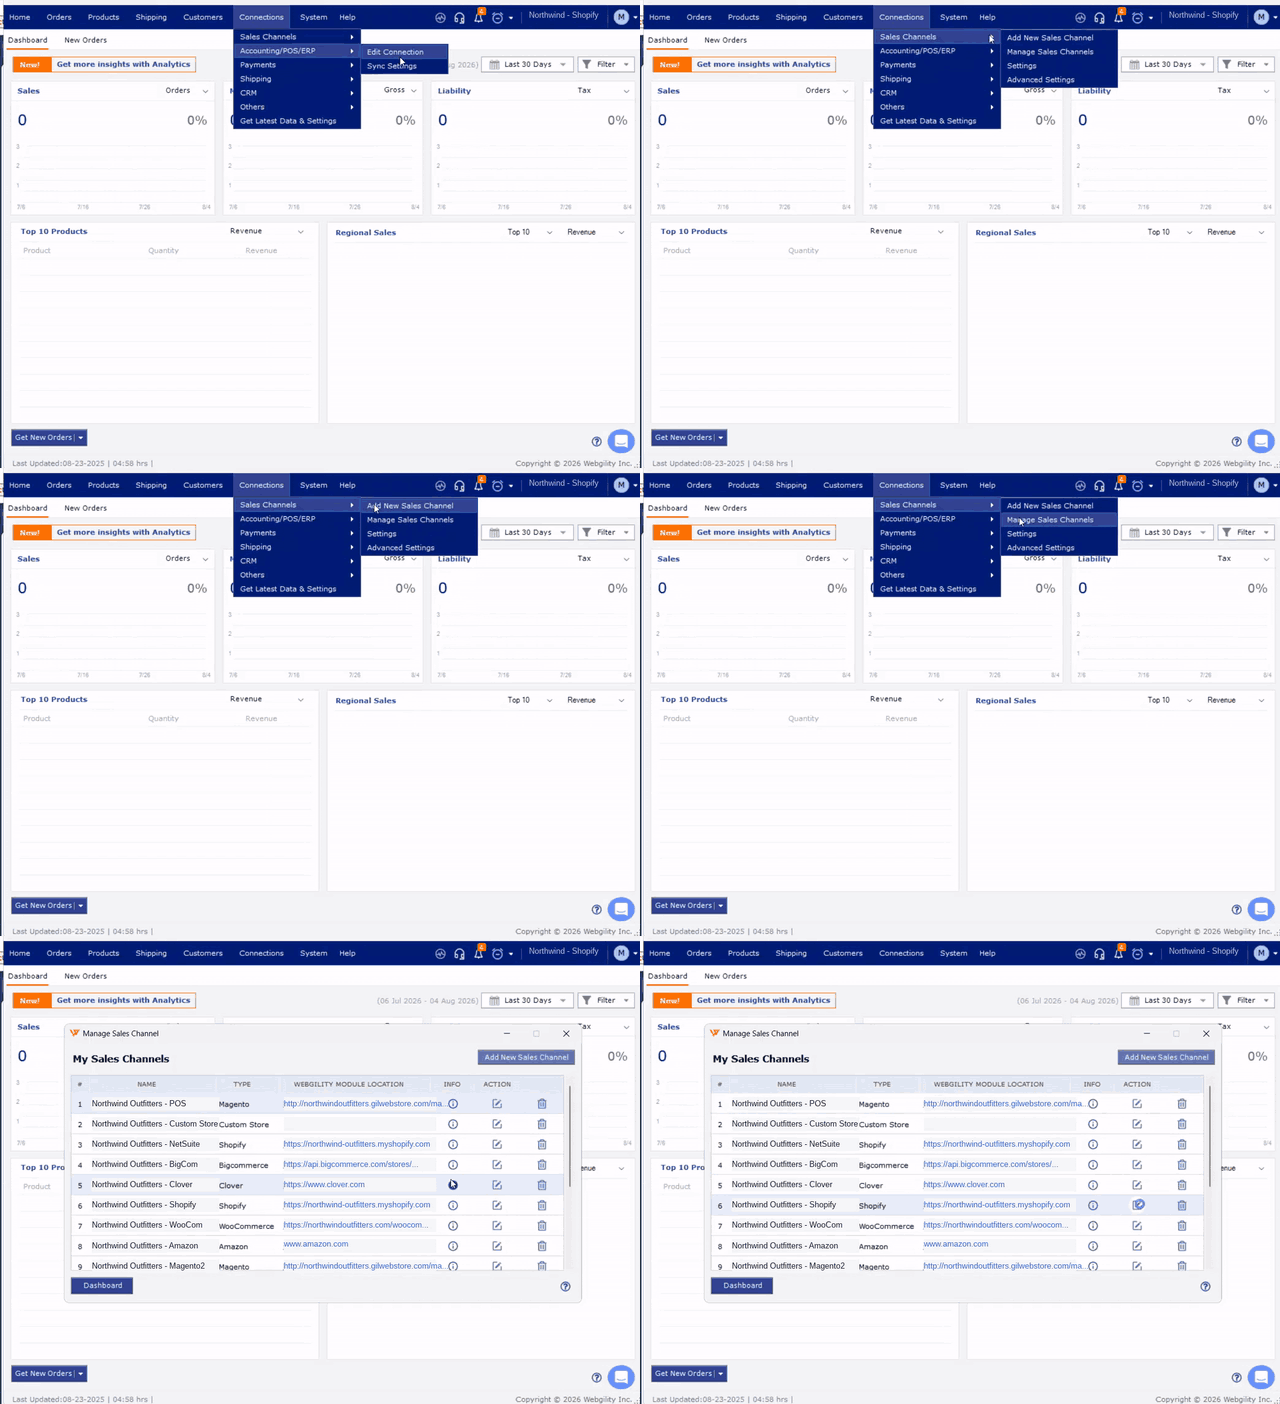
Sample data shown — store names and URLs in this list are for illustration only.
This opens the Sales Channel Settings window with two tabs: Download Settings and Order Processing.
2. Set your Download SettingsOn the Download Settings tab, choose which orders Webgility should pull in from the channel:
- For each online order status (e.g. open, closed, cancelled), choose whether to download it, and whether to mark it as paid/shipped in the process.
- Set Download orders from a specific date and time zone.
- Under Download Options, choose extras to pull in with each order — credit card details, discounts as a line item, refunds, shipping charges, sales tax, gift card payments, and more.
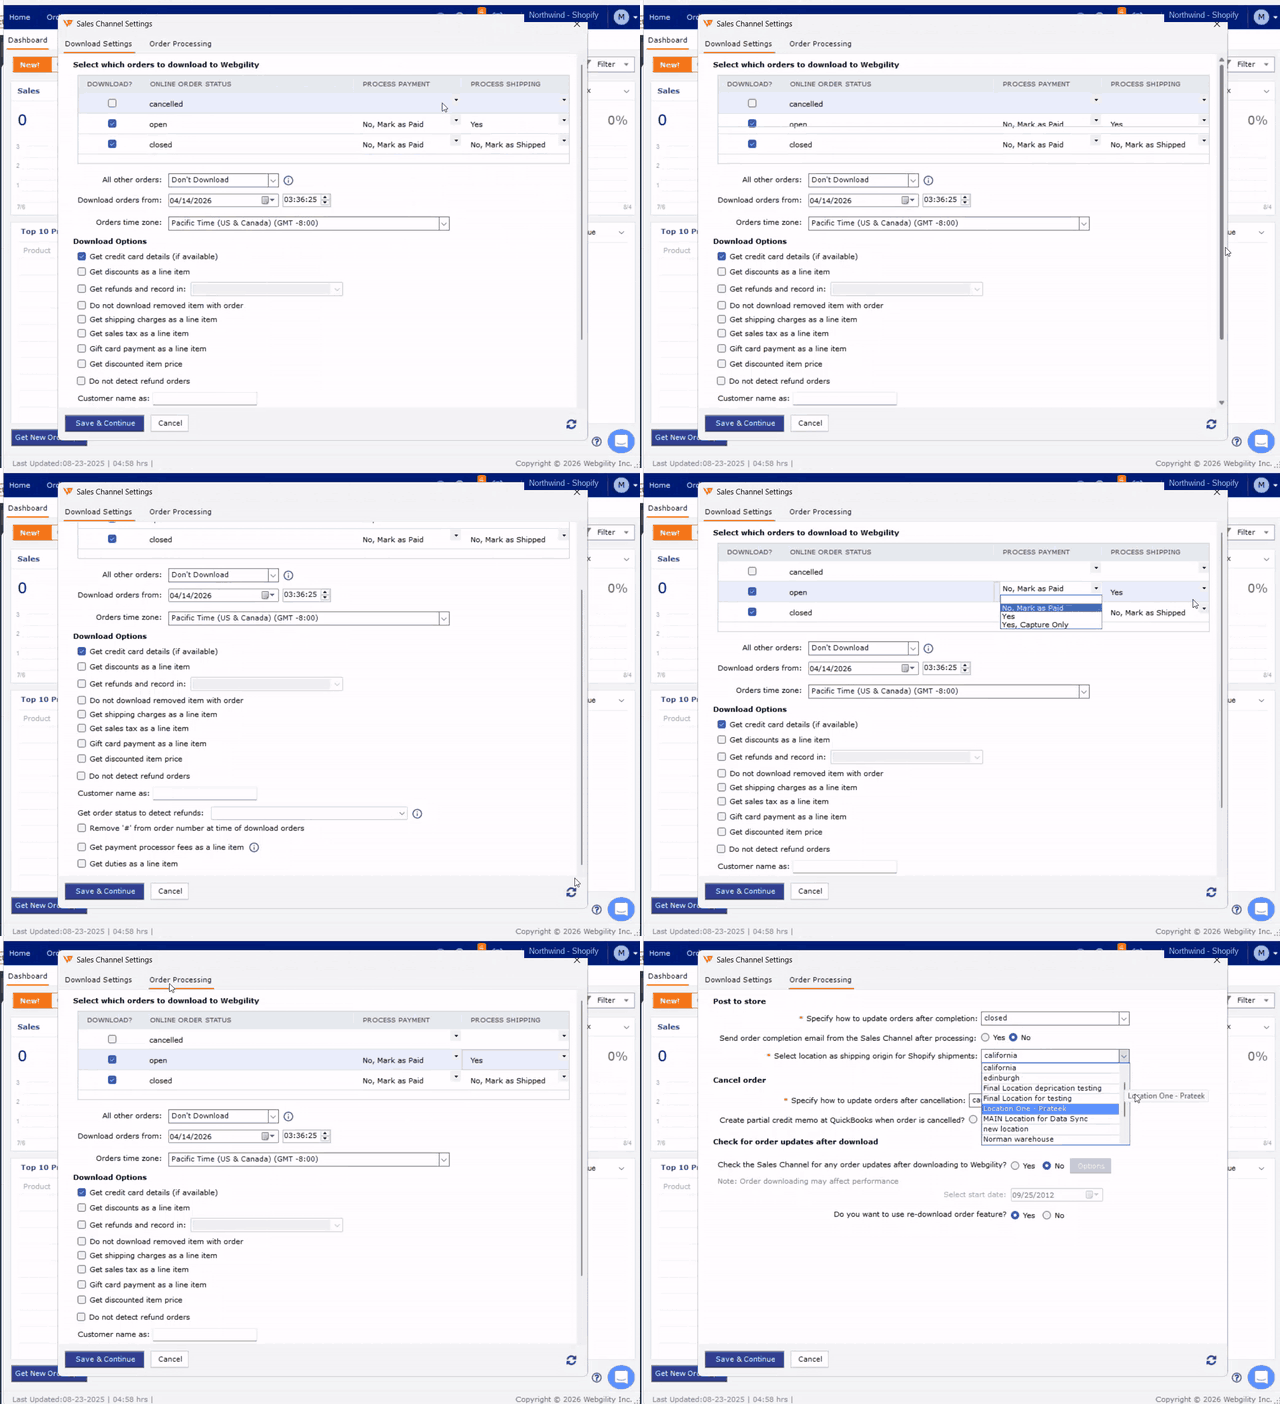 Sample data shown.
3. Set your Order Processing rules
Switch to the Order Processing tab to control what happens after an order downloads:
- Post to store — specify how to update the order in your sales channel after it completes processing, whether to send a completion email, and which location to use as the shipping origin.
- Cancel order — specify how to update orders after they're cancelled, and whether to create a partial credit memo in QuickBooks when an order is partially cancelled.
- Check for order updates after download — turn on re-checking the sales channel for updates (order status, totals, shipment details, payment details, and more) after an order has already been downloaded. Click Options to choose exactly which fields to watch, and set a date to stop checking updates on older orders.
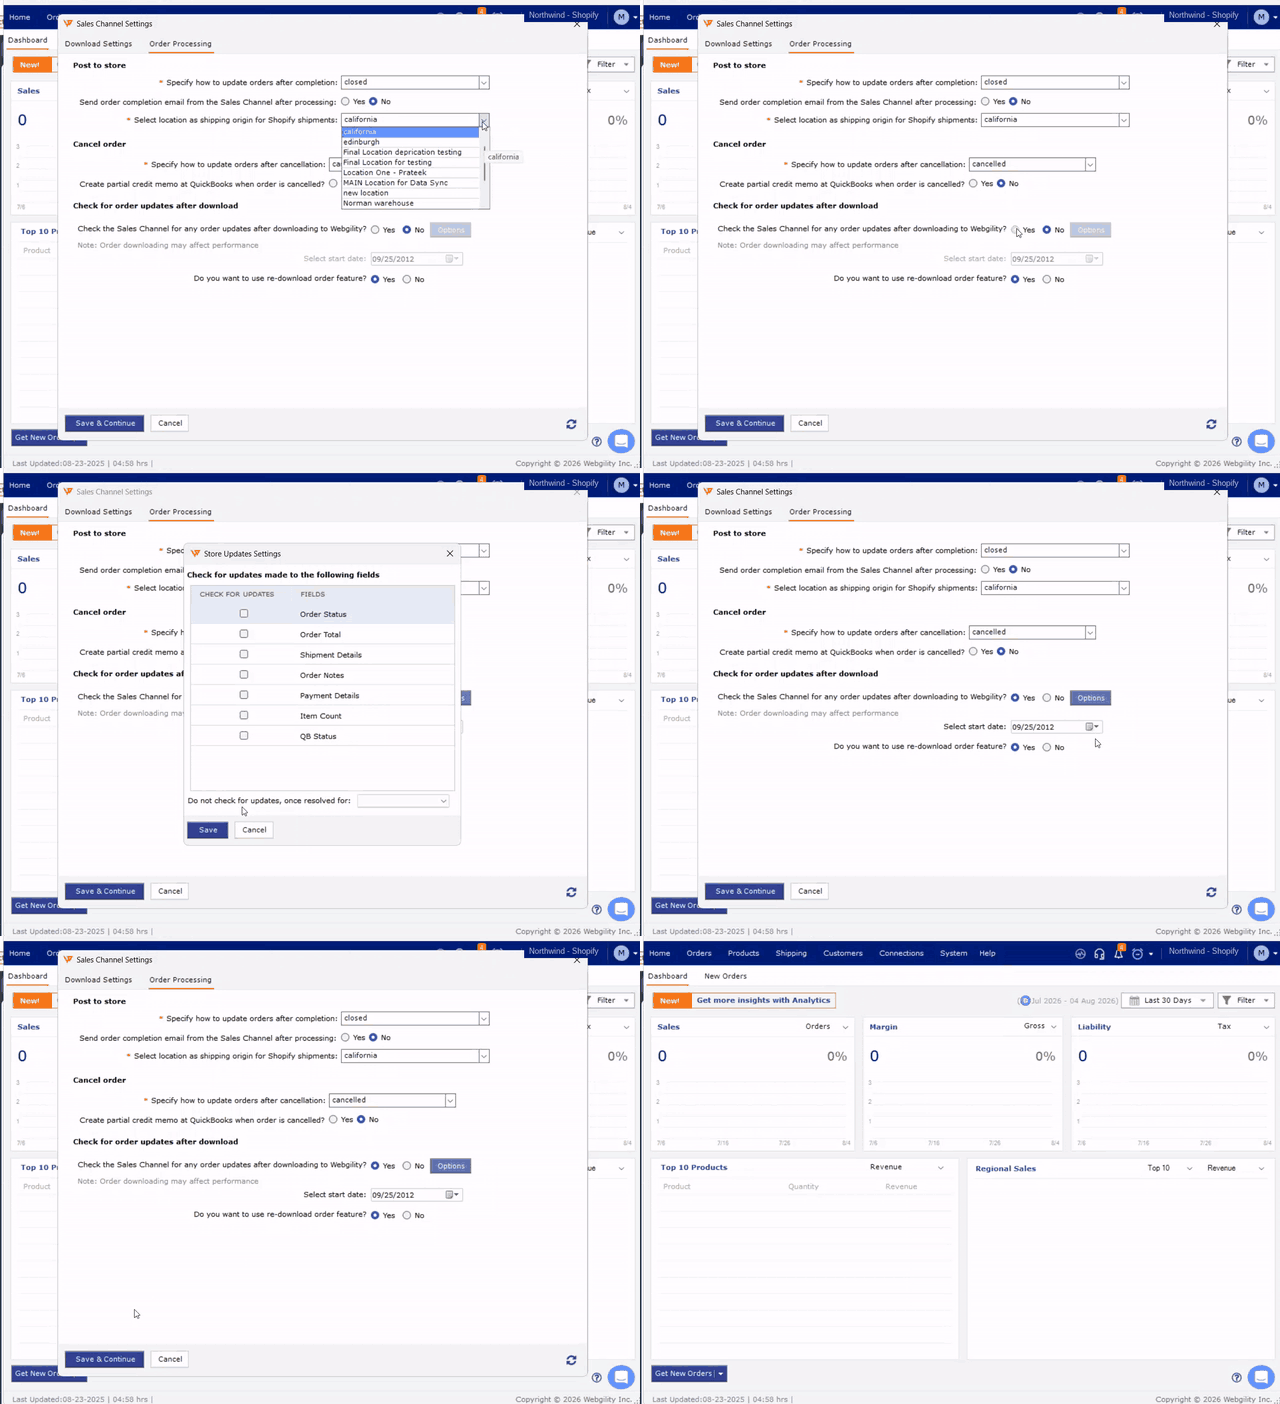 Sample data shown — location names in the dropdown are for illustration only.
Click Save & Continue when you're done, then close this window.
4. Open Sync Settings and choose how orders postSync Settings › Posting RulesOpen Sync Settings for the same channel (from Connections > Accounting/POS/ERP > Sync Settings, or the Get Latest Data & Settings link). On the Posting Rules tab:
- Choose whether to post each order individually or post orders in groups.
- Choose the transaction type to use for all orders (Invoice, Sales Receipt, Sales Order, or Estimate) — or select Post differently based on Order Status, Payment Method, Store, Order Type, or a 3rd-party app, and set a different transaction type per rule.
- Click Setup next to the transaction type to open Setup Transaction Settings, where you choose the QuickBooks template, A/R account, sales rep, deposit-to account, and how payments are recorded. From here, click Map Payment Terms to match your sales channel's payment terms (e.g. Due on receipt, Net 30) to the matching QuickBooks terms, or add a new QuickBooks account on the fly.
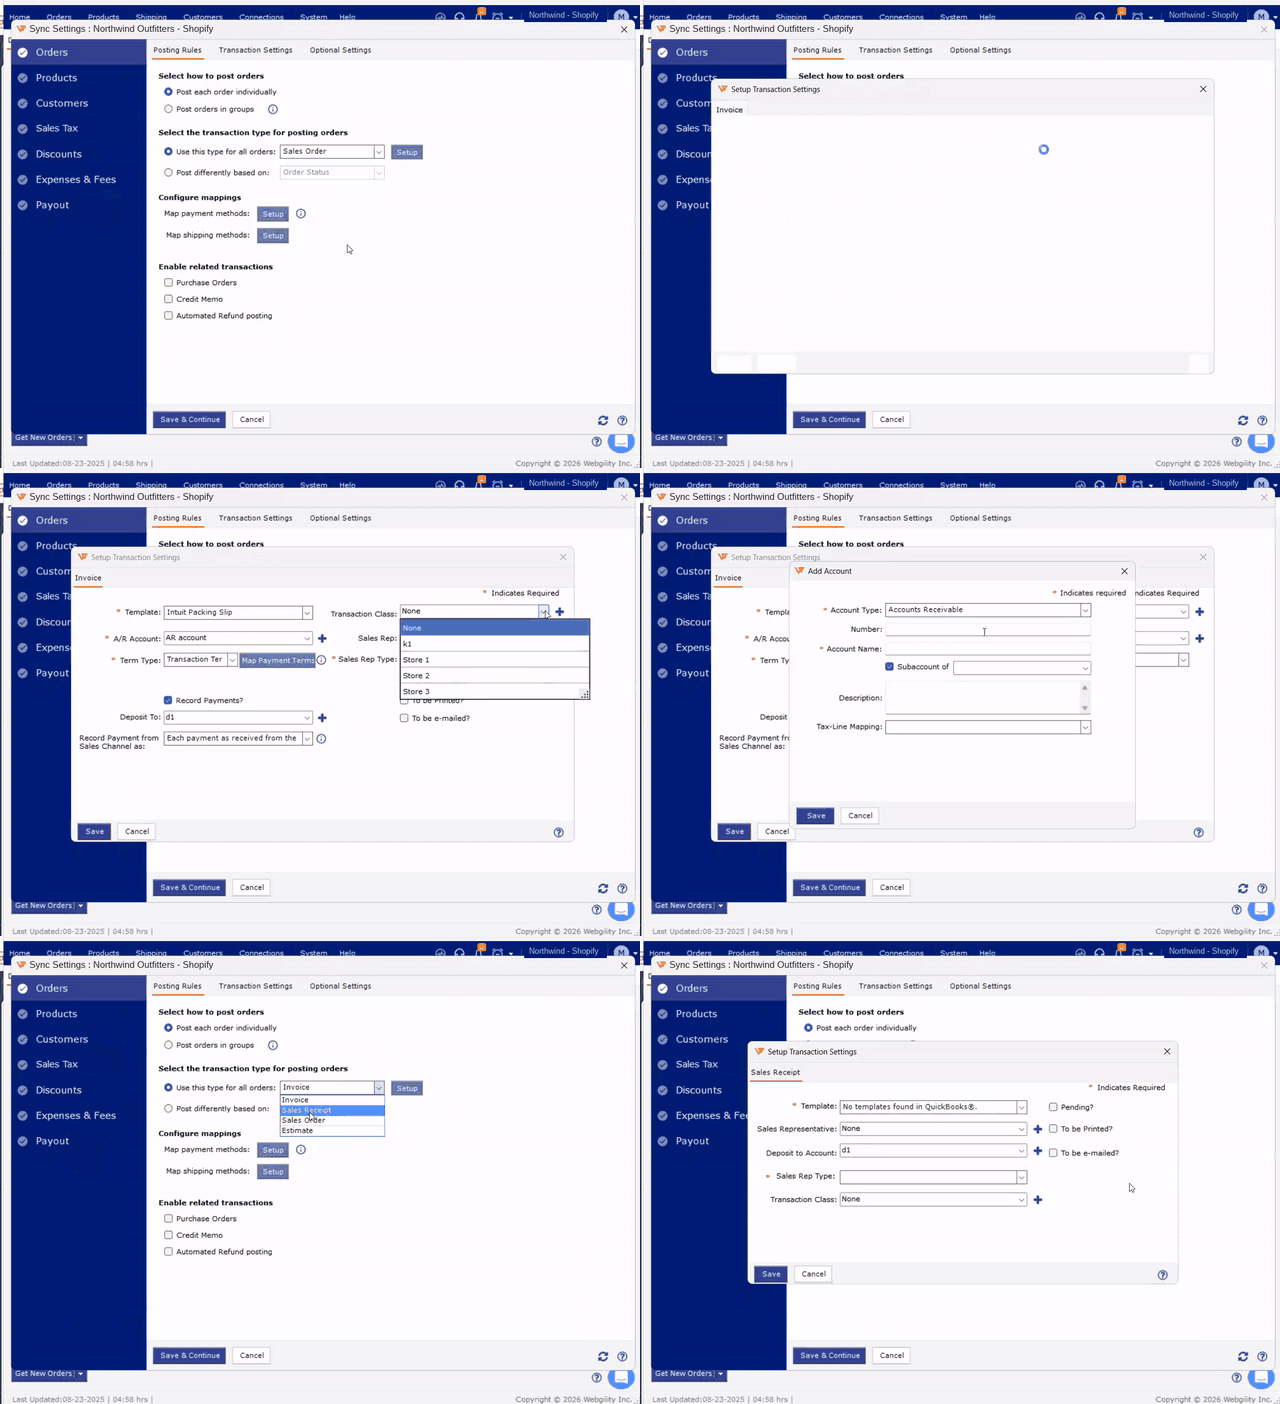
Sample data shown.
5. Map your payment and shipping methodsSync Settings › Posting Rules › Configure mappings
Still on the Posting Rules tab, under Configure mappings:
- Click Setup next to Map payment methods to match each payment method from your sales channel (Cash, Check, American Express, Visa, gift card, etc.) to the corresponding payment method in QuickBooks. You can also add a brand-new payment method here.
- Click Setup next to Map shipping methods to match each carrier and shipping method from your sales channel to a shipping item in QuickBooks.
- Finally, under Enable related transactions, turn on Purchase Orders, Credit Memo, and/or Automated Refund posting if you want those extra tabs and workflows available for this channel.
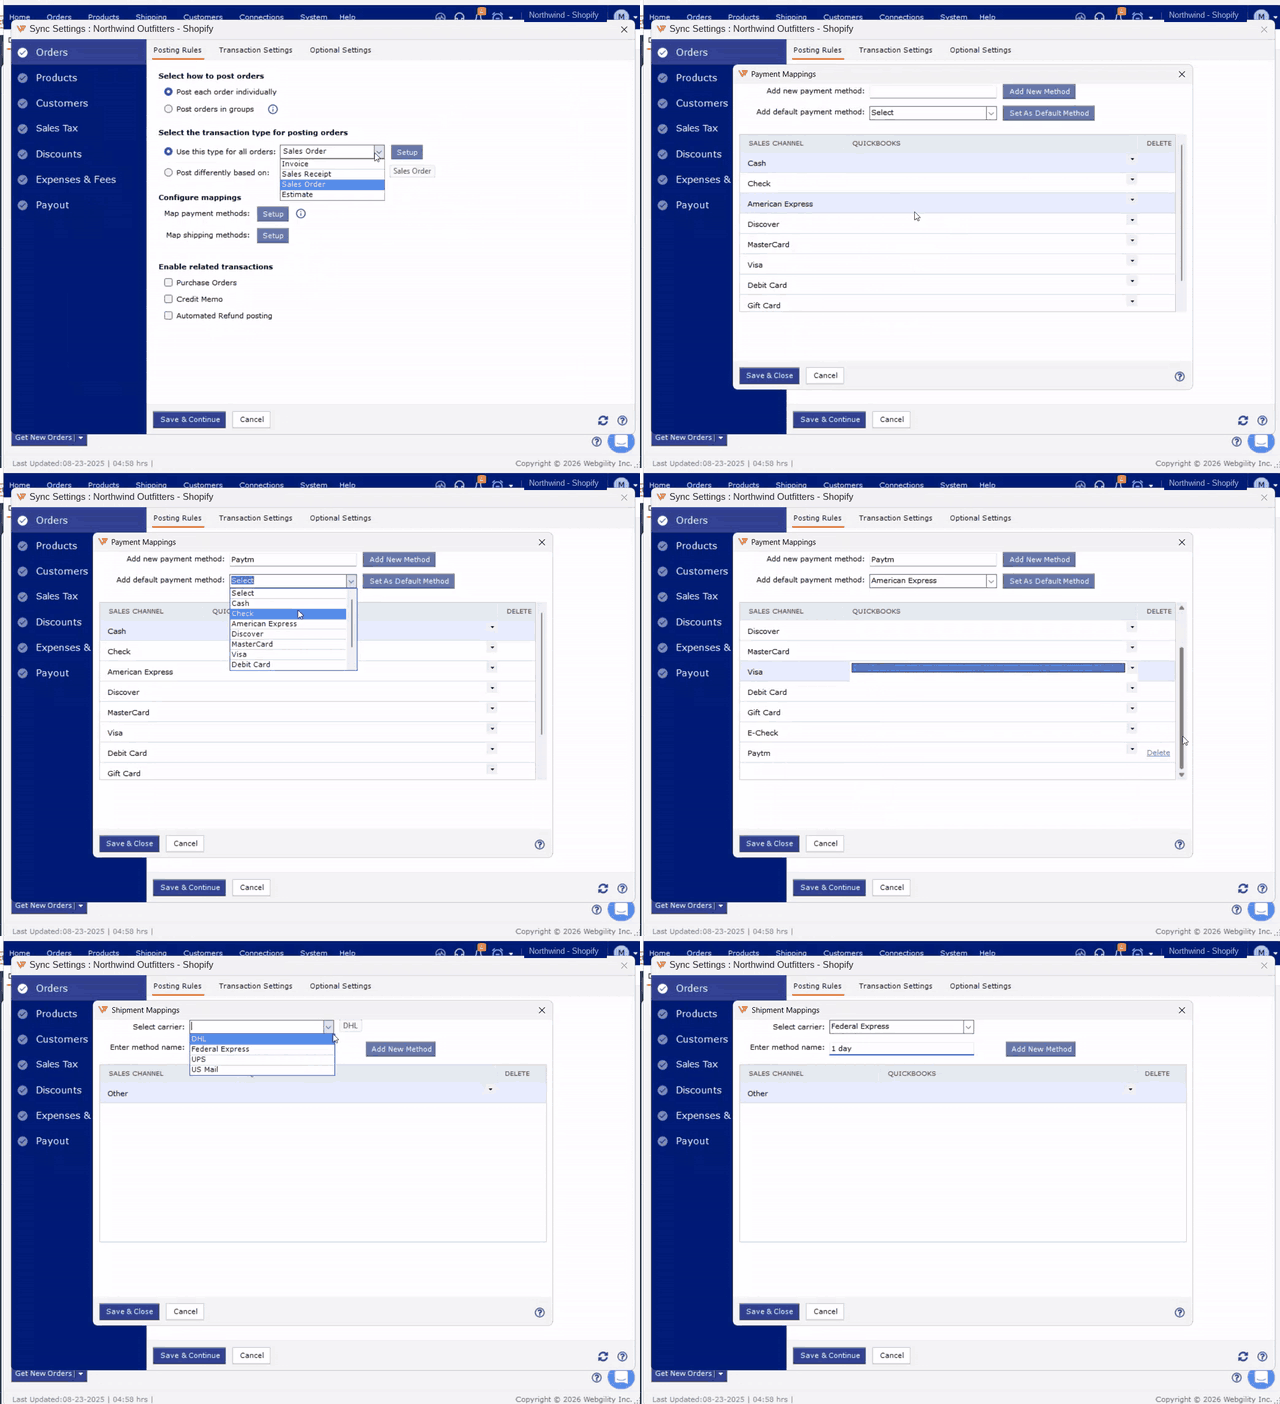
Sample data shown.
Note: The Purchase Order, Credit Memo, and Auto Refund Posting tabs only appear after you check the matching box under Enable related transactions.6Fine-tune Transaction SettingsSync Settings › Transaction Settings
The Transaction Settings tab controls the details of how each transaction is built:
- Transaction numbering, date, and item description — choose whether to use QuickBooks- generated numbers or your order number, which date to use, and how line items are described.
- Record shipping charges — choose the item used for domestic and international orders' shipping charges, and map specific shipping methods to specific items.
- Additional Settings — map check numbers, payment references, PO numbers, payment memos, and customer messages to specific order fields.
- Display these order related fields in the transaction — choose which extra fields (order ID, shipment details, payment details, order notes, customer comments, phone number) appear on the posted transaction.
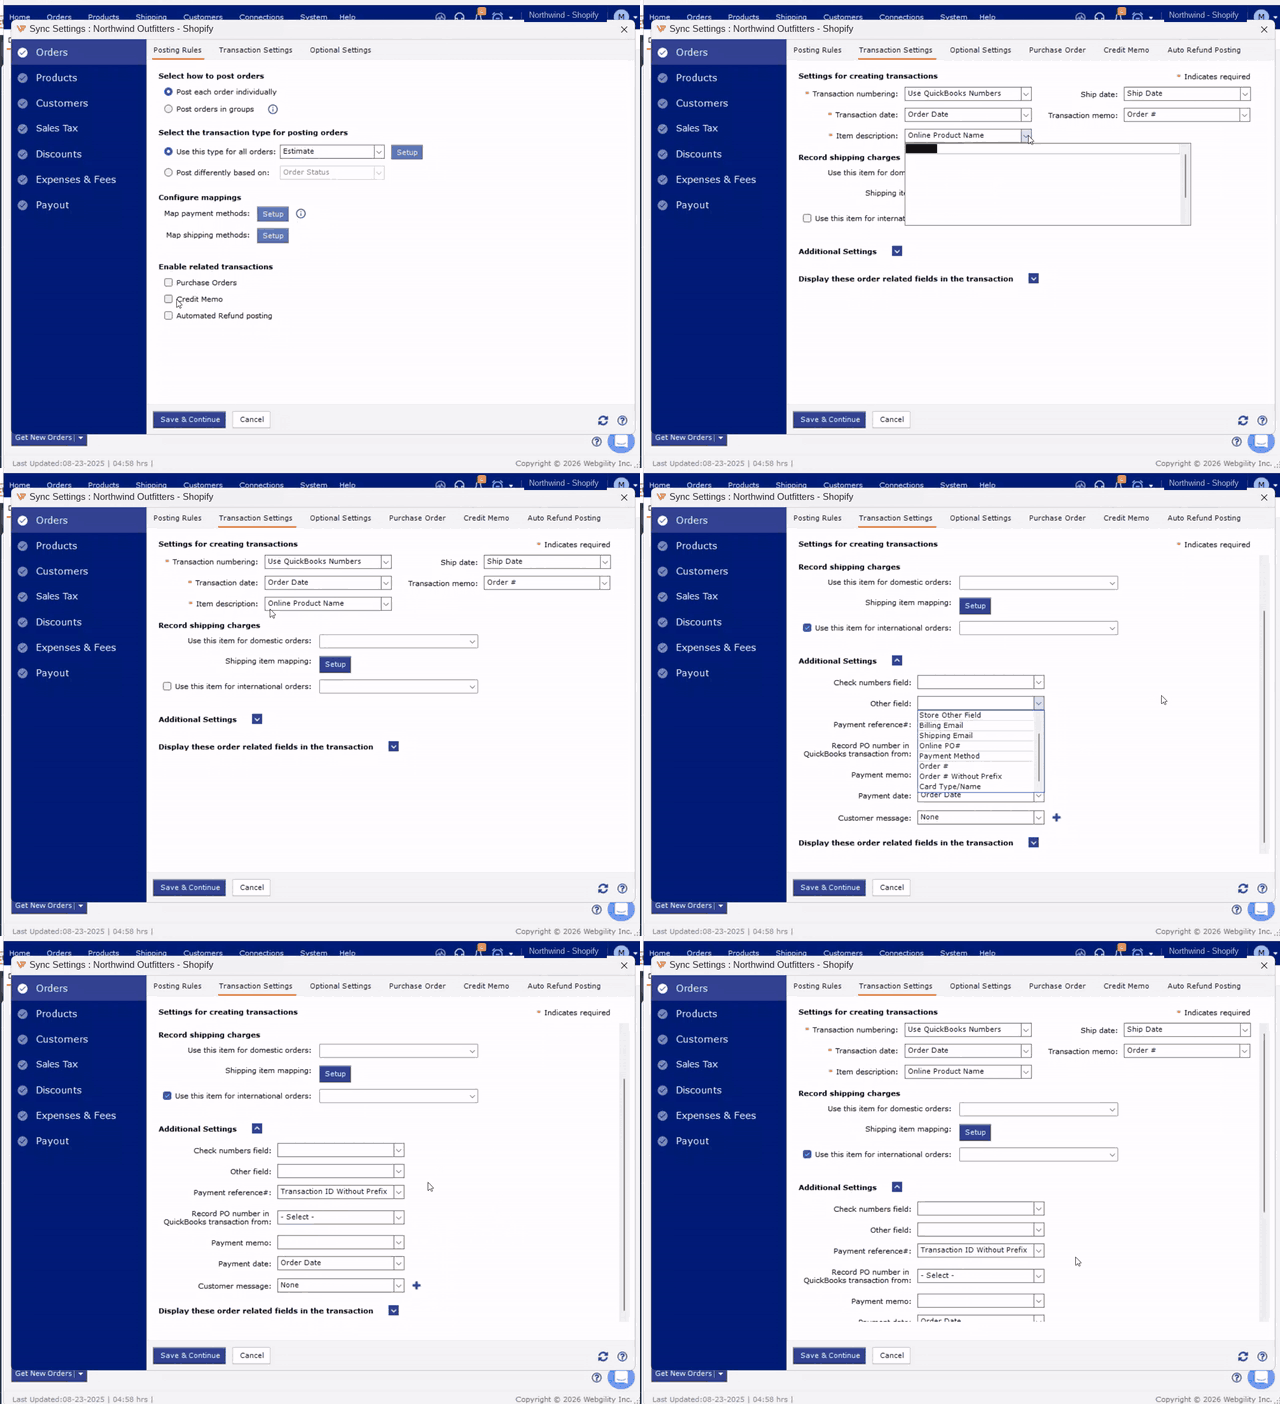
Sample data shown.
7. Review Optional SettingsSync Settings › Optional Settings
The Optional Settings tab has additional rules for edge cases, grouped under More configurations and Customize post options:
- Post group items as individual items, skip posting zero-amount orders, or skip orders with insufficient QuickBooks stock.
- Print packing slips automatically, build assembly products before posting, or adjust how item prices are set when orders are grouped.
- Choose whether to post orders even if the accounting period is closed.
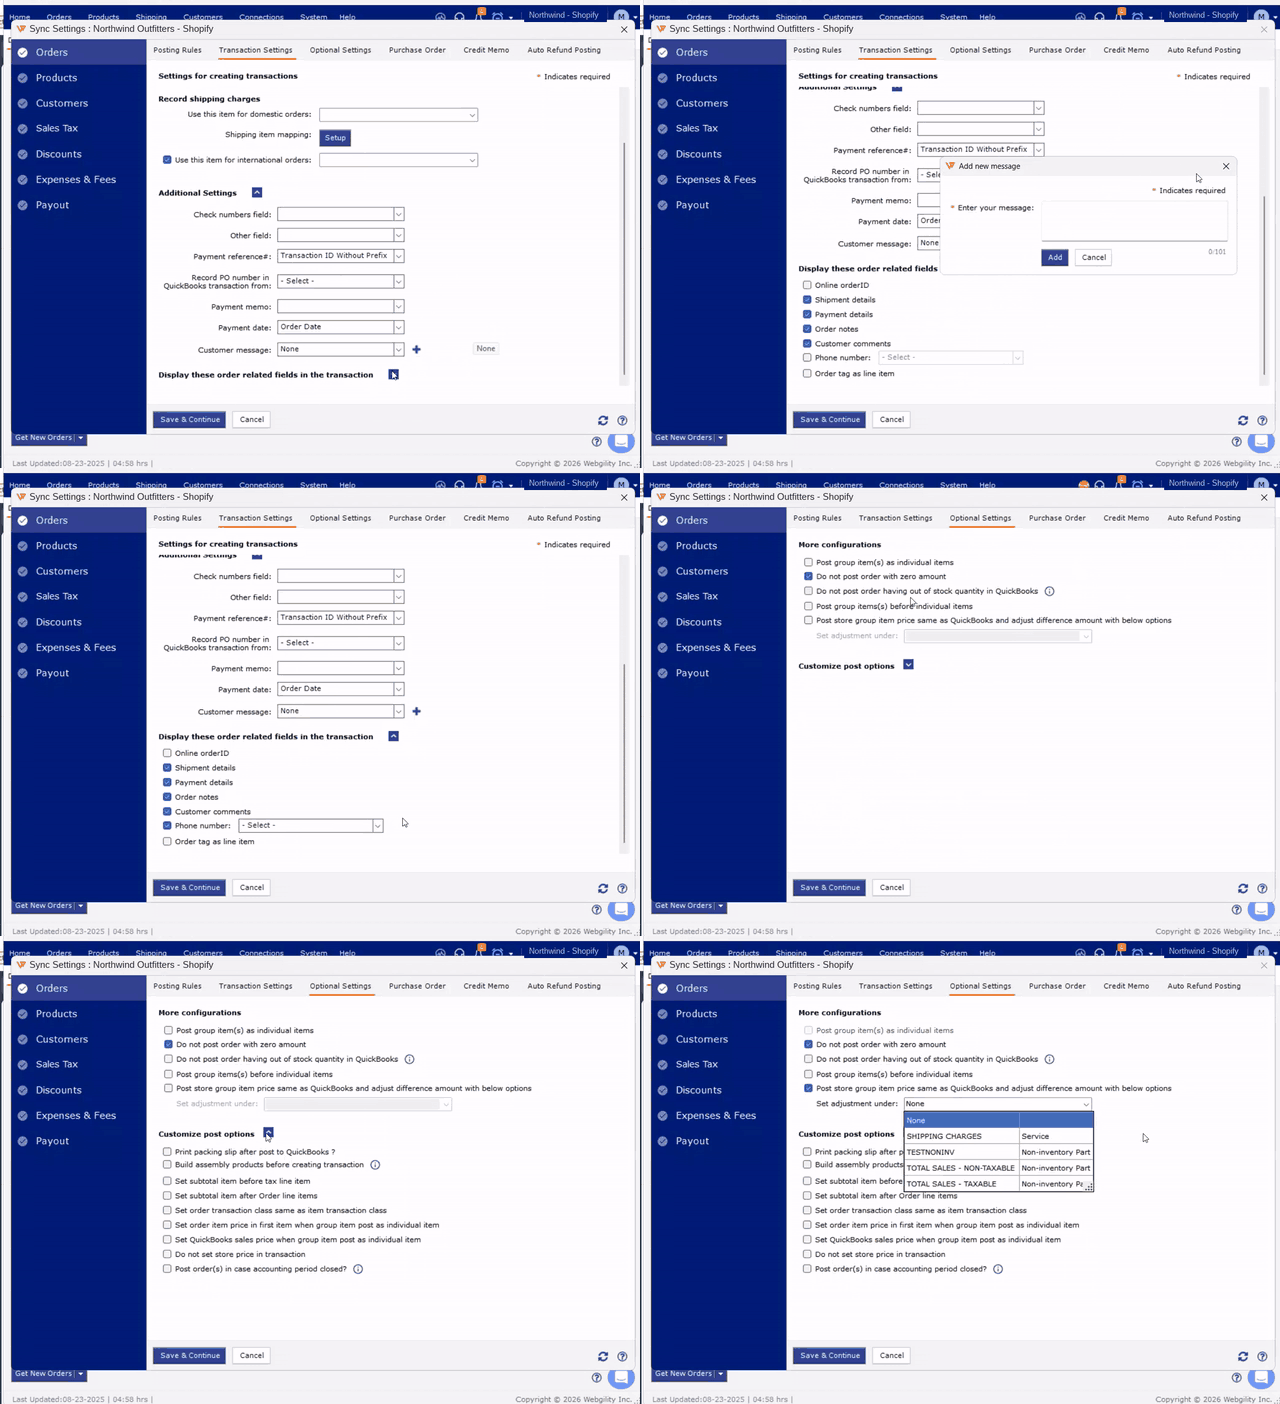
Sample data shown.
8. Set up Purchase Order rulesSync Settings › Purchase Order
If you enabled Purchase Orders in step 5, the Purchase Order tab lets you decide:
- When to create purchase orders — for all orders, only for out-of-stock items, or only for items marked as drop-ship.
- How to create them — a separate PO per order, grouped by vendor per order, or a single PO per vendor across multiple orders.
- Which vendor to use, and whether to include group items while creating the PO.
- Click Setup next to Purchase order settings to configure the ship-to address, template, PO numbering, expected ship date, and item description used on the PO itself.
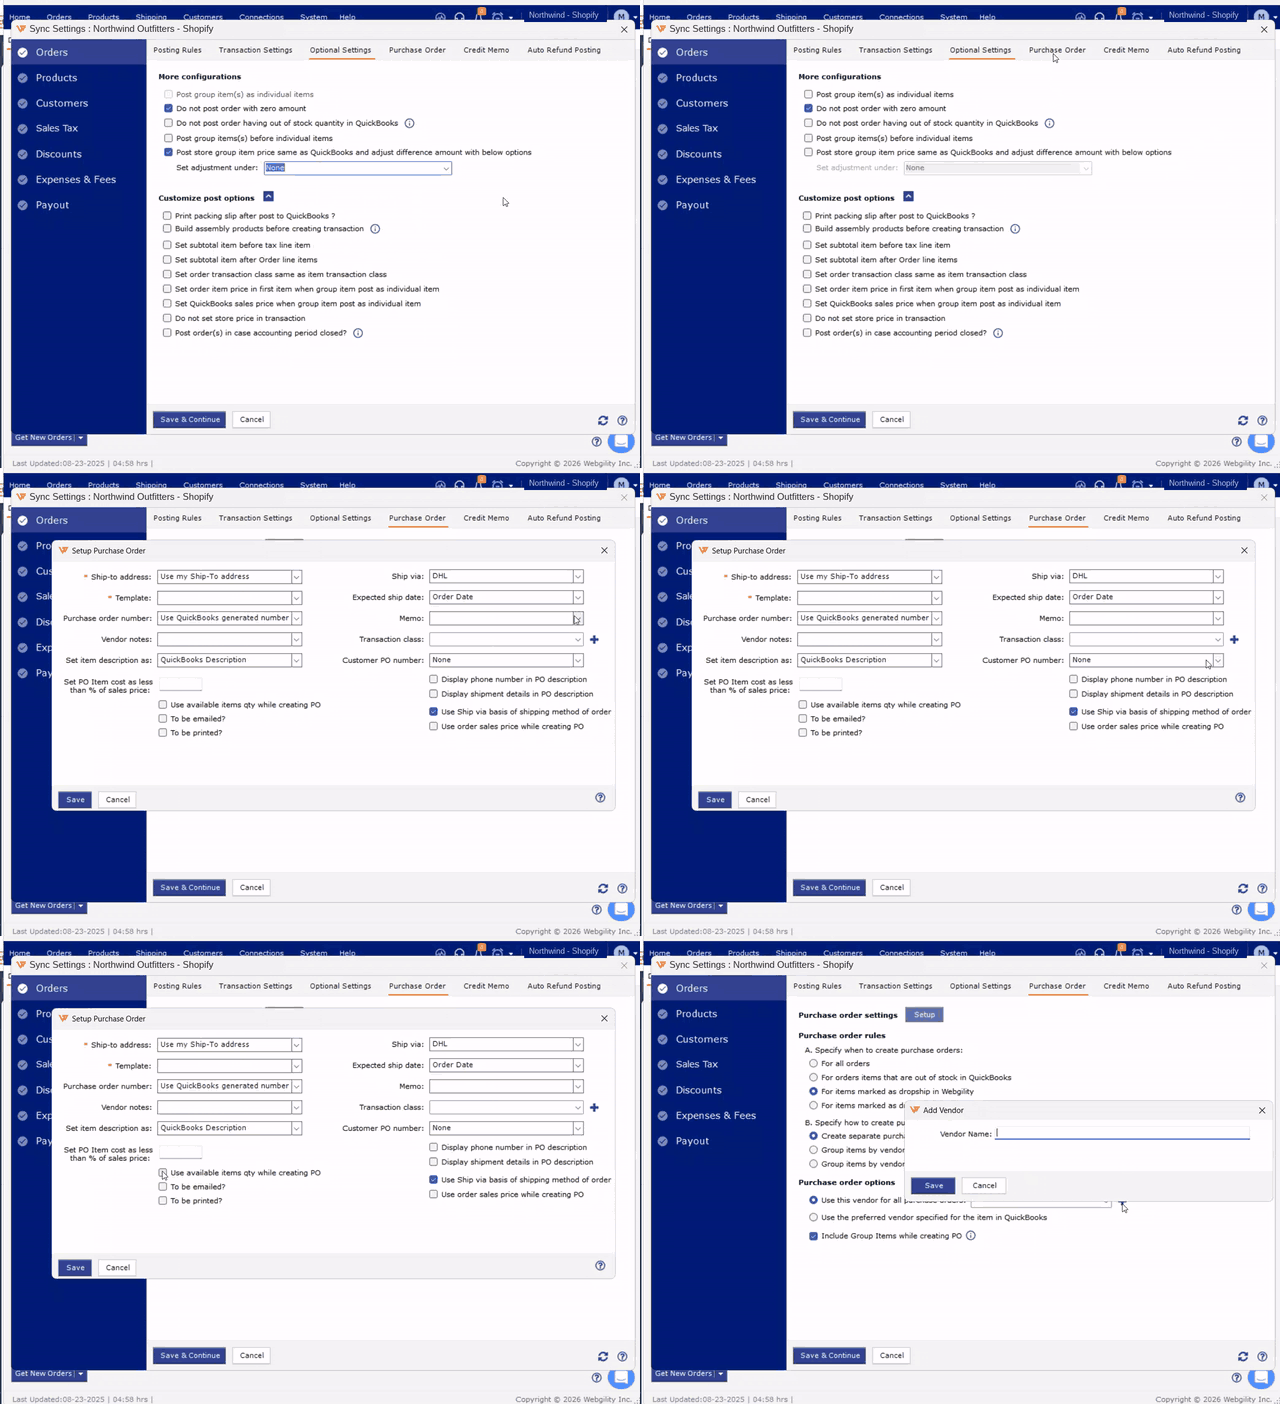
Sample data shown.
Note: Like the Posting Rules tab, Purchase Order also supports posting individually or in groups and posting differently based on order status, payment method, store, order type, or 3rd-party app.9Set up Credit Memo defaultsSync Settings › Credit Memo
If you enabled Credit Memo in step 5, use this tab to set the A/R account, sales class, sales rep, template, and terms used whenever Webgility creates a credit memo. You can also name the credit memo automatically, mark it pending/emailed/printed by default, and choose whether refund payments use the same date as the payout.
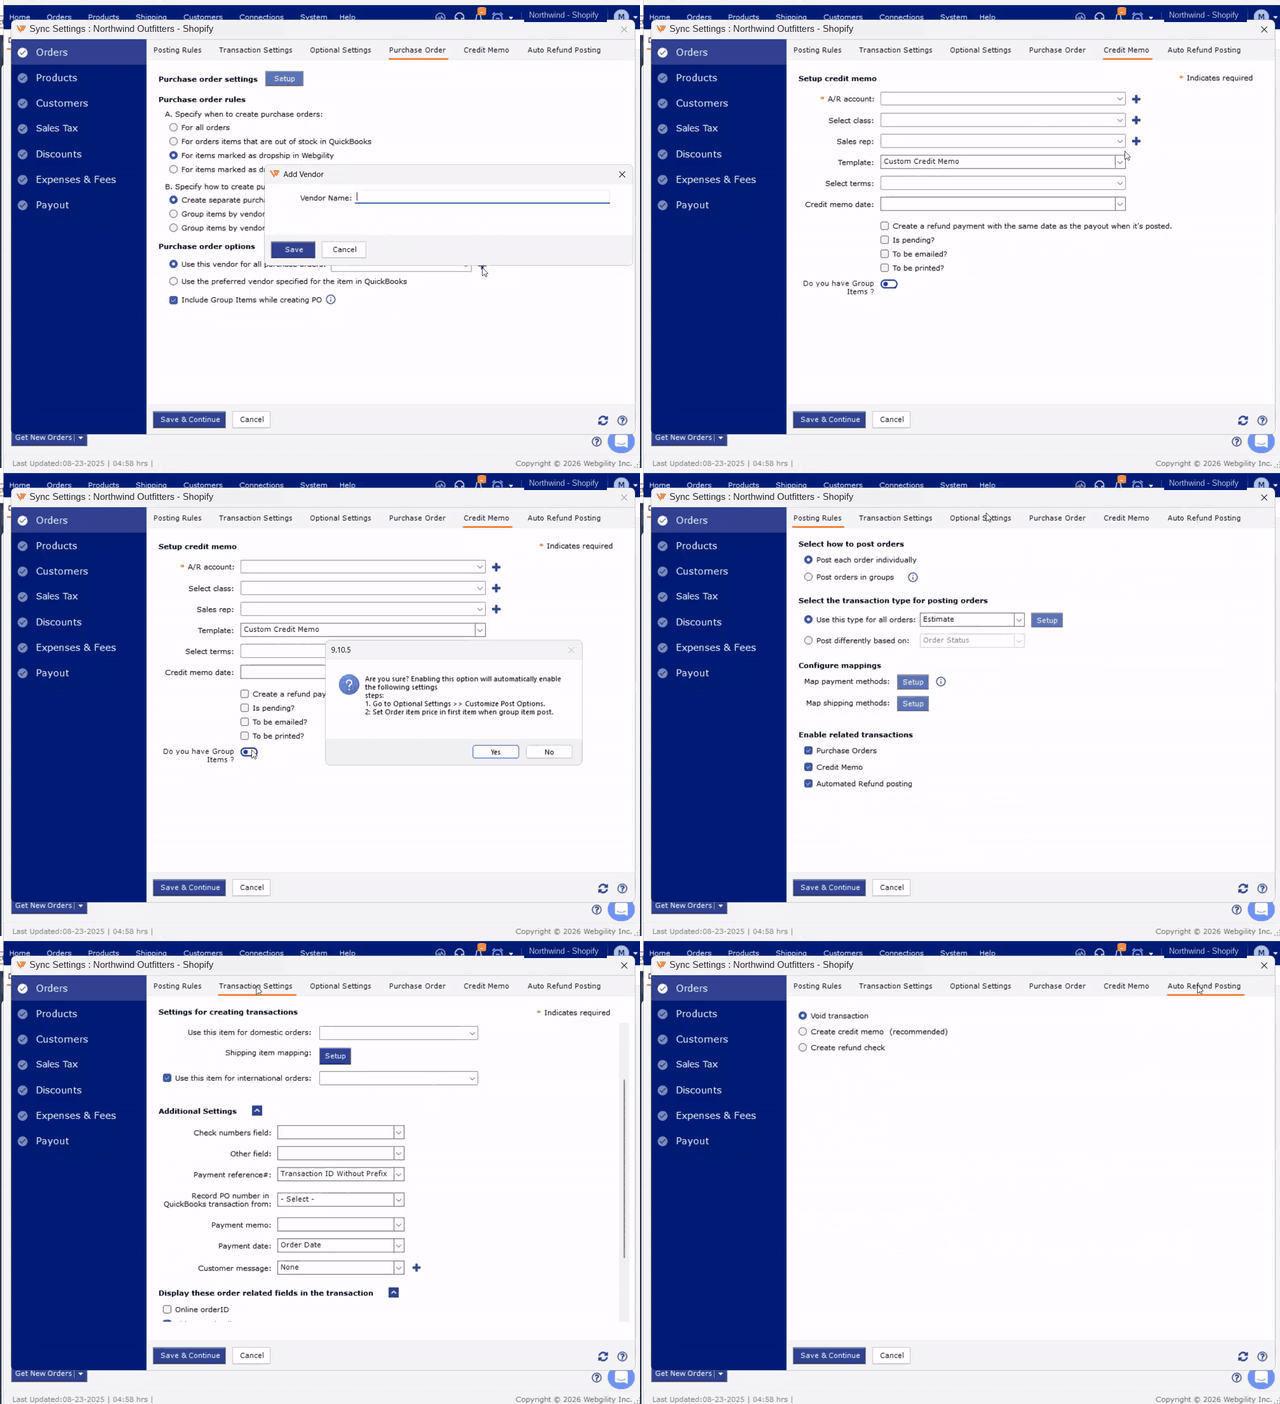
Sample data shown.
10. Choose your Auto Refund Posting methodSync Settings › Auto Refund Posting
If you enabled Automated Refund posting in step 5, this tab lets you choose how refunds are recorded in QuickBooks:
- Void transaction — voids the original transaction.
- Create credit memo (recommended) — creates a credit memo against the selected bank account.
- Create refund check — writes a refund check instead.
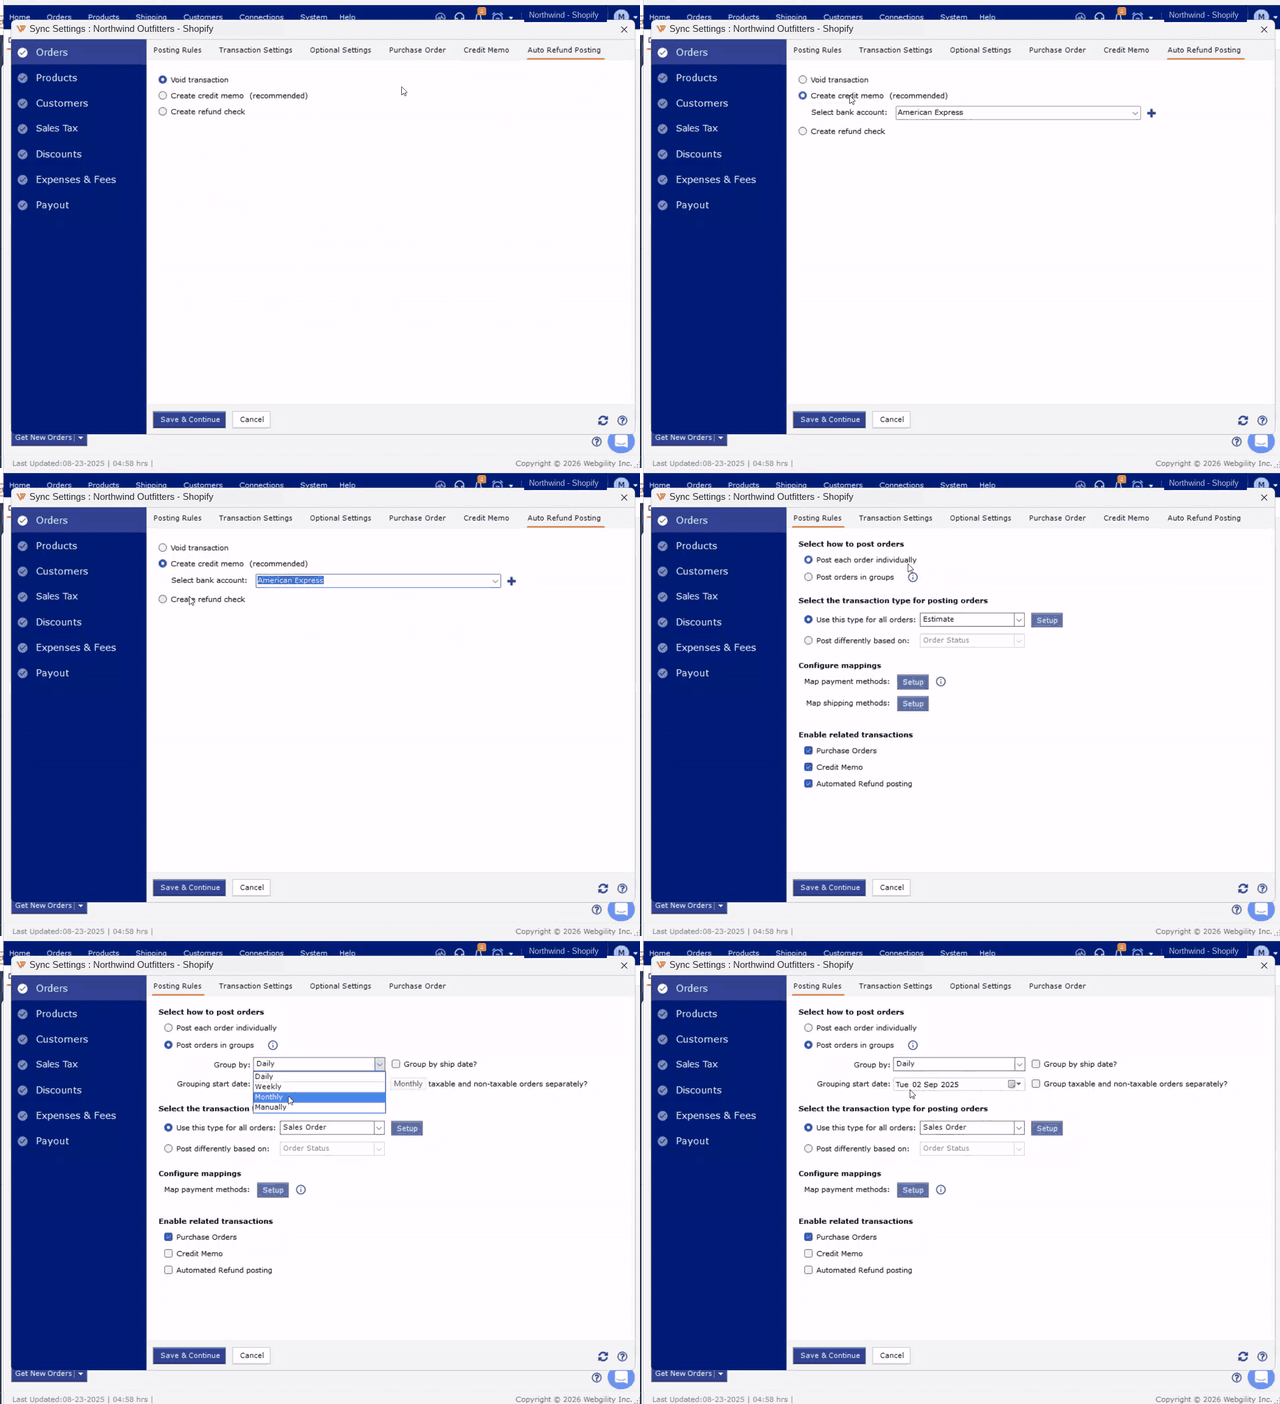
Sample data shown.
Click Save & Continue to finish.
Note: Changes to these settings apply going forward only — orders already downloaded or posted before you saved won't be reprocessed automatically. If you need past orders to follow the new rules, use the re-download or reprocess options on the Orders screen.