
Problem description
The user wants to change the dimensions on the Webgility Desktop shipping form without manually entering the same values each time.
Resolution steps: configure default dimensions
The detailed navigation below comes from Webgility’s published shipping documentation. The case note confirms that support guided the customer through editing and saving defaults, but does not record every menu selection.
1. Open shipping settings
Open Webgility Desktop, path is Shipping > [required shipping processor] > Shipping Presets. For this case, select Stamps.com as the processor.
2. Open the Stamps.com default configuration
These settings can also be accessed directly from the order when you try to process the shipment by clicking on the edit settings options as highlighted in the screenshot.
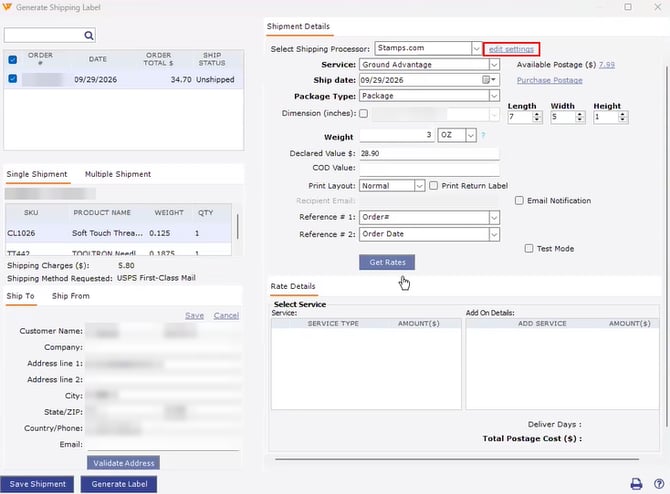
3. Set the package dimensions
Under Default for Domestic Labels, review the shipping service and package type, then enter the required package dimensions.
4. Save the configuration
Save your changes in the provider configuration. If the parent settings window also presents a save action, save there as well.
5. Verify the result before purchasing or printing a label
Open an order from New Orders, then select Process Shipping to open label preparation. Confirm that Stamps.com is the selected processor and that the expected dimensions populate.
Review the dimensions against the actual package before proceeding. As a recommended persistence check, open another suitable order and verify that the same defaults appear without repeating the manual entry.
Expected result: Saved defaults populate in the shipping form, reducing repeated entry for matching shipments.
Optional: configure rules for different package sizes
This is a documented option for workflows that need multiple sizes. The ticket does not establish that support created conditional rules during the call.
- Navigate to Shipping > Automation Rules.
- Click Add custom rules.
- In the left panel, select conditions that identify the orders requiring a particular package size. Supported examples include order weight, shipping method, item name, SKU, and item count.
- In the right panel, select the carrier, service, package type, and dimensions appropriate for those conditions.
- Save the rule, then save the shipping rules configuration.
- Open a matching order for shipping and confirm that the predefined options appear in the Generate Shipping Label window.
Use separate, appropriate conditions for different package sizes. The ticket does not provide the business criteria needed to assign the two example sizes automatically.
If you require any further assistance, please feel free to contact Webgility Support.