
Webgility Desktop shows a group of recent orders in a POSTED state, so the queue looks clean, but when you open QuickBooks Desktop and search for the invoice or sales receipt for those same orders, nothing is there. New orders continue to post correctly; the discrepancy is limited to a specific batch already marked posted.
Root Cause
An open pop-up dialog, reminder window, saved report, or a certificate approval prompt inside QuickBooks Desktop can silently block Webgility Desktop from writing the transaction, even while Webgility marks the order's status as posted in its own database. The status update in Webgility and the write into QuickBooks are two separate operations, so when the write to QuickBooks fails because QuickBooks is not accepting input at that moment, only the Webgility-side status change survives. The result is an order that looks posted in Webgility but has no matching record in QuickBooks.
Solution Steps
Step 1: Take a fresh Webgility database backup before you undo sync anything, so you always have a safe restore point. The full walk-through is in How to Create a Database Backup.
Step 2: Open QuickBooks Desktop and clear every window that could block input. Close any open reports, click OK or Cancel on every reminder or pop-up, dismiss the Insights or Home-Page banners, and make sure no dialog is waiting for a response. Then switch the company file to Single-User Mode from the File menu in QuickBooks so Webgility has exclusive write access.
Step 3: Update Webgility Desktop and re-issue the QuickBooks certificate. In Webgility Desktop, click the Help menu and choose Check for Updates — install the update if one is offered and restart Webgility. Then open Connections > Accounting/POS/ERP, click Edit Connection on your QuickBooks Desktop connection, and follow the on-screen steps. QuickBooks will show an Application Certificate pop-up — approve it as the QuickBooks Admin user and choose to always allow access even if QuickBooks is not running. The full walk-through with the exact screens is in Regenerate QuickBooks Certificate.
Step 4: Undo the sync on the affected orders in Webgility Desktop so they can be posted again. There are three variants depending on how the orders were originally posted — the full walk-through with the exact buttons and dialogs is in How to Undo Sync in Webgility Desktop:
a. One order at a time. Open the Orders tab, click the Posted Orders sub-tab, double-click the affected order to open its detail view, and click the Undo Sync button on the order screen. The order moves back to New Orders with its POSTED badge removed.
b. Multiple orders at once. On the Posted Orders list, tick the checkbox next to every affected order, then right-click any selected row and choose Undo Sync from the context menu.
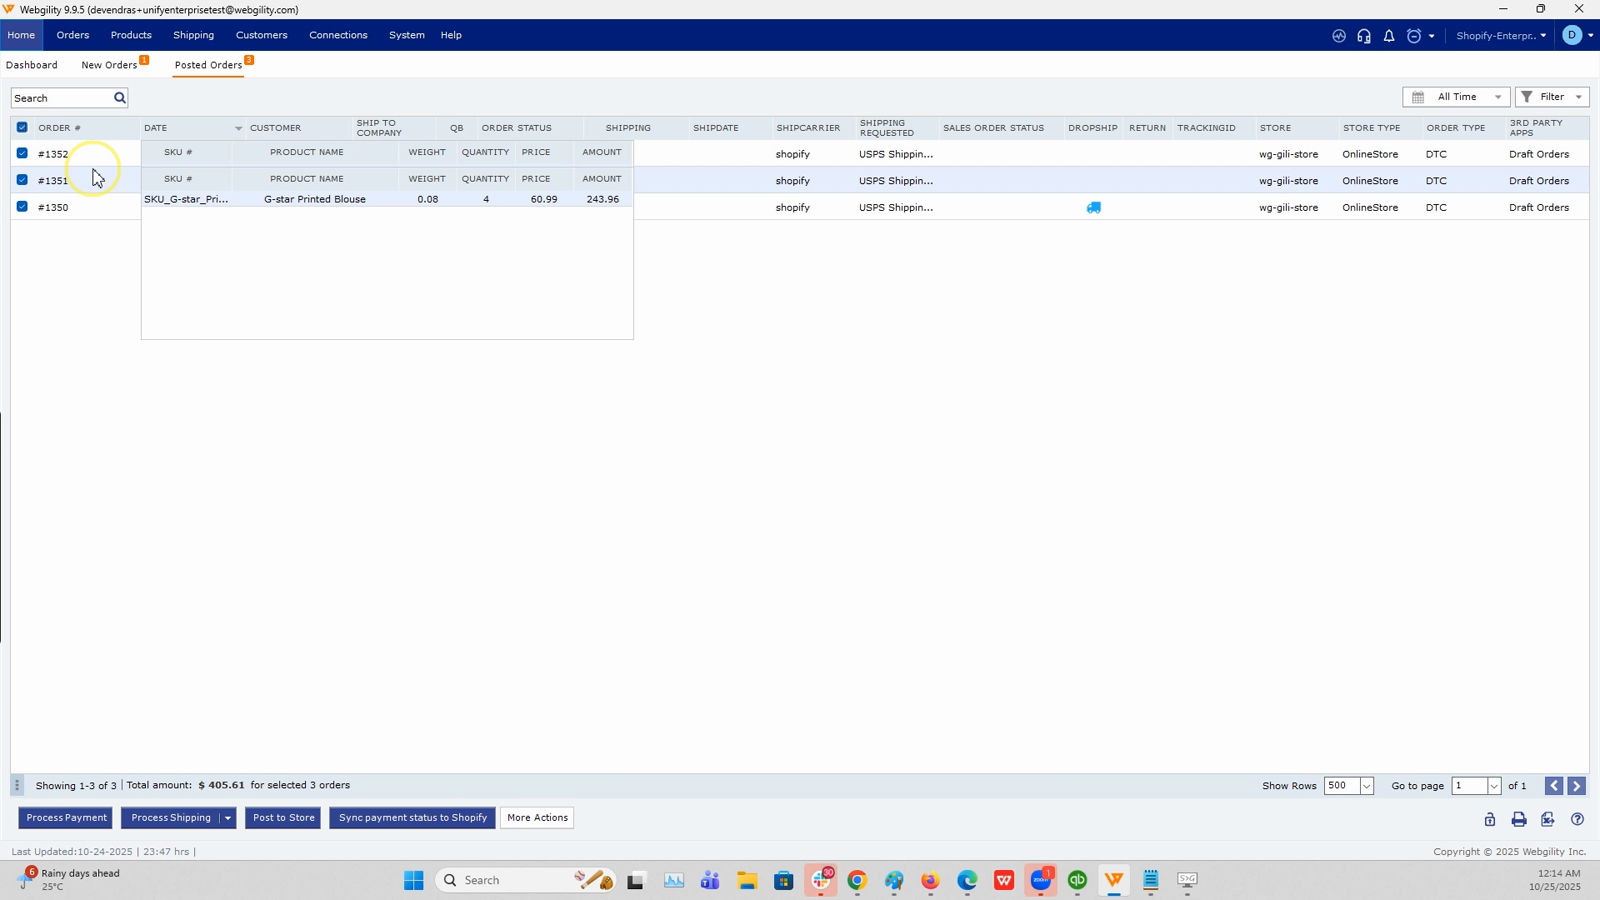
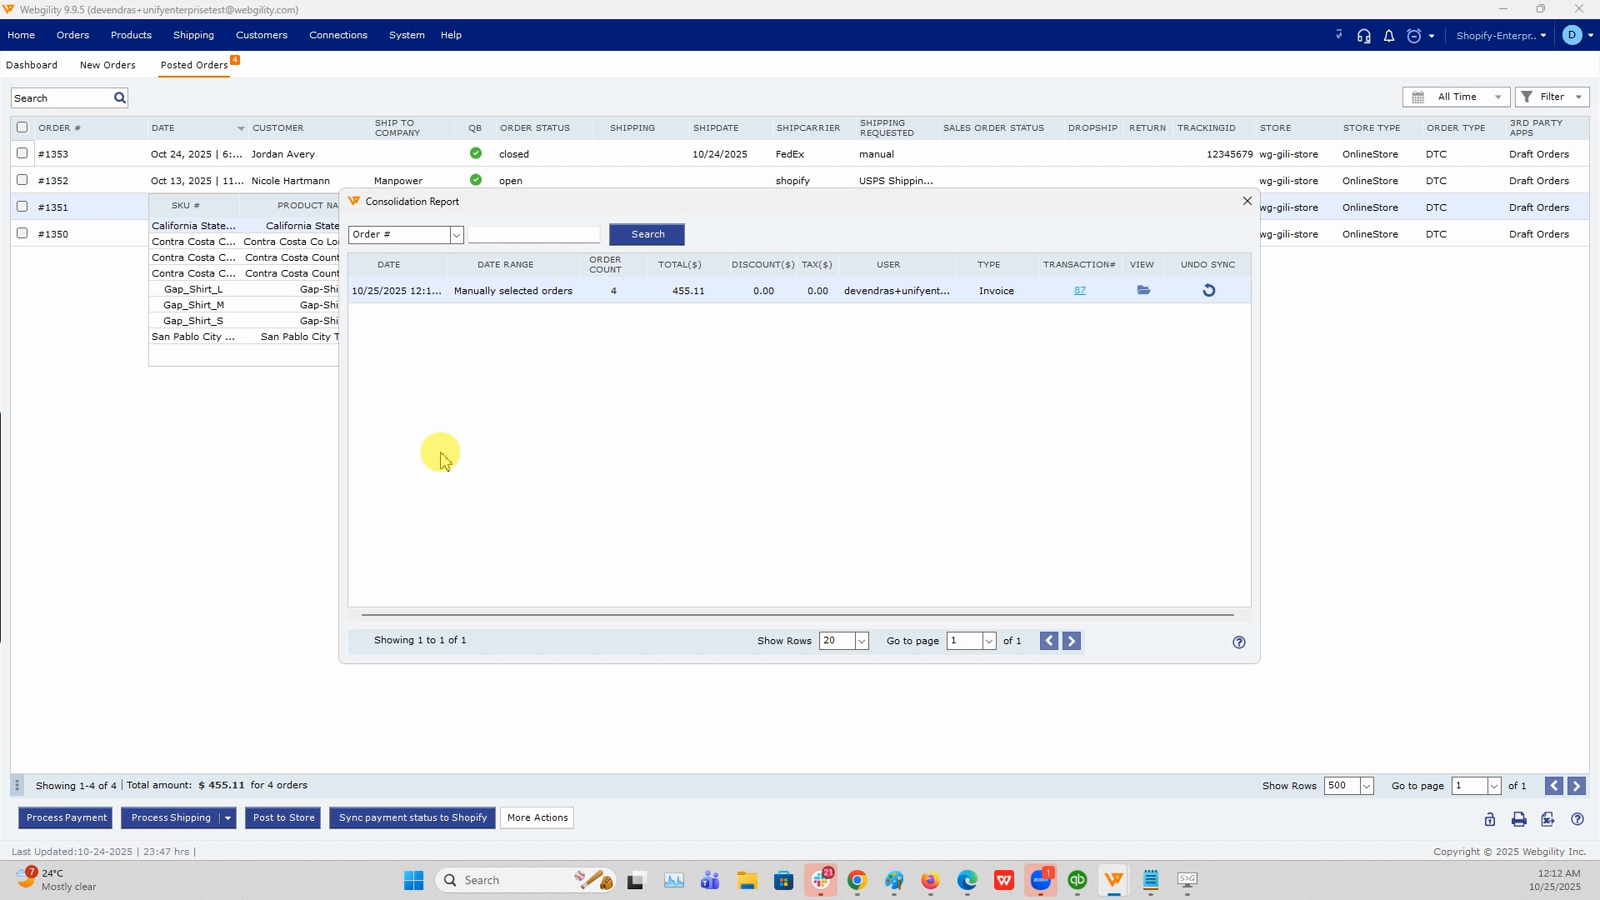
c. Consolidated postings (Daily / Weekly / Monthly / Manual groups). When orders were posted as a consolidated group they cannot be unsynced from the Orders list — go to Orders > Reports > Consolidate Report, find the consolidated posting that contains the affected orders, and undo the sync from there.
Step 5: Repost the orders. In the New Orders tab, select the orders you just unsynced and click Post to QuickBooks. Post them one at a time or in a small group so you can watch each order land in QuickBooks before moving on. Verify each order in QuickBooks by opening the customer record and confirming the new invoice or sales receipt is present with the correct total.
Be extra cautious with Undo Sync. Undo Sync removes the corresponding transaction from your accounting software. If an order you unsync did in fact reach QuickBooks, the transaction is deleted from QuickBooks when the unsync completes. Always check QuickBooks first before unsyncing to confirm the order is genuinely missing.Important Note: If a repost creates a duplicate in QuickBooks by mistake, delete the extra transaction in QuickBooks first, then use the Step 1 backup as a rollback point using How to Restore a Database Backup in Webgility Desktop.Further Assistance
If orders continue to be marked posted in Webgility Desktop but not reach QuickBooks even after clearing every dialog, updating Webgility, and putting QuickBooks in Single-User Mode, contact Webgility Support. Share the specific order numbers, the QuickBooks company file name, and confirmation that no pop-ups were open during the failed posting run so support can reproduce the block on your data.Fix Orders Marked Posted in Webgility Desktop but Missing in QuickBooks
This article shows how to recover a batch of orders that Webgility Desktop lists as posted but that never actually reached QuickBooks Desktop. Following these steps clears the block that caused the discrepancy and reposts the affected orders cleanly.
Problem Description
Webgility Desktop shows a group of recent orders in a POSTED state, so the queue looks clean, but when you open QuickBooks Desktop and search for the invoice or sales receipt for those same orders, nothing is there. New orders continue to post correctly; the discrepancy is limited to a specific batch already marked posted.
Root Cause
An open pop-up dialog, reminder window, saved report, or a certificate approval prompt inside QuickBooks Desktop can silently block Webgility Desktop from writing the transaction, even while Webgility marks the order's status as posted in its own database. The status update in Webgility and the write into QuickBooks are two separate operations, so when the write to QuickBooks fails because QuickBooks is not accepting input at that moment, only the Webgility-side status change survives. The result is an order that looks posted in Webgility but has no matching record in QuickBooks.
Solution Steps
Step 1: Take a fresh Webgility database backup before you undo sync anything, so you always have a safe restore point. The full walk-through is in How to Create a Database Backup.
Step 2: Open QuickBooks Desktop and clear every window that could block input. Close any open reports, click OK or Cancel on every reminder or pop-up, dismiss the Insights or Home-Page banners, and make sure no dialog is waiting for a response. Then switch the company file to Single-User Mode from the File menu in QuickBooks so Webgility has exclusive write access.
Step 3: Update Webgility Desktop and re-issue the QuickBooks certificate. In Webgility Desktop, click the Help menu and choose Check for Updates — install the update if one is offered and restart Webgility. Then open Connections > Accounting/POS/ERP, click Edit Connection on your QuickBooks Desktop connection, and follow the on-screen steps. QuickBooks will show an Application Certificate pop-up — approve it as the QuickBooks Admin user and choose to always allow access even if QuickBooks is not running. The full walk-through with the exact screens is in Regenerate QuickBooks Certificate.
Step 4: Undo the sync on the affected orders in Webgility Desktop so they can be posted again. There are three variants depending on how the orders were originally posted — the full walk-through with the exact buttons and dialogs is in How to Undo Sync in Webgility Desktop:
a. One order at a time. Open the Orders tab, click the Posted Orders sub-tab, double-click the affected order to open its detail view, and click the Undo Sync button on the order screen. The order moves back to New Orders with its POSTED badge removed.
b. Multiple orders at once. On the Posted Orders list, tick the checkbox next to every affected order, then right-click any selected row and choose Undo Sync from the context menu.
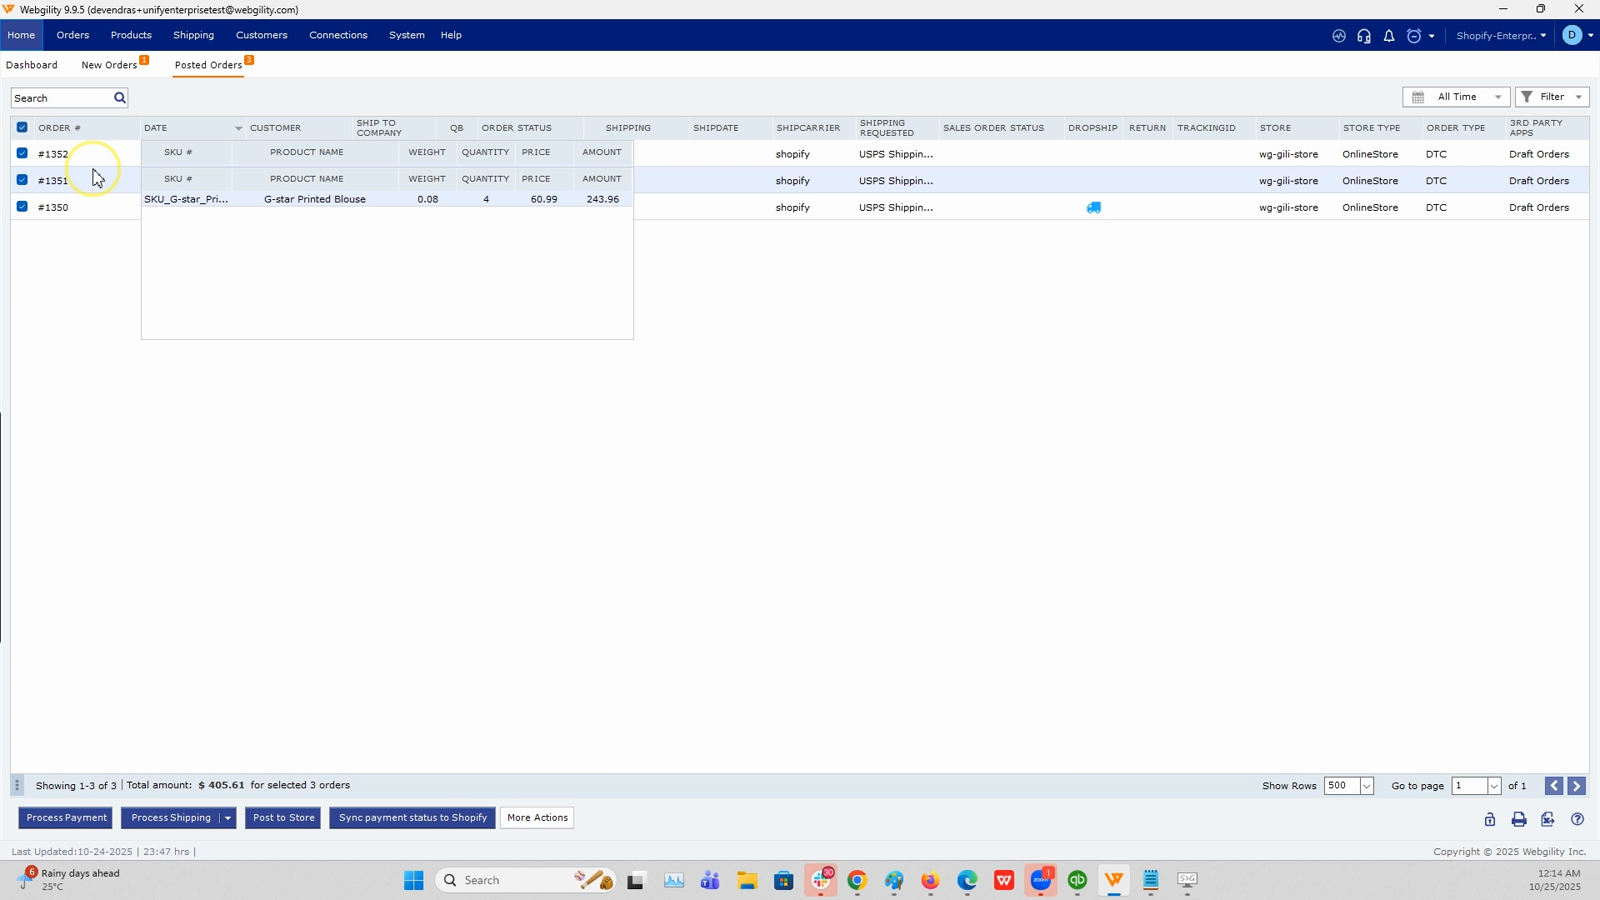
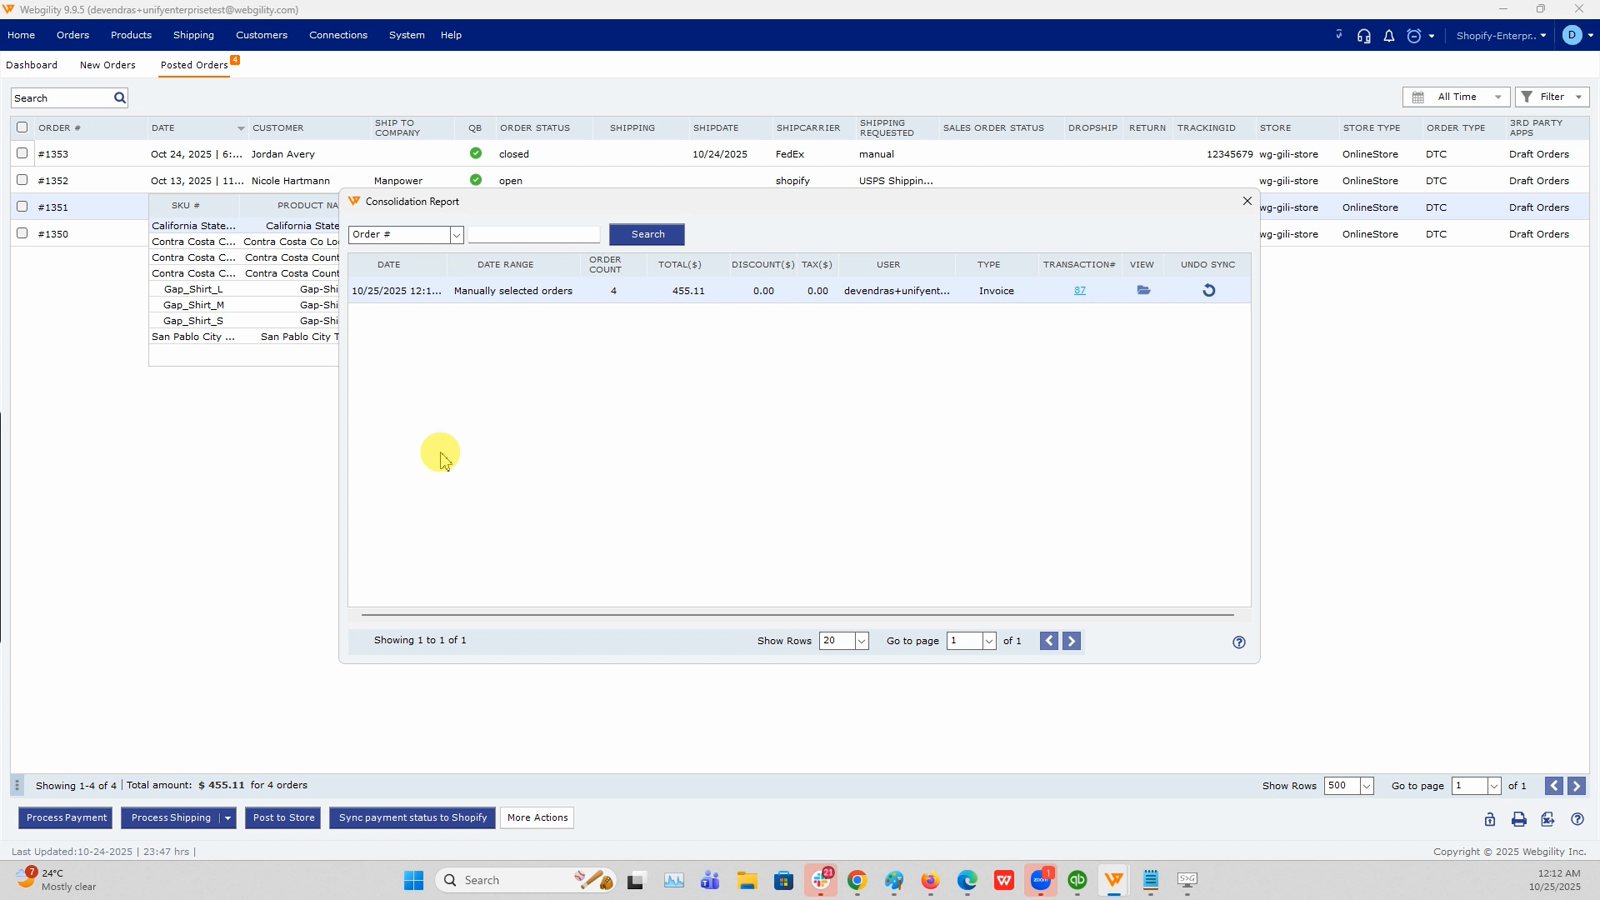
c. Consolidated postings (Daily / Weekly / Monthly / Manual groups). When orders were posted as a consolidated group they cannot be unsynced from the Orders list — go to Orders > Reports > Consolidate Report, find the consolidated posting that contains the affected orders, and undo the sync from there.
Step 5: Repost the orders. In the New Orders tab, select the orders you just unsynced and click Post to QuickBooks. Post them one at a time or in a small group so you can watch each order land in QuickBooks before moving on. Verify each order in QuickBooks by opening the customer record and confirming the new invoice or sales receipt is present with the correct total.
Be extra cautious with Undo Sync. Undo Sync removes the corresponding transaction from your accounting software. If an order you unsync did in fact reach QuickBooks, the transaction is deleted from QuickBooks when the unsync completes. Always check QuickBooks first before unsyncing to confirm the order is genuinely missing.
Further Assistance
If orders continue to be marked posted in Webgility Desktop but not reach QuickBooks even after clearing every dialog, updating Webgility, and putting QuickBooks in Single-User Mode, contact Webgility Support. Share the specific order numbers, the QuickBooks company file name, and confirmation that no pop-ups were open during the failed posting run so support can reproduce the block on your data.