
This article explains how to disable payment processing fee posting in Webgility when a user does not want PayPal or other payment processor fees posted into QuickBooks and prefers to manage those fees separately.
Problem descriptionThe user reported that payment processor fees were being posted into QuickBooks with the order. In this case, the user was using Shopify and saw the PayPal or payment processor fee post incorrectly in QuickBooks Desktop. The user did not want Webgility to continue capturing that fee automatically and instead wanted to manage it outside of the sync flow.
Root causeThis is tied to the payment processing fee posting setting being enabled while the user no longer wants those fees posted through Webgility. Because the user planned to account for the fees separately, leaving the setting enabled caused Webgility to keep sending that fee data into QuickBooks, which led to the unwanted posting behavior.
- Open Webgility.
- Go to Connections.
- Open the connected Accounting/POS/ERP integration.
- Go to Sync Settings.
- Open the Expenses & Fees posting settings.
- Locate the option that posts the payment processing fee.
- Disable that option so Webgility no longer posts the payment processor fee to QuickBooks.
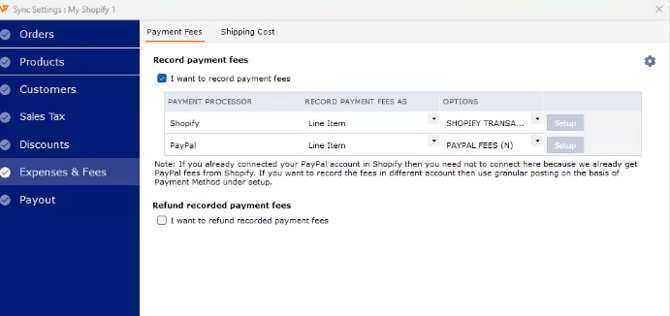
- Save the setting change.
- Post a test order to confirm the fee is no longer being sent through the sync.
If the issue persists after adjusting this setting, please reach out to Webgility Support or Chat Support for further assistance.