
Overview
The Shopify App Store is now the starting point for connecting a Shopify store to Webgility Desktop. What happens next depends on your Webgility account state — a brand-new user selects a plan during install, an existing user skips the plan step, and connecting Shopify accounts with different subscription emails needs a small assist from the Webgility support team.
Pick the Path That Matches Your Situation
|
Scenario A New to WebgilityYou do not have a Webgility account yet. Install from Shopify, select a plan, and Webgility creates your account. |
Scenario B
Existing Webgility account, adding a storeYou already have a Webgility account. Install from Shopify to connect the store — no plan selection required. |
Scenario C
Multiple Shopify accounts, one Webgility accountYou want to connect two or more independent Shopify accounts (each with its own subscription email) to a single Webgility account. This one starts with a call to Webgility support. |
Scenario D
Shopify is asking you to purchase a plan againYou already have Webgility, but the Shopify install is asking you to purchase a Webgility plan. Contact Webgility support before you continue. |
Important note
Under Shopify's compliance requirements, each Shopify store URL can only be connected to Webgility Desktop once through this flow. If you previously connected the same store URL more than once for order bifurcation or POS-location separation, work with your account team on an alternative setup before switching over.
Scenario A: Steps to Install Webgility From Shopify as a New User
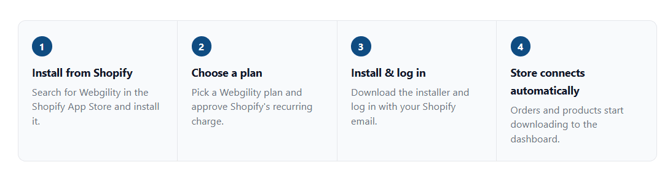
Search for Webgility in the Shopify App Store and install it.
Pick a Webgility plan and approve Shopify's recurring charge.
Download the installer and log in with your Shopify email.
Orders and products start downloading to the dashboard.
1.
Find Webgility in the Shopify App Store
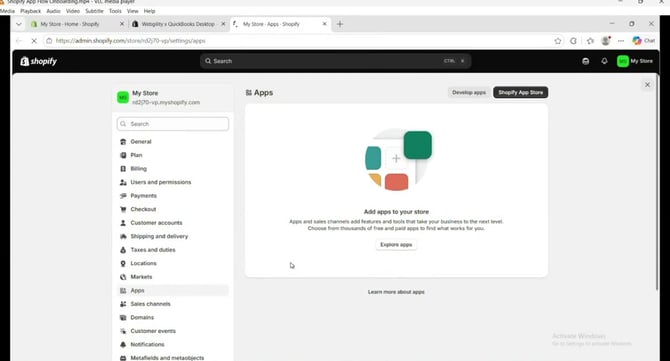
Sign in to your Shopify admin, open the Apps section under Settings, click Explore apps, and search for Webgility Desktop Application for QuickBooks.
2
Install the app and select a plan
Open the Webgility Desktop listing, click Install, and pick the plan that matches your business needs on the plan page that appears.
3
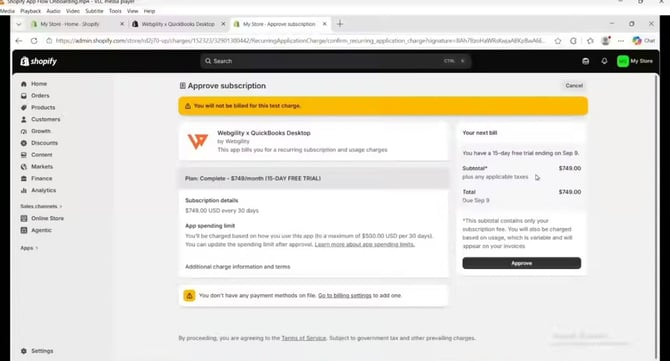
Approve the subscription
Shopify shows the Approve subscription screen with your chosen plan and billing cadence. Click Approve to authorize Shopify to bill on Webgility's behalf and to start creating your Webgility account.
4
Download the installer
Once your account is created, download Webgility installer from portal.webgilitycom on your computer and you receive an email with your login details. Run the installer to finish setup.
5
Log in to Webgility Desktop
Open Webgility Desktop and sign in using the same email address you used on Shopify. Your Shopify store is already linked, so orders, products, and other data begin downloading to the dashboard automatically.
Scenario B: Steps to Add a Shopify Store to an Existing Webgility Account
If your Webgility account is already active, adding another Shopify store skips the plan-selection step. Shopify recognizes the account and installs the app directly.
1
Start the sales channel from inside Webgility Desktop
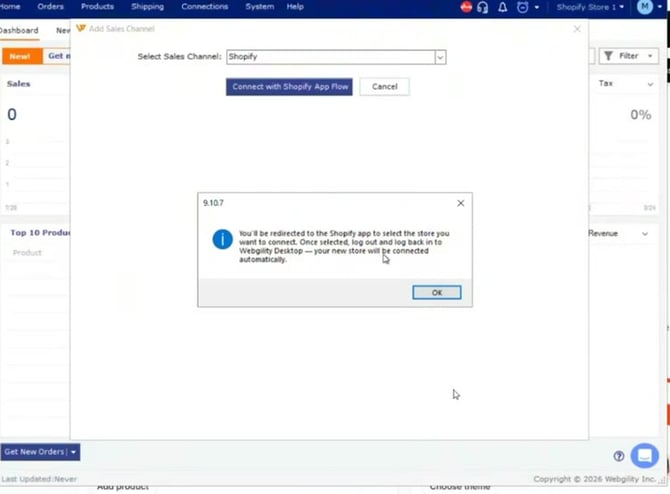
In Webgility Desktop, open Connections, choose to add a new sales channel, select Shopify, and click Connect with Shopify App Flow. A confirmation window explains that Webgility will redirect you to Shopify to select the store you want to connect.
2
Switch to the store you want to add and install the app
Webgility opens Shopify in your browser on your current default store. Use the store picker in the top-right of the Shopify App Store to switch to the store you want to connect, then click Install on the Webgility app listing. Because your account already exists, Shopify skips the plan-selection step and installs the app directly.
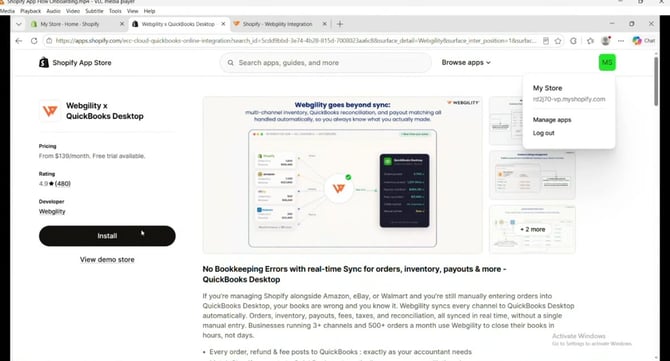
3
Log back in to Webgility Desktop and confirm the store is connected
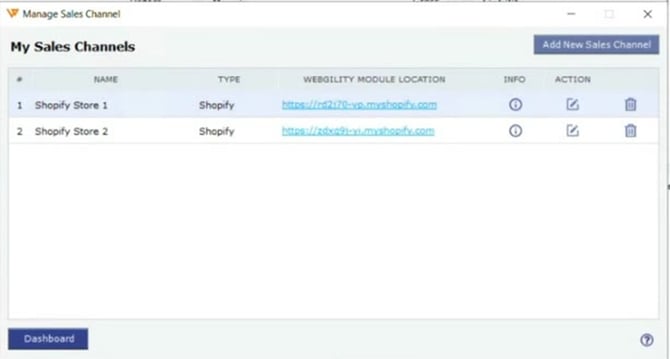
After the install finishes, log out of Webgility Desktop and log back in. Open Connections > Sales Channel > Manage Sales Channel — the Shopify store should now appear in My Sales Channels.
Scenario C: Connect Multiple Shopify Accounts (Different Subscription Emails) to One Webgility Account
This scenario is different from adding sub-stores under a single Shopify account. It applies when you own two or more independent Shopify accounts, each with its own subscription email, and you want them all connected to the same Webgility account.
Support-assisted setupShopify links each install to the Shopify account's subscription email. To attach a second or third independent Shopify account to your existing Webgility account, Webgility support first updates the email address on your Webgility account so it matches the Shopify account you are about to connect. Only then will Shopify's install recognize your Webgility account and skip the plan step.
Contact Webgility support before starting the install
Email support@webgility.com (or call the number in Additional Support below) with the Shopify subscription email of the second or third account you plan to connect. Ask support to update your Webgility account email to match that Shopify account.
Initiate the connection once support confirms the email update
After the Webgility account email is aligned with the Shopify account, follow the Scenario B steps to add the new Shopify store from inside Webgility Desktop. Shopify will recognize the account and complete the install without asking for a new plan.
Repeat for each additional independent Shopify account
Each independent Shopify account you connect follows the same pattern — support updates the Webgility account email to match the next Shopify subscription email, then you run the install from inside Webgility Desktop.
Scenario D: Shopify Is Asking You to Purchase a Webgility Plan Again
If you already have a Webgility account and the Shopify install still asks you to purchase a Webgility plan, do not complete the purchase. This usually means the Shopify subscription email and your Webgility account email do not match, so Shopify does not recognize you as an existing customer.
Stop and contact support
Cancel the plan selection screen and contact support@webgility.com before proceeding. Support will align your Webgility account with the Shopify subscription email so the install can continue without a duplicate purchase.
Steps to Edit a Shopify Store Connection
Open Connections in Webgility Desktop, choose the Shopify store you want to change, and open its settings. All fields remain editable except the store name, which is fixed after the initial setup so your data continues to map to the correct sales channel.
Key RecommendationKeep track of which Shopify subscription email belongs to which Webgility account. New-user installs, add-store installs, and multi-account installs all rely on that email match to skip plan selection and connect the store cleanly.
Additional SupportIf a store does not appear after logging back in, or the Shopify install ends without redirecting you to Webgility, contact support@webgility.com with the store URL and the time of the install attempt.