

Turn on class and location tracking in QuickBooks Online.
Step 2Pick where class and location apply on orders in Webgility Online.
Step 3Set class and location for fees, payouts, and settlements.
Step 4Use product-level class to tag each line item from the product itself.
Overview
QuickBooks Online offers two tracking tags that attach to a transaction: Class and Location. Reports such as Profit and Loss can be filtered or grouped by either one. Webgility Online writes these tags onto every sales receipt, invoice, bill, or expense it posts, so your QuickBooks reports can split revenue, fees, and payouts by whatever dimension you track.
When This Applies
Use class and location tracking when you want QuickBooks reports to break out performance by store, warehouse, region, business vertical, product group, or any similar dimension. The classic difference between the two: class can sit on each line of a transaction, while location sits on the whole transaction.
How Class and Location Behave in QuickBooks Online
Open any transaction in QuickBooks Online and the fields show where each tag lives. Class appears next to each line item when you choose One to each row in transaction; location sits once at the header for the entire transaction.
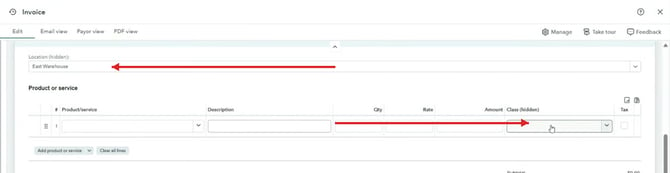 Invoice in QuickBooks Online — Location sits on the transaction header; Class is attached to each line item.
The same shape carries into bills and expenses. On a vendor bill posted by Webgility, the location (relabeled Store in this example) sits in the header and the class is attached to each category row.
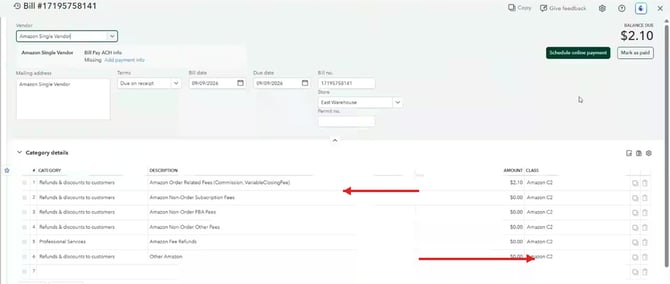 Vendor bill — Store (location) in the header, Class on each category line.
Steps to Set Up Class and Location Tracking
Step 1: Turn on tracking in QuickBooks Online
In QuickBooks Online, open Settings → Advanced, scroll to Categories, and switch on Track classes and Track locations. Under Assign classes, choose One to each row in transaction so class can sit on each line item. Optionally rename the Location label to something more familiar to your team such as Store, Warehouse, or Region.
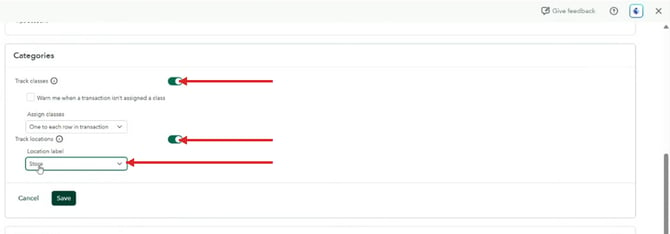 QuickBooks Online Settings → Advanced → Categories, with both tracking toggles on and the location label renamed.
Step 2: Build your class and location lists in QuickBooks Online
Open Settings → All lists → Classes (and Locations) and add every value you plan to tag transactions with. Classes support parent and child levels, so a report filtered by the parent class rolls up all of its subclasses.
Step 3: Set class and location on orders in Webgility Online
In Webgility Online, open the connection for the sales channel at the top-right, then go to Sync Settings → Orders and scroll down. Turn on Set the Location in the Sales Receipt as and pick a location from Use this Location. Turn on Set the Class for each line item under Product/Service in the Sales Receipt as and pick a class from Use this Class.
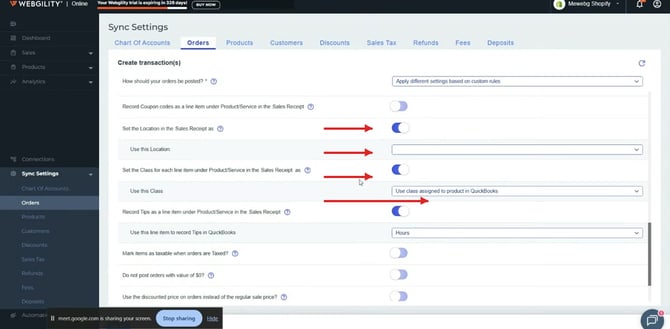 Sync Settings → Orders — location and class controls for the sales receipt and its line items.
Step 4: Use the product's own class for each line
If your products already carry classes in QuickBooks Online (set on each product under Products & services), choose Use class assigned to product in QuickBooks in the Use this Class dropdown. Webgility will pull the class from each product onto its own line, which lets a single sales receipt carry mixed classes line by line.
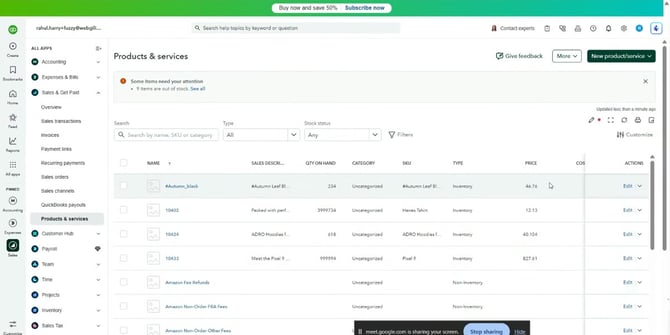 QuickBooks Online Products & services — each product can carry its own class, which Webgility can inherit.
Step 5: Set class and location on fees, payments, and payouts
Open Sync Settings → Fees. Each fee type — settlement fees, shipping fees, payment fees, and payout fees — has its own Class and Location fields so expense transactions carry the same tags as revenue.
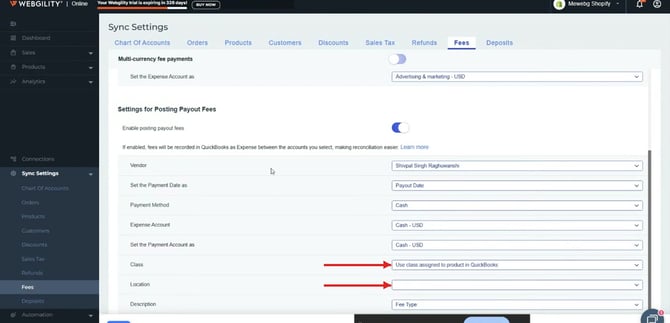 Sync Settings → Fees → Settings for Posting Payout Fees — same class and location controls as orders.
| Set the Location in the Sales Receipt as | Writes a single location on the header of every sales receipt or invoice Webgility posts for this channel. |
|---|---|
| Use this Location | The location value Webgility writes. Pick from the list you built in QuickBooks Online. |
| Set the Class for each line item... | Writes a class on each line item of the sales receipt or invoice. |
| Use this Class | Either a fixed class for every line, or Use class assigned to product in QuickBooks to inherit the product's class line by line. |
| Fees → Class / Location | Applies the same tags to settlement, shipping, payment, and payout fees posted as bills or expenses in QuickBooks Online. |
Match the tag to the dimension you actually report on. Use location for one top-level dimension that identifies the whole transaction — a store, a warehouse, a region. Use class when the split needs to live on each line, such as a product group or business vertical, and inherit it from each product so a mixed-category order posts correctly.
Current Limitations
QuickBooks Online allows one location per transaction, so Webgility writes a single location on each sales receipt — line-level location is not supported by QuickBooks Online. Customer-level class is also not supported: QuickBooks Online does not resolve a conflict between a class on the customer and a class on the transaction line, so Webgility does not fetch a class from the customer record.
If a class or location is not appearing on posted transactions, confirm the value exists in your QuickBooks Online lists, then refresh the lists in Webgility Online from Chart of Accounts and re-check the Orders and Fees tabs for the right channel.