

Step 1: Open Payout sync settings
Step 2: Turn on Bank Deposit Setup and map the accounts
Step 3: Post the payout from the Payouts page
Step 4: Review the auto-created deposit in QuickBooks
Overview
When this is turned on, Webgility validates that the payout amount matches the transactions posted to QuickBooks, and only then records the deposit. The deposit moves the payout amount from your clearing account to your QuickBooks bank account in one step, mirroring how the money actually arrived from the sales channel.
When This Applies
Use this when you post payouts from a sales channel (for example, Shopify) and would otherwise record the bank deposit in QuickBooks yourself after each payout. Turning this on hands that step to Webgility, so the deposit, the processing fees, and the marketplace adjustments all land in QuickBooks together as soon as the payout is posted.
How It Works
Webgility runs the payout through a ten-step reconciliation. The first nine steps download and post orders, refunds, payments, adjustments, and payment fees. The last step, Create Deposit, is the new one: Webgility compares the sales channel's payout total to what it just posted in QuickBooks, and if they match, it creates the deposit in your bank account automatically.
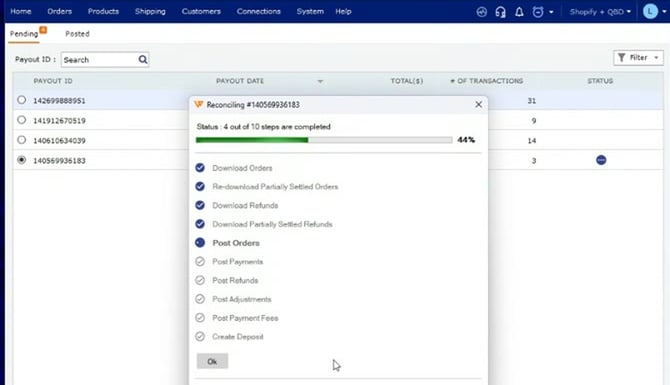 The ten-step reconciliation Webgility runs when you post a payout.
Steps to Turn On and Use the Auto Deposit
Step 1: Open Payout sync settings
In Webgility Desktop, go to Connections → Accounting/POS/ERP → Sync Settings, then select Payout from the left panel of the Sync Settings window.
Step 2: Turn on Bank Deposit Setup
Scroll to the Bank Deposit Setup section and switch on Create a bank deposit / transfer when a payout is received. The account fields below the toggle become editable.
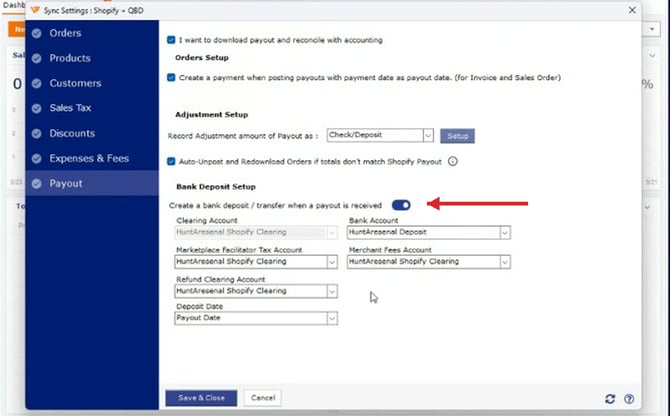 The Bank Deposit Setup section inside Payout sync settings.
Step 3: Map the accounts Webgility will use
Each account below carries a specific role in the deposit Webgility will create. The Clearing Account is pre-filled from your invoice posting settings and is read-only here; the rest are editable.
| Clearing Account | The clearing account payments were posted into during order posting. This is the from side of the deposit. |
|---|---|
| Bank Account | Your QuickBooks bank account. This is the to side of the deposit — the account you reconcile against your bank statement. |
| Marketplace Facilitator Tax Account | The tax liability account used for marketplace-collected sales tax lines on the deposit. |
| Merchant Fees Account | The expense account used for processing fees charged by the sales channel. |
| Refund Clearing Account | The account used for refund entries on the deposit. In most cases this is the same as the Clearing Account. |
| Deposit Date | Which date Webgility stamps on the deposit. Setting this to Payout Date lines the deposit up with the bank feed. |
Click Save & Close once the accounts are set.
Step 4: Open the Payouts page and post a payout
Go to Orders → Shopify → Payouts, select a payout from the Pending tab, and click Post To QuickBooks. Webgility runs the ten-step reconciliation and, if the payout total matches what posted to QuickBooks, creates the deposit on the final step with no further action from you.
Step 5: Review the deposit in QuickBooks
Open the deposit in QuickBooks. The Deposit To field is set to the bank account you mapped, and the deposit lines show one row per posted order payment, plus one line each for marketplace tax adjustments and payout fees — matching how your payout actually arrived.
 The deposit Webgility creates in QuickBooks — one line per order payment, plus the fee and adjustment lines.
Scenario: Marketplace tax is set to not post to QuickBooks
If your Sales Tax settings have Do not record marketplace tax in QuickBooks turned on, the marketplace facilitator tax is intentionally kept out of the posted transactions. The payout total, however, still includes that tax, so what posted to QuickBooks is short by the tax amount, and Webgility will not create the deposit on its own.
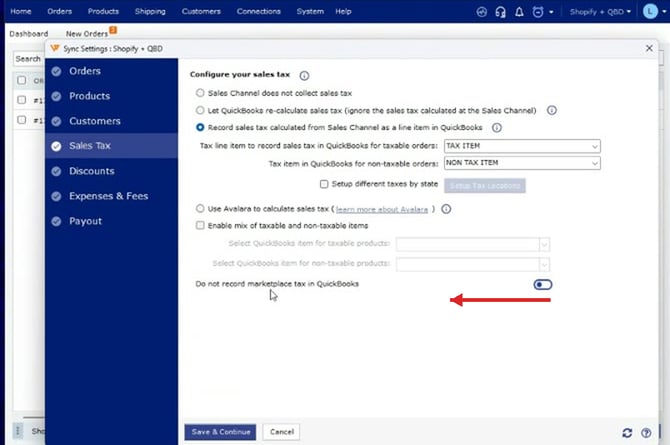 The Sales Tax setting that keeps marketplace tax out of QuickBooks.
When this happens, Webgility shows a Deposit not created message at the end of posting that spells out the payout total, the deposit net it calculated, the difference, and the exact reason.
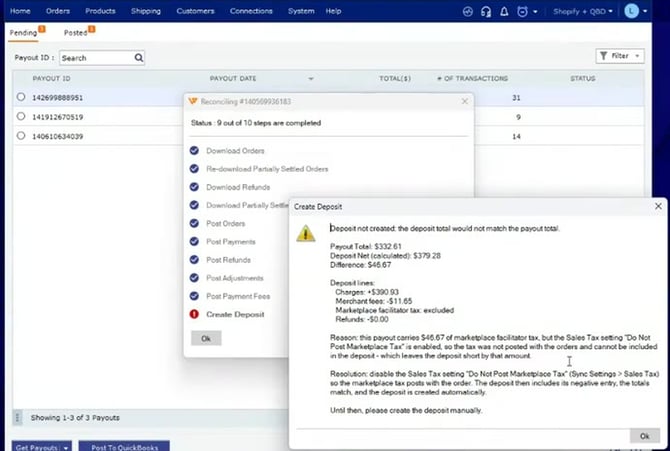 The warning you see when marketplace tax is excluded from posting.
You can see the same mismatch on the Payout Details screen on the Posted tab — the TOTAL($) column shows the full payout, and the QUICKBOOKS POSTING($) column shows what landed in QuickBooks, with the gap equal to the excluded marketplace tax.
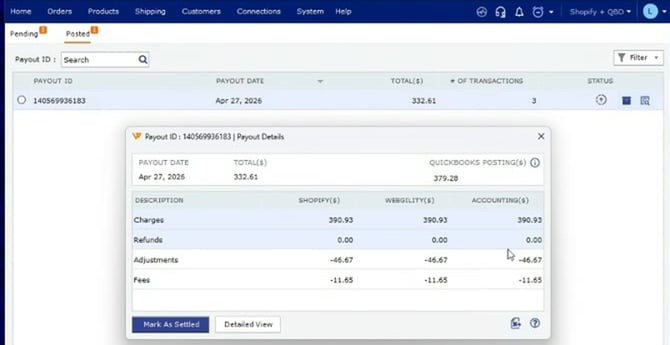 Payout Details on the Posted tab, showing the mismatch.
What to do
You have two options. If you want Webgility to automate the deposit, go to Connections → Accounting/POS/ERP → Sync Settings → Sales Tax, switch off Do not record marketplace tax in QuickBooks, re-post the payout, and the deposit will be created on its own. If you want to keep marketplace tax out of QuickBooks, record the deposit in QuickBooks manually with the marketplace tax line included so the deposit total matches the payout.
Use this feature when payouts come from a channel whose payout total matches what you post to QuickBooks exactly. If you deliberately exclude the marketplace tax, keep posting that one piece manually. Everything else — processing fees, refunds, per-order payment lines — Webgility handles.
Additional SupportIf you have questions about which accounts to map, or the deposit is not being created even though the payout total matches, contact Webgility Support with your Payout ID and a screenshot of the Payout Details screen so the team can trace the posting.