How to Connect Webgility Desktop to a Custom Store
Connect your custom Sales channel to Webgility Desktop using the steps below. Although Webgility Desktop doesn't offer direct support for a custom Sales channel connection, you can still include all your sales orders in CSV format. Utilize the CSV import option in Webgility Desktop to seamlessly record these sales in your accounting solution.
Add a Custom Sales channel
This screen appears when you already have any other sales channel added to Webgility Desktop and you intend to include a Custom Sales channel as your next sales channel.
1. Navigate to Connections > Add New Sales Channel. Search and choose the Custom Store option from the Give your Sales channel a name drop-down menu.
2. Once Custom Store option is selected then proceed by clicking "Continue."
3. Select Shipping Settings and click on Save.
4. Now connect your accounting solution by navigating to Connections > Accounting/POS/ERP > Add Connection
5. Once done you can opt. for either copying the settings from any existing store profile OR configure new settings. Once done then click on Next and then Save.

Importing Orders Using a Custom Sales channel:
1. To import orders, click "Get Orders" on the dashboard or navigate to "Orders> Import> From CSV."
2. A new window will open; click "Next."
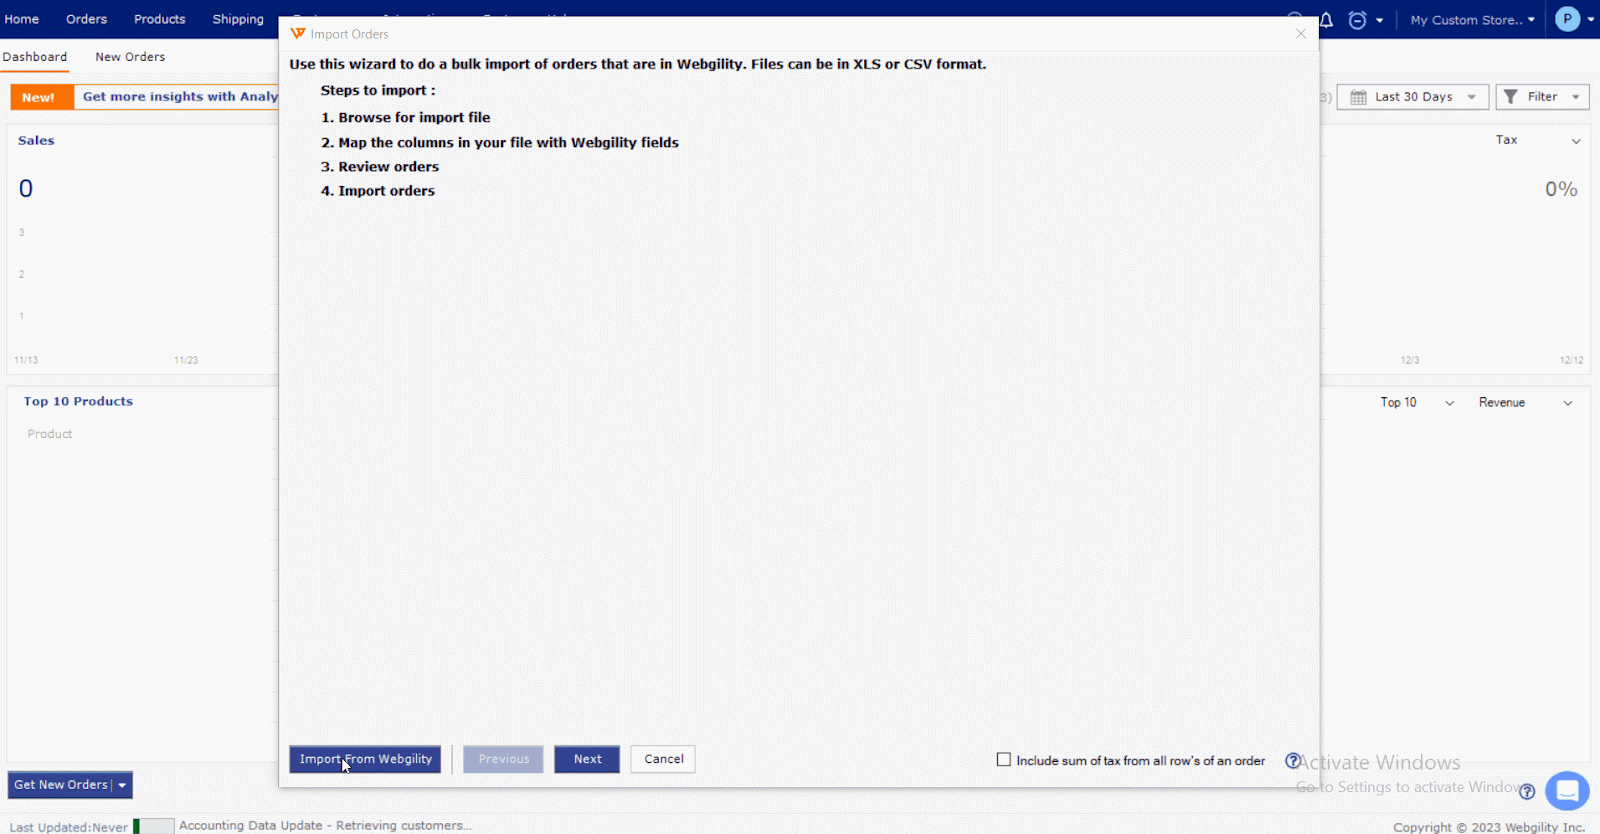
3. Browse for the CSV file you wish to import and click "Next."
4. Map the fields for your imported orders, ensuring to note the bolded required items.
5. From the drop-down options, select the mapping preferences. After mapping the necessary fields, click "Next." A success message will confirm that your mappings have been saved.
Note: if a field is accidentally duplicated the settings will not save.
6. Review the list of orders under the CSV file. Choose single or multiple orders, then click "Import Orders." Optionally, select Payment or Shipment status for those orders in Webgility Desktop during import.

Features Supported by Custom Sales channel:
These are the currently supported features:
-
Import orders from CSV or XLS files.
-
Post orders as single or consolidated based on settings.
-
Import/export product mappings.
-
Auto-create products in accounting during order posting.
-
Import tracking details.
-
Ship orders.
-
Export orders.
-
Access order, consolidation, and profitability reports.
-
Facilitate phone order creation.
-
Support offline payment processing.