
You are in the right place if
You click Post to QuickBooks in Webgility Desktop on a specific order and the posting stops with an error like:
Post to QuickBooks failed due to there was an error when saving a Customer Element: <name>.
You opened your Customer Center in QuickBooks Enterprise, searched by the name in the error, and the name is not there. Other orders post normally — only this one customer name fails.
Why this happens
QuickBooks Desktop keeps names unique across three related lists — Customers, Vendors, and Employees — plus their inactive records. If the same name (spelled the same way) exists as a vendor, an employee, an inactive customer, or as a contact on another parent customer profile, QuickBooks refuses to save a new customer with that name. Webgility asks QuickBooks to create the customer, QuickBooks rejects the save, and Webgility surfaces the error with that customer's name. Removing or renaming the hidden record clears the conflict.
What to do
Step 1: Copy the exact customer name from the Webgility error message. Spacing and punctuation matter for the searches in the next steps.
Step 2: Open QuickBooks Desktop and go to the Customer Center (Customers menu > Customer Center). Check the box Include Inactive above the customer list, then search the list for the name from Step 1. If you find it in gray (inactive), open the record and either reactivate it (so Webgility matches to it instead of creating a new one) or rename the inactive record with a suffix like " (old)" so the name is free for the new customer.
Step 3: Open the Vendor Center (Vendors menu > Vendor Center), turn on Include Inactive, and search the list for the same name. If you find it there, rename that vendor record with a clear suffix such as " (Vendor)" so the customer name is free. Do the same on the Employee Center (Employees menu > Employee Center).
Step 4: Still in QuickBooks, check whether the name exists as a Job (a sub-customer) or as an additional Contact on another customer profile. On the Customer Center, expand each parent customer and scan the sub-customer list, then open a parent customer and check the Contacts tab. Any exact match here also causes the conflict — rename it the same way.
Step 5: Refresh Webgility's local copy of the QuickBooks lists so the changes you made in Steps 2 through 4 are visible to the posting engine. In Webgility Desktop, go to Connections > Get latest data. Next to Download data, click the dropdown and choose Re-download all data. Webgility rebuilds its customer list from QuickBooks from scratch, which takes a few minutes on a typical company file and shows a progress bar while it runs.
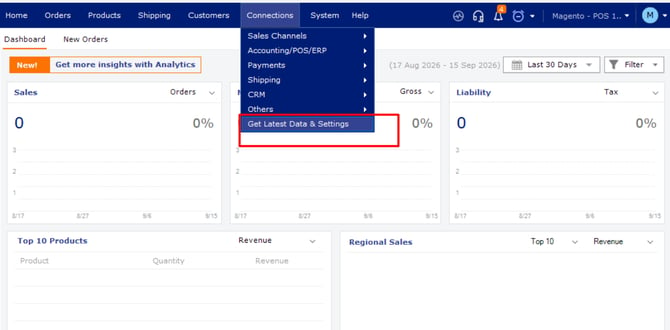
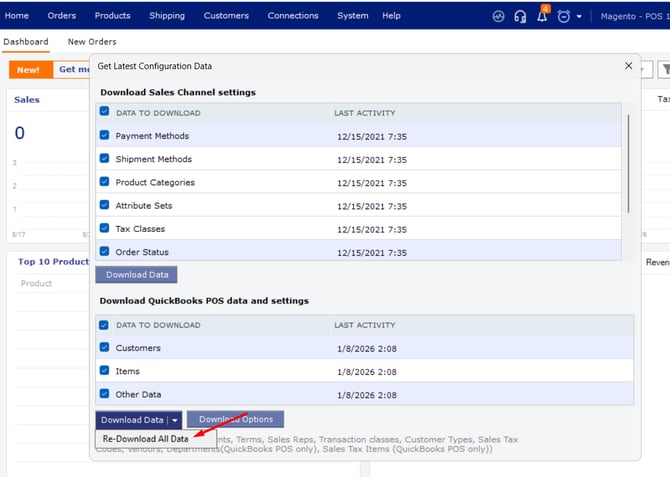
Step 6: Open the order that failed and click Post to QuickBooks again. The customer creates cleanly and the order posts. If a similar error appears for a different customer name later, repeat Steps 2 through 5 for that name.
Step 7: If your team already posted the order with a temporary workaround (for example, appending an extra letter to the last name to force it through) and you now want the record cleaned up, undo the posted order in Webgility using How to Undo Sync in Webgility Desktop, correct the customer name in QuickBooks so it matches the source order, and post the order again.
Good to know. QuickBooks' unique-name rule looks at the exact string, so "Emily King" and "Emily King " (trailing space) count as different names to QuickBooks, but two capitalization variants of the same name will still collide. When you rename a hidden record, pick a suffix you can search for later — something like " (old)" or " (Vendor)" makes future cleanup easy. If you have a large list of hidden duplicates to review, How to Merge Duplicate Customers in Webgility Desktop covers the Webgility-side merge flow you can use once the QuickBooks side is clean.
Still need help?
Share the exact customer name from the error, a screenshot of the Webgility error message, and confirmation that Steps 2 through 4 have already been run with Webgility Support. Support can then check whether Webgility is receiving a different string than what QuickBooks stores — that narrows the case to either a name-normalization pattern on the source order or a QuickBooks list entry your team has not yet found.